 |
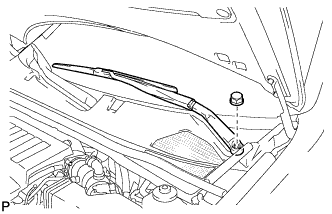
Remove the nut, and the front wiper arm and blade assembly LH.
ENGINE ASSEMBLY > REMOVAL |
| 1. PRECAUTION |
Check for DTCs (Click here).
| 2. REMOVE FRONT WIPER ARM AND BLADE ASSEMBLY LH |
|
Remove the nut, and the front wiper arm and blade assembly LH.
| 3. REMOVE FRONT WIPER ARM AND BLADE ASSEMBLY RH |
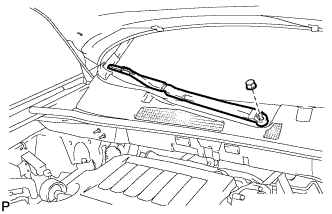 |
Remove the nut, and the front wiper arm and blade assembly RH.
| 4. REMOVE HOOD TO COWL TOP SEAL |
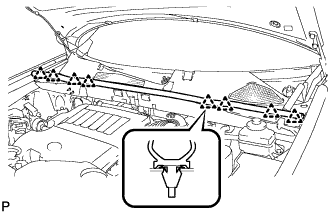 |
Disengage the 8 clips and remove the hood to cowl top seal.
| 5. REMOVE COWL TOP VENTILATOR LOUVER SUB-ASSEMBLY |
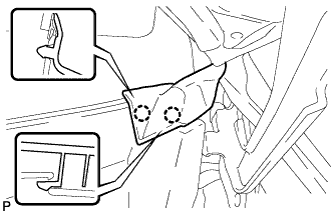 |
Disengage the 2 claws and disconnect the front fender to cowl side seal LH.
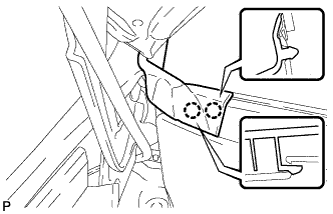 |
Disengage the 2 claws and disconnect the front fender to cowl side seal RH.
Remove the 2 clips.
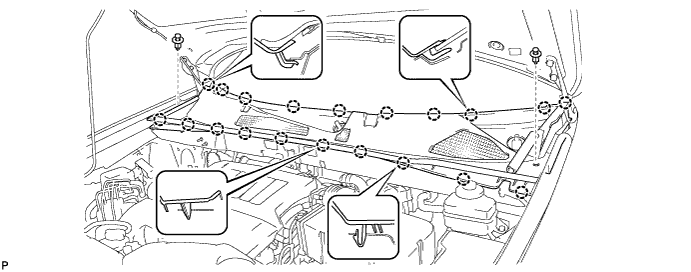
Disengage the 20 claws and remove the cowl top ventilator louver sub-assembly.
| 6. REMOVE WINDSHIELD WIPER MOTOR AND LINK ASSEMBLY |
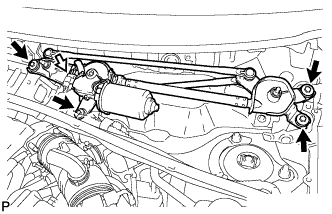 |
Disconnect the connector.
Remove the 4 bolts, and the windshield wiper motor and link assembly.
| 7. REMOVE OUTER COWL TOP PANEL SUB-ASSEMBLY |
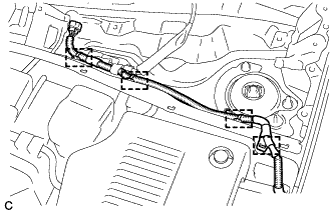 |
Disengage the 4 clamps and separate the wiper wire harness from the outer cowl top panel sub-assembly.
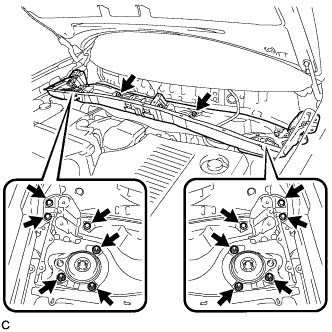 |
Remove the 8 bolts, 6 nuts, and the outer cowl top panel sub-assembly.
| 8. DISCHARGE FUEL SYSTEM PRESSURE |
| 9. REMOVE SERVICE PLUG GRIP |
 |
Remove the 5 clips and door scuff plate LH.
 |
Remove the 2 clips and reclining hinge cover.
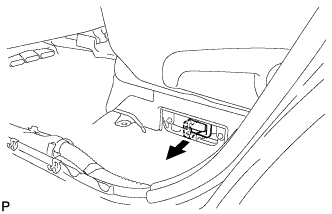 |
Wear insulated glove and remove the service plug grip, after sliding up the lever of the service plug grip.
| 10. REMOVE NO. 2 ENGINE ROOM SIDE COVER LH |
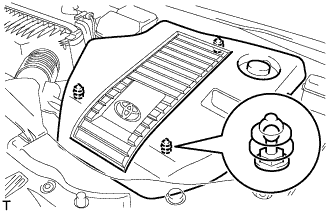 |
Remove the engine room side cover.
| 11. REMOVE COOL AIR INTAKE DUCT SEAL |
Remove the 11 clips and cool air intake duct seal.
| 12. REMOVE FRONT WHEELS |
| 13. REMOVE NO. 1 ENGINE UNDER COVER |
Remove the 6 bolts, 2 screws, 2 clips and No. 1 engine under cover.
| 14. SEPARATE FRONT FENDER LINER LH |
Remove the screw and clip, and separate the front fender liner.
| 15. SEPARATE FRONT FENDER LINER RH |
| 16. REMOVE FRONT FENDER APRON SEAL LH |
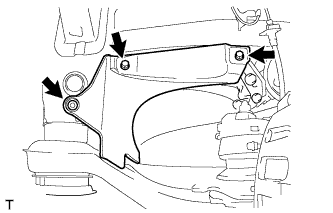 |
Remove the 2 bolts, clip and fender apron seal LH.
| 17. REMOVE FRONT FENDER APRON SEAL RH |
| 18. REMOVE NO. 2 ENGINE UNDER COVER |
Remove the 4 bolts and No. 2 engine under cover.
| 19. DRAIN COOLANT (for Engine) |
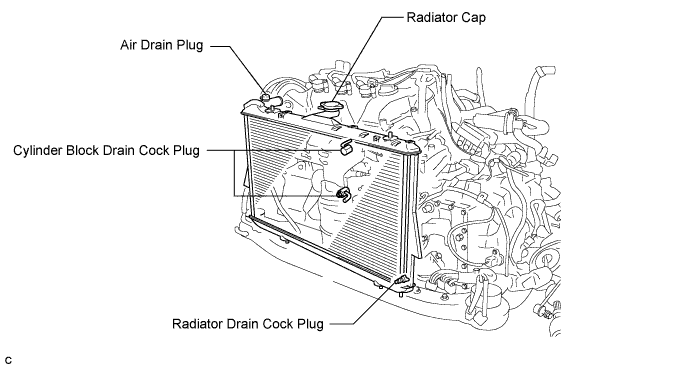
Loosen the radiator drain cock plug.
Loosen the cylinder block drain cock plugs.
Remove the radiator cap.
| 20. DRAIN COOLANT (for Inverter) |
Remove the inverter reserve tank cap.
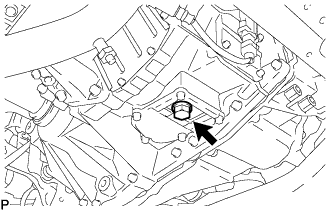 |
Using a hexagon wrench (10 mm), remove the drain plug indicated in the illustration and drain the coolant.
Install the plug with a new gasket.
| 21. DRAIN ENGINE OIL |
Remove the oil filler cap.
Remove the oil drain plug and drain the oil into a container.
Clean and install the oil pan drain plug with a new gasket.
| 22. DRAIN HYBRID TRANSAXLE FLUID |
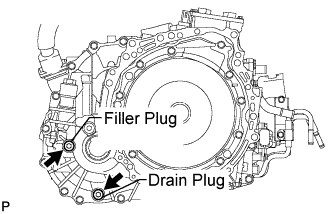 |
Using a socket hexagon wrench 10 mm, remove the filler plug and gasket.
Using a socket hexagon wrench 10 mm, remove the drain plug and gasket.
Using a socket hexagon wrench 10 mm, install the drain plug, and a new gasket.
| 23. REMOVE BATTERY |
Disconnect the battery terminal.
Remove the bolt and battery clamp.
Remove the battery and battery tray.
| 24. REMOVE BATTERY CARRIER SUB-ASSEMBLY |
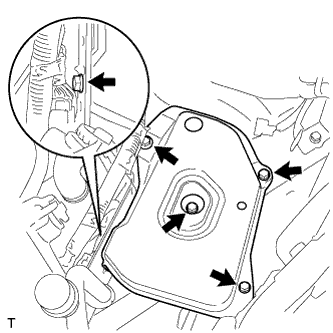 |
Remove the 5 bolts and battery carrier.
| 25. REMOVE AIR CLEANER CAP SUB-ASSEMBLY |
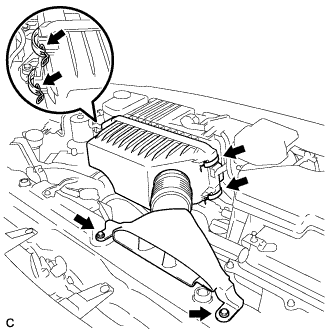 |
Remove the 2 bolts, 4 clamps and air cleaner cap sub-assembly.
Remove the air cleaner filter element from the air cleaner case.
| 26. REMOVE AIR CLEANER CASE SUB-ASSEMBLY |
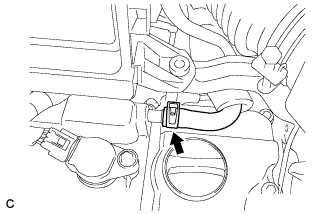 |
Separate the No. 1 ventilation hose.
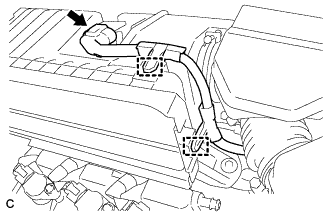 |
Disconnect the intake air flow meter connector.
Disconnect the 2 wire harness clamps from the air cleaner case sub-assembly.
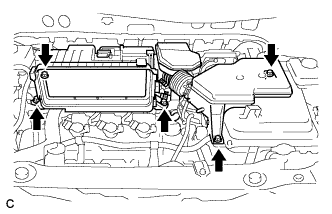 |
Remove the 5 bolts from the air cleaner case sub-assembly.
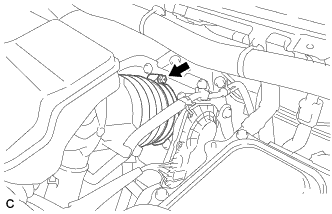 |
Loosen the hose clamp and separate the No. 1 air cleaner hose.
Remove the air cleaner case sub-assembly.
| 27. DISCONNECT NO. 1 CIRCUIT BREAKER SENSOR |
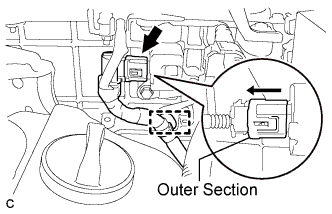 |
Move the outer section to the wire harness side as illustrated, then disconnect the No. 1 circuit breaker sensor.
| 28. DISCONNECT NO. 2 ENGINE ROOM WIRE |
Remove the relay block cover.
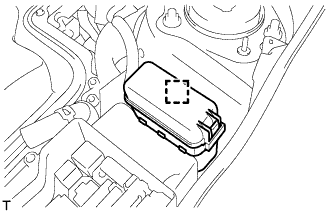 |
Disconnect the clamp, and release the engine room relay block assembly.
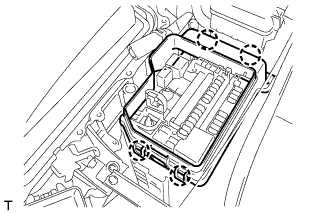 |
Disconnect the 4 claws, and disconnect the No. 2 relay block cover.
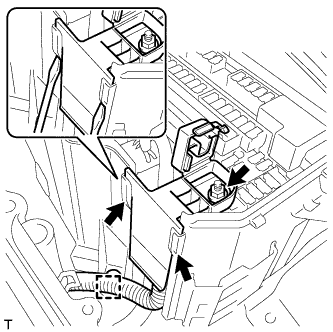 |
Remove the nut from the No. 2 engine room wire.
Release the 2 claws, and disconnect the No. 2 engine room wire.
Disconnect the clamp.
| 29. REMOVE INVERTER RESERVE TANK SUB-ASSEMBLY |
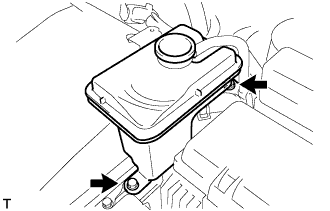 |
Remove the 2 bolts and inverter reserve tank sub-assembly.
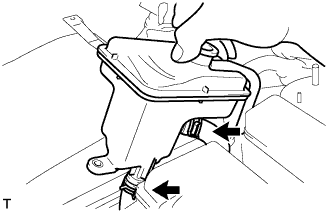 |
Slide the 2 clamps, and disconnect the 2 water hoses from the inverter reserve tank sub-assembly.
| 30. DISCONNECT WATER HOSE |
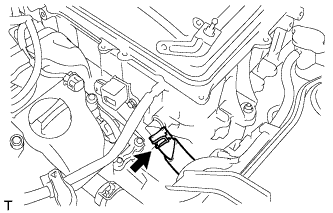 |
Slide the clamp, and disconnect the water hose from the inverter with converter assembly.
| 31. REMOVE INVERTER COVER |
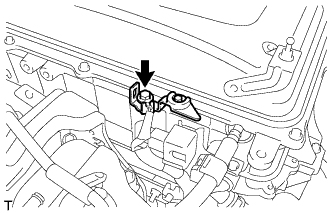 |
Remove the bolt and interlock bracket.
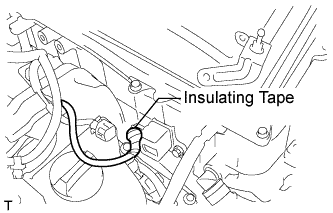 |
Insulate the removed terminal with insulating tape.
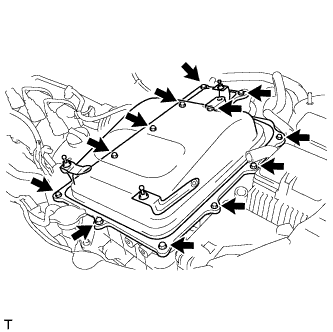 |
Remove the 12 bolts and inverter cover.
| 32. CHECK TERMINAL VOLTAGE |
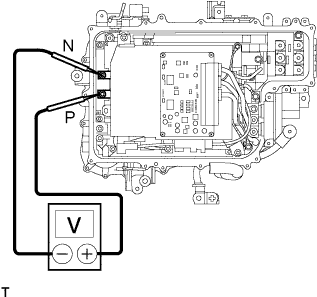 |
Using the voltmeter, measure the voltage between the terminals of the 2 phase connectors (N-P).
| 33. SEPARATE NO. 4 ENGINE WIRE |
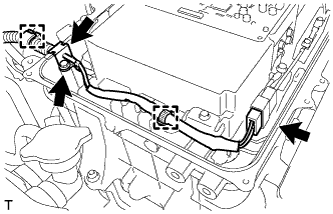 |
Remove the bolt, and disconnect the No. 4 engine wire from the inverter with converter assembly.
Disconnect the connector, clamps and grommet, and separate the No. 4 engine wire from the inverter with converter assembly.
| 34. DISCONNECT HIGH VOLTAGE CABLE OF FRONT MOTOR |
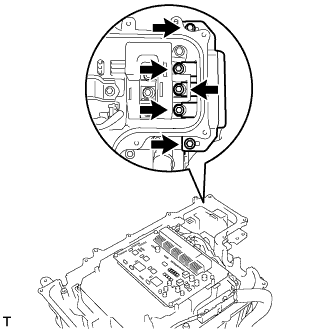 |
Remove the 5 bolts, and disconnect the high voltage cables of the motor from the inverter with converter assembly.
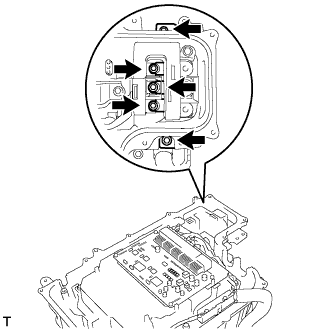 |
Remove the 5 bolts, and disconnect the high voltage cables of the generator (MG1) from the inverter with converter assembly.
| 35. DISCONNECT MG ECU CONNECTOR |
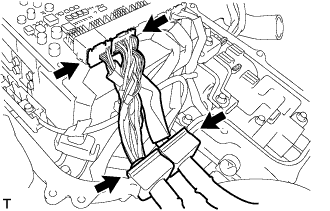 |
Disconnect the 2 connectors and 2 grommets from the inverter with converter assembly.
| 36. DISCONNECT NO. 3 FRAME WIRE |
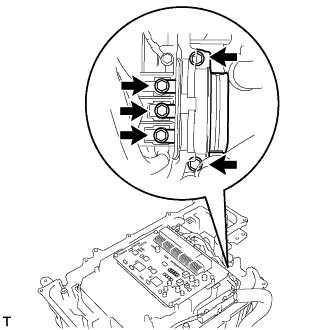 |
Remove the 5 bolts, and disconnect the No. 3 frame wire (high voltage cables of the rear motor (MGR)) from the inverter with converter assembly.
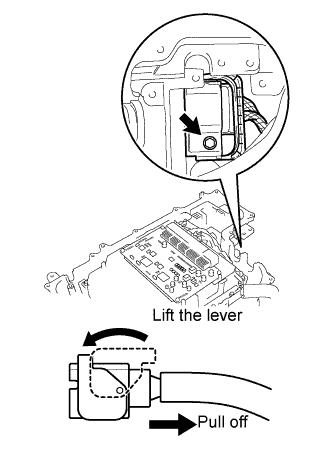 |
Remove the bolt and lift the lever to disconnect the No. 3 frame wire from the inverter with converter assembly.
| 37. INSTALL INVERTER COVER |
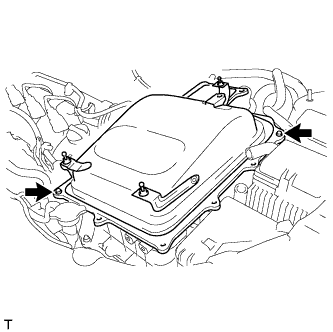 |
Temporarily install the inverter cover with the 2 bolts to prevent any foreign objects or waterdrops from entering the inverter with converter assembly.
| 38. SEPARATE ENGINE ROOM RELAY BLOCK ASSEMBLY |
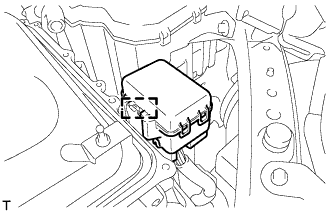 |
Disconnect the clamp, and release the engine room relay block assembly.
| 39. REMOVE NO. 4 INVERTER BRACKET |
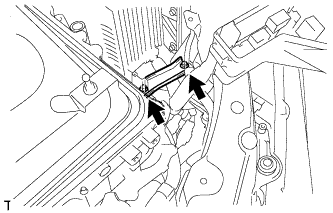 |
Remove the 2 bolts and No. 4 inverter bracket.
| 40. REMOVE INVERTER WITH CONVERTER ASSEMBLY |
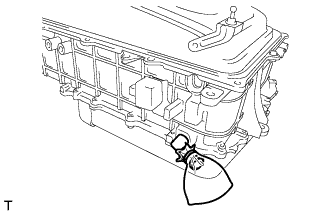 |
Disconnect the coolant hose from the inverter with converter assembly. Put a piece of cloth in the pipe and in the disconnected hose or cover the pipe and hose with plastic bags as shown in the illustration, in order to prevent coolant from spilling around the inverter with converter assembly.
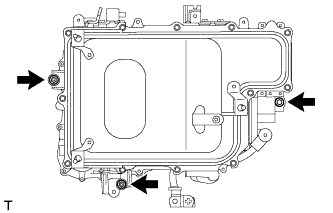 |
Remove the 2 nuts, bolt and inverter with converter assembly.
| 41. SEPARATE BRAKE MASTER CYLINDER RESERVOIR SUB-ASSEMBLY |
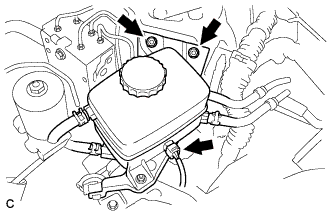 |
Disconnect the connector.
Remove the 2 nuts and separate the brake master cylinder reservoir.
| 42. REMOVE AIR CLEANER BRACKET |
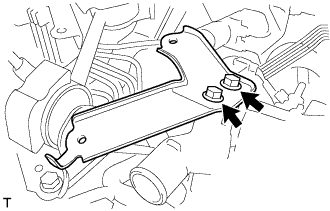 |
Remove the 2 bolts and air cleaner bracket.
| 43. REMOVE NO. 2 ENGINE MOUNTING STAY RH |
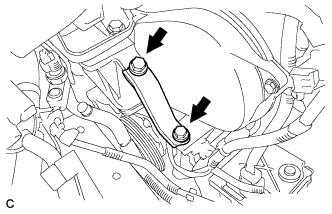 |
Remove the 2 bolts and the No. 2 engine mounting stay RH.
| 44. REMOVE ENGINE MOVING CONTROL ROD |
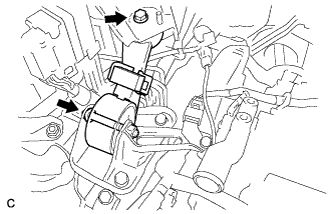 |
Remove the 2 bolts and the engine moving control rod.
| 45. REMOVE ENGINE MOUNTING CONTROL BRACKET |
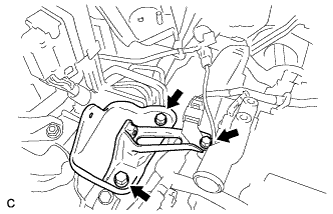 |
Remove the 3 bolts and the engine mounting control bracket.
| 46. REMOVE NO. 2 ENGINE MOUNTING BRACKET RH |
| 47. SEPARATE COMPRESSOR WITH MOTOR ASSEMBLY |
Disconnect the 2 connectors.
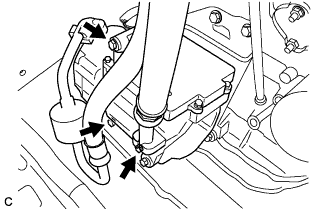 |
Remove the 3 bolts and compressor with motor assembly.
| 48. REMOVE NO. 1 INVERTER BRACKET |
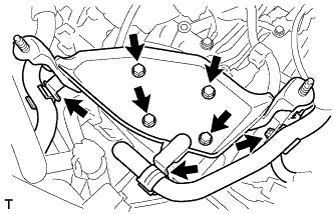 |
Separate the 3 hose clamps.
Remove the 4 bolts, harness clamp and No. 1 inverter bracket.
| 49. SEPARATE TRANSMISSION CONTROL CABLE ASSEMBLY |
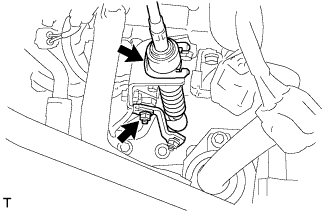 |
Remove the nut and separate the control shaft lever from the position sensor.
Remove the clip and disconnect the control cable from the bracket.
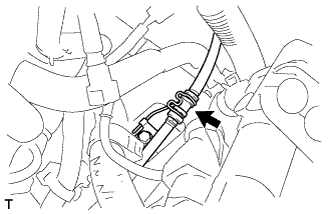 |
Separate the control cable from the cable bracket.
| 50. DISCONNECT FUEL VAPOR FEED HOSE |
| 51. DISCONNECT NO. 1 FUEL PIPE SUB-ASSEMBLY |
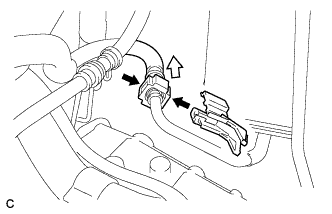 |
Remove the EFI fuel pipe clamp.
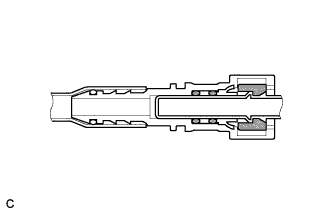 |
Pinch the retainer as illustrated, then pull out the fuel tube connector from the pipe.
| 52. DISCONNECT INLET HEATER WATER HOSE |
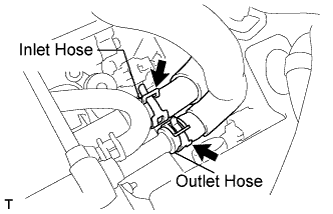 |
Using pliers, grip the claws of the clip and slide the clip to disconnect the inlet heater water hose.
| 53. DISCONNECT OUTLET HEATER WATER HOSE |
| 54. DISCONNECT INLET RADIATOR HOSE |
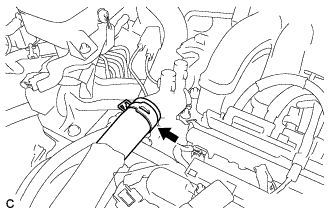 |
Using pliers, grip the claws of the clip and slide the clip to disconnect the inlet radiator hose.
| 55. DISCONNECT OUTLET RADIATOR HOSE |
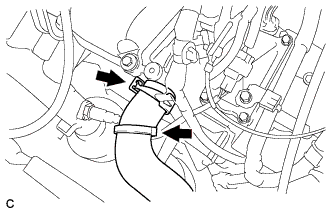 |
Using pliers, grip the claws of the clip and slide the clip to disconnect the outlet radiator hose.
| 56. DISCONNECT INLET OIL COOLER TUBE SUB-ASSEMBLY |
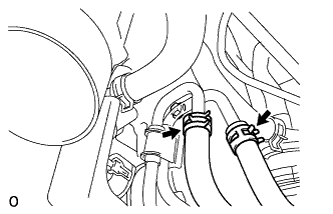 |
Using pliers, grip the claws of the clip and slide the clip to disconnect the inlet oil cooler tube.
| 57. DISCONNECT OUTLET OIL COOLER TUBE SUB-ASSEMBLY |
| 58. DISCONNECT WATER HOSE |
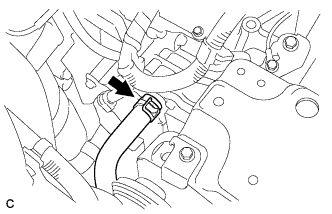 |
Using pliers, grip the claws of the clip and slide the clip to disconnect the water hose.
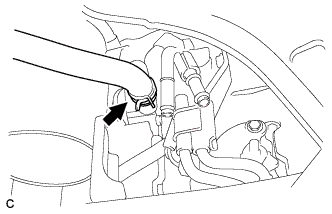 |
Using pliers, grip the claws of the clip and slide the clip to disconnect the water hose.
| 59. REMOVE FRONT DOOR SCUFF PLATE RH |
| 60. REMOVE COWL SIDE TRIM SUB-ASSEMBLY RH |
| 61. REMOVE NO. 2 INSTRUMENT PANEL UNDER COVER SUB-ASSEMBLY |
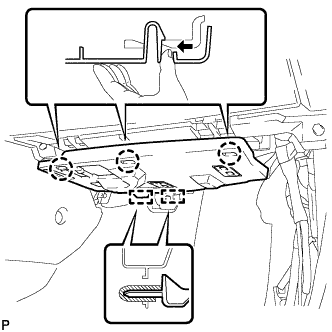 |
Disengage the 3 claws.
Disengage the 2 guides and remove the No. 2 instrument panel under cover sub-assembly.
| 62. REMOVE LOWER INSTRUMENT PANEL SUB-ASSEMBLY |
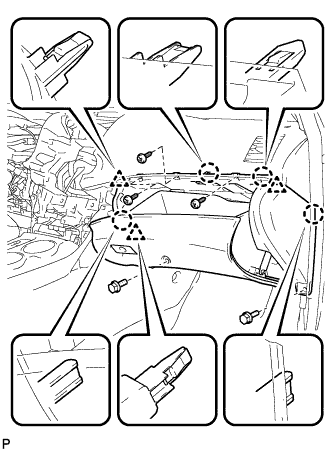 |
Remove the 2 bolts <B> and 3 screws <E>.
Disengage the 4 claws and 3 clips.
Disconnect each connector and clamp, and remove the lower instrument panel sub-assembly.
| 63. SEPARATE ENGINE WIRE |
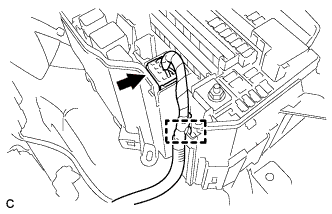 |
Disconnect the connector and clamp from the junction block.
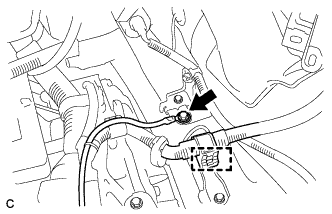 |
Remove the bolt and clamp.
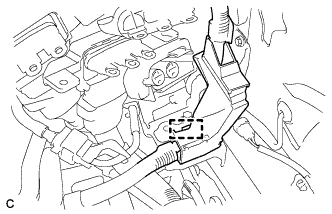 |
Separate the clamp and wire harness protector.
Disconnect the 6 connectors from the ECM.
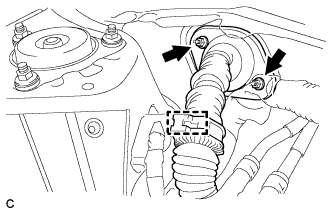 |
Remove the 2 nuts and pull out the engine wire harness.
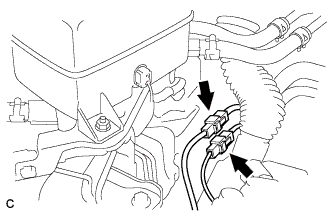 |
Disconnect the 2 connectors.
| 64. REMOVE FRONT EXHAUST PIPE ASSEMBLY |
Disconnect the heated oxygen sensor connector.
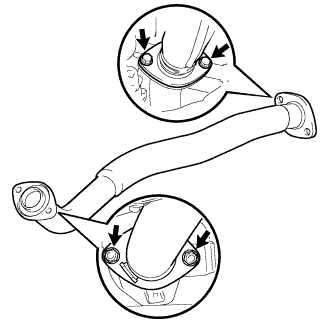 |
Remove the 2 bolts, 2 nuts and front exhaust pipe assembly.
Remove the 2 gaskets.
| 65. REMOVE FRONT NO. 3 EXHAUST PIPE SUB-ASSEMBLY |
Disconnect the heated oxygen sensor connector.
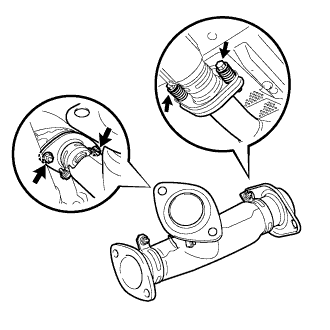 |
Remove the 2 bolts, 2 nuts and front No. 3 exhaust pipe sub-assembly.
Remove the 2 gaskets.
| 66. SECURE STEERING WHEEL |
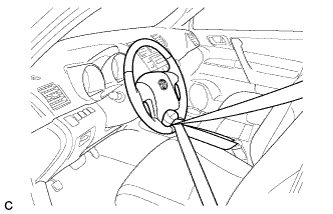 |
Secure the steering wheel with the seat belt in order to prevent it from rotating.
| 67. SEPARATE FRONT STABILIZER LINK ASSEMBLY LH |
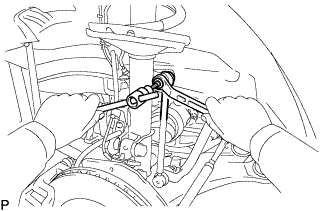 |
Remove the nut and separate the front stabilizer link assembly from the front shock absorber.
| 68. SEPARATE FRONT STABILIZER LINK ASSEMBLY RH |
| 69. REMOVE FRONT AXLE SHAFT NUT LH |
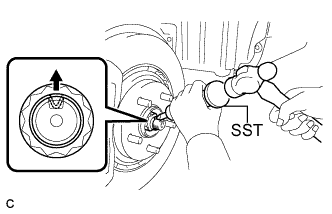 |
Using SST and a hammer, release the staked part of the front axle shaft nut LH.
While applying the brakes, remove the front axle shaft nut LH.
| 70. REMOVE FRONT AXLE SHAFT NUT RH |
| 71. SEPARATE FRONT SPEED SENSOR LH |
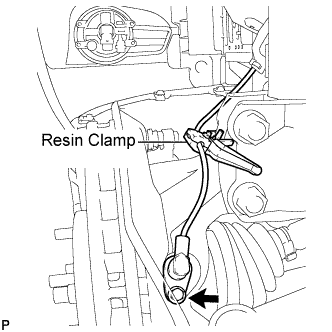 |
Remove the bolt and resin clamp, and separate the front speed sensor.
| 72. SEPARATE FRONT SPEED SENSOR RH |
| 73. SEPARATE TIE ROD END SUB-ASSEMBLY LH |
Remove the cotter pin and the nut.
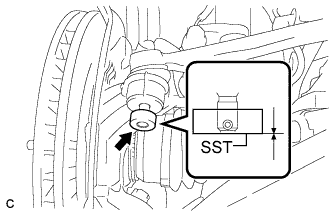 |
Install SST to the tie rod end.
Using SST, separate the tie rod end from the steering knuckle.
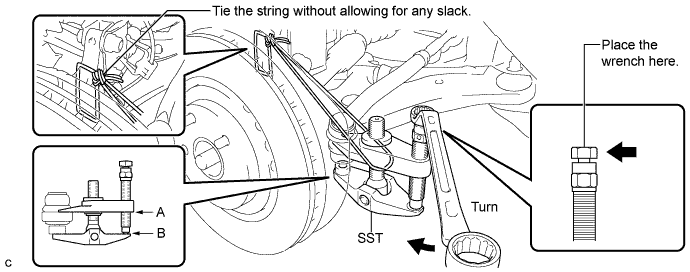
| 74. SEPARATE TIE ROD END SUB-ASSEMBLY RH |
| 75. SEPARATE FRONT LOWER SUSPENSION ARM LH |
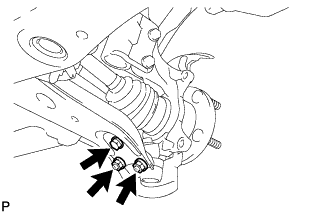 |
Remove the bolt and 2 nuts, and separate the front lower suspension arm from the front lower ball joint.
| 76. SEPARATE FRONT LOWER SUSPENSION ARM RH |
| 77. SEPARATE FRONT AXLE ASSEMBLY LH |
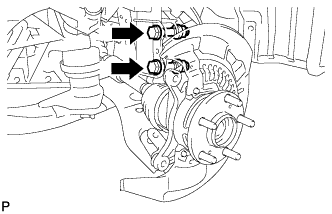 |
Remove the 2 bolts, 2 nuts and front axle assembly.
| 78. SEPARATE FRONT AXLE ASSEMBLY RH |
| 79. SEPARATE STEERING INTERMEDIATE SHAFT SUB-ASSEMBLY |
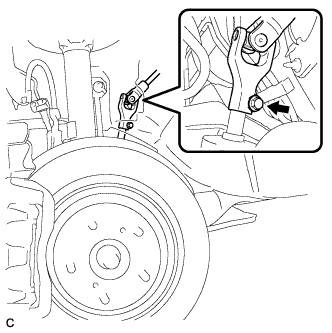 |
Remove the bolt and slide the steering intermediate shaft assembly.
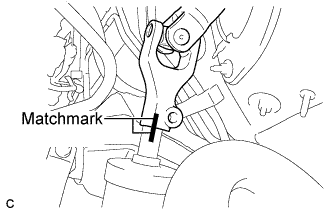 |
Put matchmarks on the steering intermediate shaft assembly and the power steering link assembly.
Separate the steering intermediate shaft assembly from the power steering link assembly.
| 80. REMOVE ENGINE ASSEMBLY WITH TRANSAXLE |
Set the engine lifter.
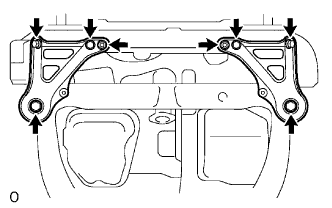 |
Remove the 6 bolts and 2 nuts, then remove the frame side plates RH and LH.
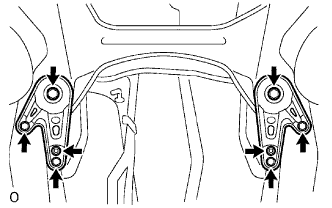 |
Remove the 6 bolts and 2 nuts, then remove the front suspension member brace RH and LH.
Carefully remove the engine assembly from the vehicle.
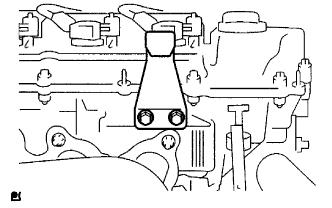 |
Install the No. 2 engine hanger in the correct direction shown in the illustration.
| No. 2 engine hanger | 12282-20020 |
| Bolt | 91641-80825 |
Attach the engine sling and hang the engine assembly with the chain block.
| 81. REMOVE ENGINE WIRE |
| 82. REMOVE NO. 1 EXHAUST MANIFOLD HEAT INSULATOR |
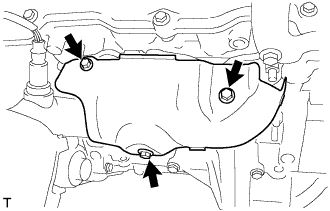 |
Remove the 3 bolts and No. 1 exhaust manifold heat insulator.
| 83. REMOVE MANIFOLD STAY |
Remove the 2 bolts and manifold stay.
| 84. REMOVE EXHAUST MANIFOLD SUB-ASSEMBLY RH |
Disconnect the heated oxygen sensor connector.
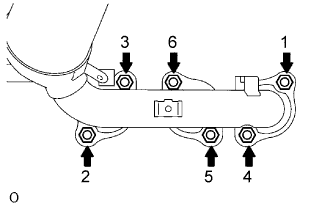 |
Using several steps, loosen and remove the 6 nuts in the sequence shown in the illustration.
Remove the exhaust manifold RH and the gasket from the cylinder head RH.
| 85. REMOVE HYBRID TRANSAXLE MASS DAMPER |
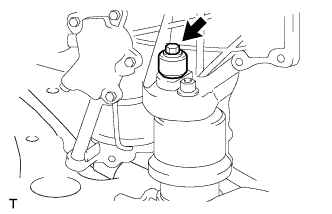 |
Remove the bolt and transaxle mass damper.
| 86. REMOVE ENGINE MOUNTING ABSORBER SUB-ASSEMBLY |
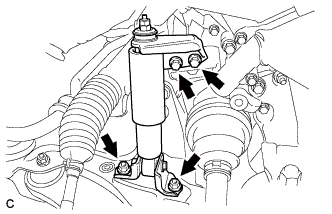 |
Remove the 2 bolts, 2 nuts and engine mounting absorber sub-assembly.
| 87. REMOVE REAR ENGINE MOUNTING INSULATOR |
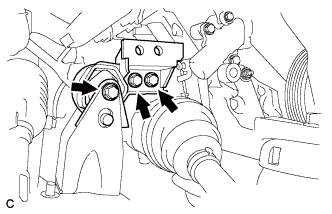 |
Remove the 3 bolts and rear engine mounting insulator.
| 88. REMOVE FRONT FRAME ASSEMBLY |
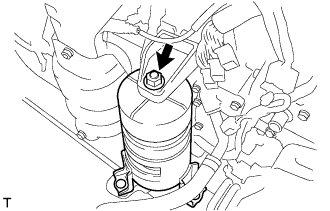 |
Remove the nut and separate the front engine mounting insulator.
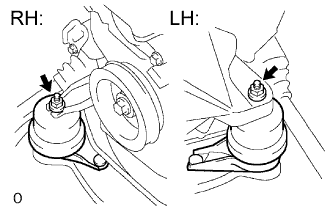 |
Remove the 2 nuts and separate the engine mounting insulators RH and LH.
| 89. REMOVE FRONT ENGINE MOUNTING INSULATOR |
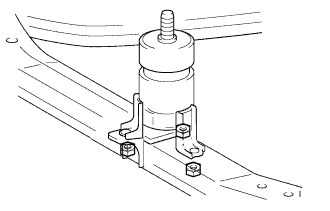 |
Remove the 3 nuts and front engine mounting insulator.
| 90. REMOVE ENGINE MOUNTING INSULATOR LH |
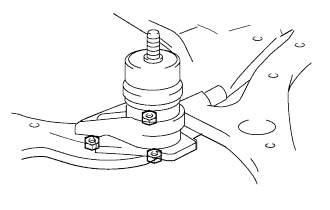 |
Remove the 3 nuts and engine mounting insulator LH.
| 91. REMOVE ENGINE MOUNTING INSULATOR RH |
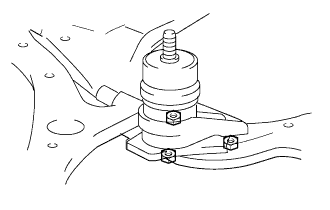 |
Remove the 3 nuts and engine mounting insulator RH.
| 92. REMOVE FRONT DRIVE SHAFT ASSEMBLY LH |
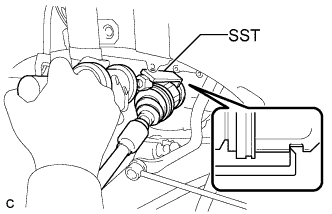 |
Using SST, remove the front drive shaft assembly LH.
| 93. REMOVE FRONT DRIVE SHAFT ASSEMBLY RH |
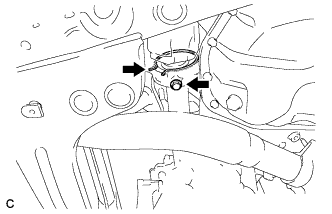 |
Remove the bearing bracket hole snap ring from the drive shaft bearing bracket.
Remove the bolt and front drive shaft assembly RH from the drive shaft bearing bracket.
| 94. REMOVE FLYWHEEL HOUSING UNDER COVER |
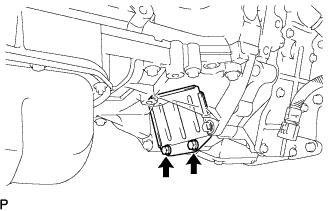 |
Remove the 2 bolts and flywheel housing under cover.
| 95. REMOVE FRONT ENGINE MOUNTING BRACKET |
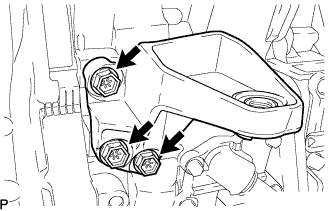 |
Remove the 3 bolts and engine mounting bracket.
| 96. REMOVE HYBRID VEHICLE TRANSAXLE ASSEMBLY |
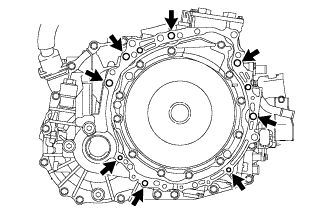 |
Remove the 8 bolts.
Separate and remove the hybrid vehicle transaxle.
| 97. REMOVE REAR ENGINE MOUNTING BRACKET |
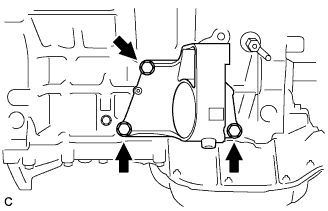 |
Remove the 3 bolts and rear engine mounting bracket.
| 98. REMOVE TRANSMISSION INPUT DAMPER ASSEMBLY |
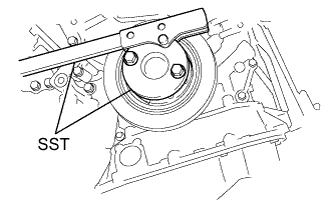 |
Using SST, hold the crankshaft.
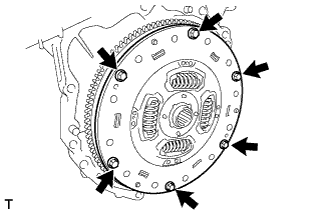 |
Remove the 6 bolts and transmission input damper from the flywheel.
| 99. REMOVE FLYWHEEL SUB-ASSEMBLY |
|
Using SST, hold the crankshaft.
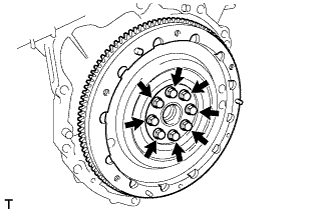 |
Remove the 8 bolts and flywheel.