Home › BRAKE › BRAKE CONTROL › BRAKE ACTUATOR

BRAKE ACTUATOR > REMOVAL

for Preparation Click here


NOTICE:
While the battery is connected, even if the power switch is off, the brake control system activates when the brake pedal is depressed or any door courtesy switch turns on. Therefore, when servicing the brake system components, do not operate the brake pedal or open/close the doors while the battery is connected.


1. PERFORM ACCUMULATOR PRESSURE ZERO DOWN

HINT:
Using the Techstream to perform accumulator zero down causes the pressurized fluid in the actuator's accumulator to be returned to the brake fluid reservoir.


    C170593E03
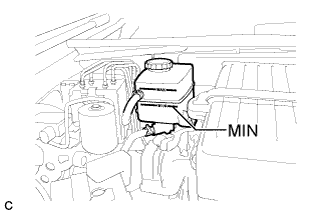
  1. Drain the brake fluid in the reservoir tank near the MIN line.

  1. Connect the Techstream to the DLC3 with the power switch off.

  1. Check that the parking brake is set, and turn the power switch on (IG).

  1. Enter the following menus: Chassis / ABS/VSC/TRC / Utility / Electronically Controlled Brake system Utility / Zero Down.

  1. When the buzzer sounds, turn the power switch off.


2. DISCONNECT CABLE FROM NEGATIVE BATTERY TERMINAL

NOTICE:
When disconnecting the cable, some systems need to be initialized after the cable is reconnected (Click here).


3. REMOVE SERVICE PLUG GRIP

CAUTION:
  1. Remove the service plug to interrupt a high voltage circuit at the time of the check.
  2. Keep the removed service plug in your pocket to prevent other technicians from accidentally reconnecting it while you are servicing the vehicle.
  3. All the high voltage wiring connectors are colored in orange.


    A175634
  1. Remove the 5 clips and door scuff plate LH.



    A175635
  1. Remove the 2 clips and reclining hinge cover.


    A175636
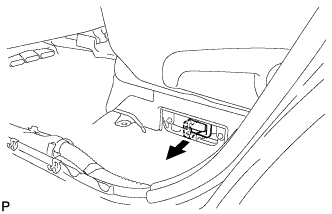
  1. Wear insulated glove and remove the service plug grip, after sliding up the lever of the service plug grip.

    CAUTION:
    1. Keep the removed service plug in your pocket to prevent other technicians from accidentally reconnecting it while you are servicing the vehicle.
    2. After removing the service plug grip, do not touch the high voltage connectors and terminals for 5 minutes.

    NOTICE:
    After removing the service plug grip, do not operate the power switch as it may damage the hybrid vehicle control ECU.


4. REMOVE BATTERY
  1. Disconnect the battery terminal.

    NOTICE:
    When disconnecting the cable, some systems need to be initialized after the cable is reconnected (Click here).

  1. Remove the bolt and battery clamp.

  1. Remove the battery and battery tray.


5. REMOVE FRONT WHEEL


6. DRAIN BRAKE FLUID

NOTICE:
If brake fluid leaks onto any painted surface, wash or remove it completely.


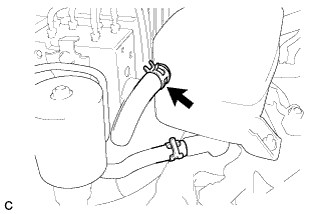
7. SEPARATE NO. 1 RESERVOIR HOSE


    C171401E01
  1. Separate the No. 1 reservoir hose.


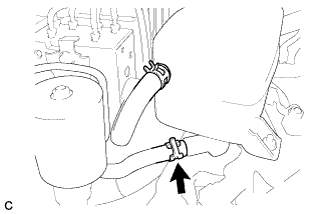
8. SEPARATE NO. 2 BRAKE ACTUATOR HOSE


    C171401E02
  1. Separate the No. 2 brake actuator hose.


9. DISCONNECT BRAKE TUBE


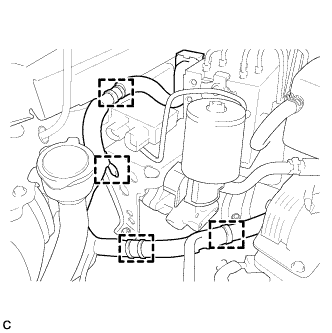
  1. Disconnect the 2 brake booster pump connectors.
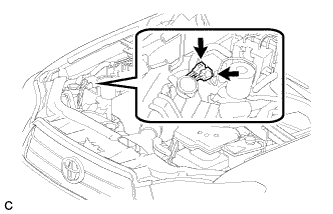
    NOTICE:
    C170592
    Do not allow brake fluid to contact the connector faces.


  1. Release the lock lever and disconnect the brake booster pump connector.
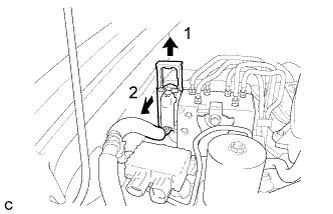
    NOTICE:
    C171402E01
    Do not allow brake fluid to contact the connector face.


    C171400
  1. Disconnect the 4 clamps.


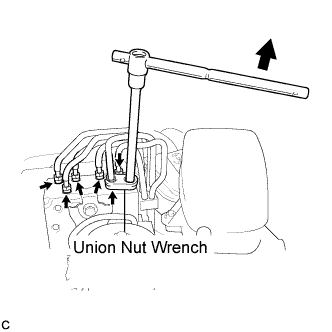
    C171404E01
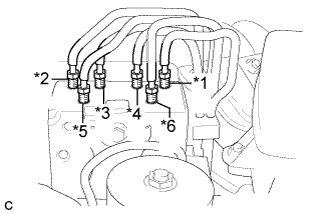
  1. Using a union nut wrench, disconnect the 6 brake lines from the actuator.


    C171405E01
  1. Use tags or make a note to identify the reconnection locations.

    HINT:
    1. *1: To front wheel cylinder RH
    2. *2: To front wheel cylinder LH
    3. *3: To rear wheel cylinder RH
    4. *4: To rear wheel cylinder LH
    5. *5: From stroke simulator
    6. *6: From master cylinder


10. REMOVE BRAKE ACTUATOR AND BRAKE BOOSTER PUMP


    C171406
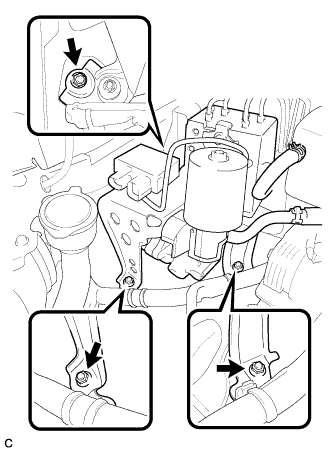
  1. Remove the 3 nuts, the brake actuator and the brake booster pump.

    NOTICE:
    1. Do not damage the brake tubes.
    2. When removing the brake actuator and brake booster pump from the vehicle, do not hold it by the connectors, harnesses, hoses or tubes.
    3. Do not drop the brake actuator or brake booster pump. Do not use parts that have been dropped.


11. REMOVE NO. 1 BRAKE ACTUATOR HOSE

NOTICE:
When disconnecting the hose, be careful that there is no excessive weight applied to the union of the brake actuator (especially in the union rotation direction).


    C171410
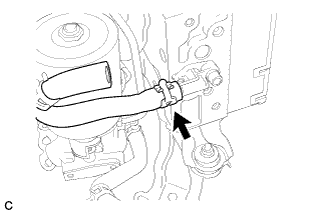
  1. Remove the hose clip and No. 1 brake actuator hose.


12. SEPARATE BRAKE BOOSTER PUMP CONNECTOR


    C171411
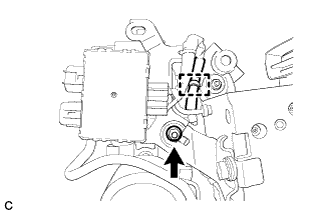
  1. Separate the brake booster pump connector box.

    1. Detach the wiring harness clamp.

    2. Remove the nut and the brake booster pump connector.


13. REMOVE NO. 3 BRAKE ACTUATOR TUBE

NOTICE:
  1. Do not damage the No. 3 brake actuator tube, brake actuator or brake booster pump.
  2. When removing the No. 3 brake actuator tube, hold the tube, brake actuator and brake booster pump securely.


  1. Using a union nut wrench, disconnect the No. 3 brake actuator tube.
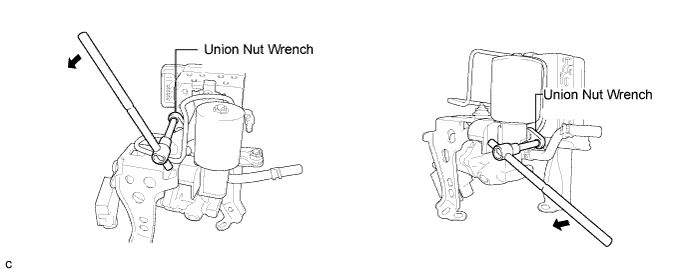

    C171408E01


14. REMOVE BRAKE ACTUATOR


    C171416
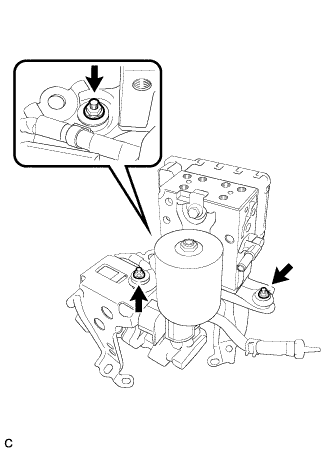
  1. Remove the 3 nuts and brake actuator with brackets.
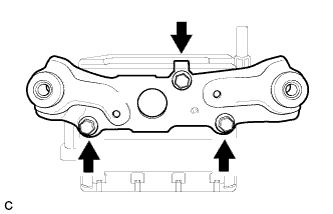


    C171414E01
  1. Remove the 3 bolts and No. 1 brake actuator bracket from the brake actuator.
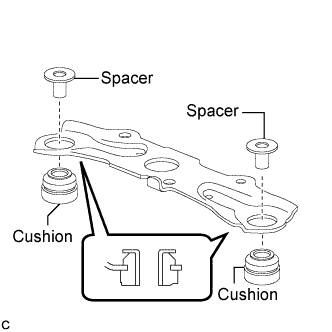


    C171415E01
  1. Remove the 2 cushions and 2 spacers from the No. 1 brake actuator bracket.


15. REMOVE NO. 2 BRAKE ACTUATOR BRACKET


    C171412E01
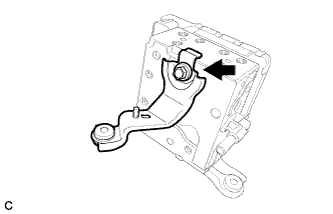
  1. Remove the bolt and No. 2 brake actuator bracket.
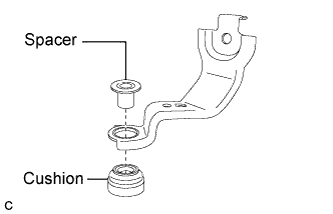


    C171413E01
  1. Remove the cushion and spacer from the No. 2 brake actuator bracket.


16. REMOVE BRAKE BOOSTER PUMP


    C171419E01
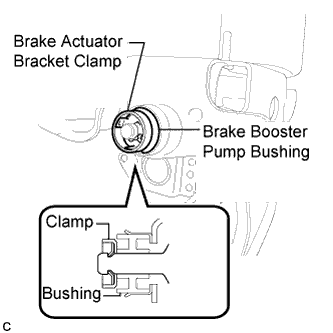
  1. Break and remove the brake actuator bracket clamp and then remove the brake booster pump bush from the brake actuator bracket.
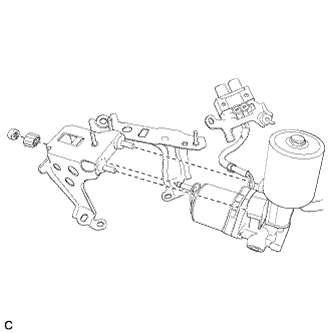


    C171421
  1. Remove the brake booster pump from the brake actuator bracket .


17. REMOVE NO. 2 BRAKE ACTUATOR HOSE

NOTICE:
When disconnecting the hose, be careful that there is no excessive weight applied to the union of the brake accumulator (especially in the union rotation direction).


    C171422
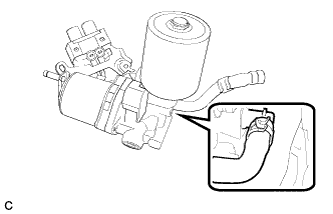
  1. Remove the No. 2 brake actuator hose from the brake booster pump.