 |
Remove the nut, and the front wiper arm and blade assembly LH.
AIR OUTLET CONTROL SERVO MOTOR (for Front) > REMOVAL |
| 1. PRECAUTION |
| 2. RECOVER REFRIGERANT FROM REFRIGERATION SYSTEM |
Turn the A/C switch on.
Operate the A/C with the setting temperature at 25°C (77°F) and the blower level at LO for 10 minutes to circulate the refrigerant. This causes most of the compressor oil from the various components of the A/C system to collect in the A/C compressor.
Turn the power switch off.
Recover the refrigerant from the A/C system using a refrigerant recovery unit.
| 3. POSITION FRONT WHEELS STRAIGHT AHEAD |
| 4. DISCONNECT CABLE FROM NEGATIVE BATTERY TERMINAL |
| 5. REMOVE FRONT WHEEL LH |
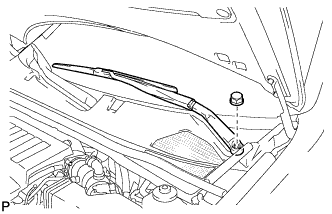
| 6. REMOVE FRONT WIPER ARM AND BLADE ASSEMBLY LH |
|
Remove the nut, and the front wiper arm and blade assembly LH.
| 7. REMOVE FRONT WIPER ARM AND BLADE ASSEMBLY RH |
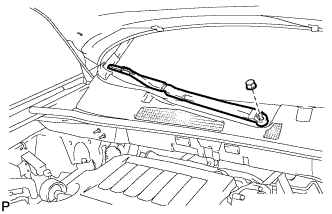 |
Remove the nut, and the front wiper arm and blade assembly RH.
| 8. REMOVE COWL TOP VENTILATOR LOUVER SUB-ASSEMBLY |
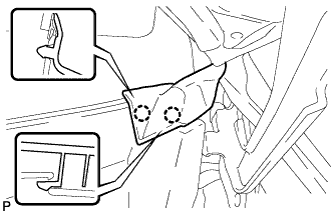 |
Disengage the 2 claws and disconnect the front fender to cowl side seal LH.
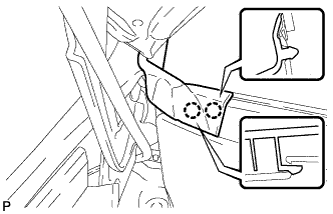 |
Disengage the 2 claws and disconnect the front fender to cowl side seal RH.
Remove the 2 clips.
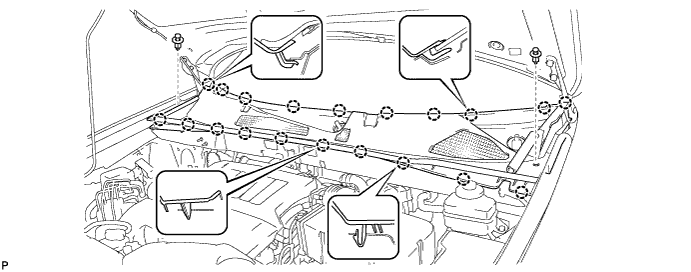
Disengage the 20 claws and remove the cowl top ventilator louver sub-assembly.
| 9. REMOVE WINDSHIELD WIPER MOTOR AND LINK ASSEMBLY |
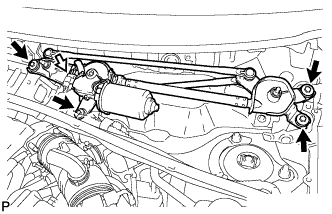 |
Disconnect the connector.
Remove the 4 bolts, and the windshield wiper motor and link assembly.
| 10. REMOVE COWL TOP OUTER PANEL SUB-ASSEMBLY |
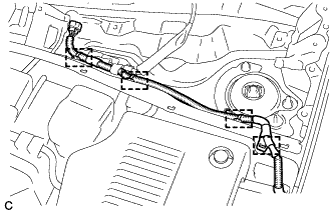 |
Disengage the 4 clamps and separate the wiper wire harness from the outer cowl top panel sub-assembly.
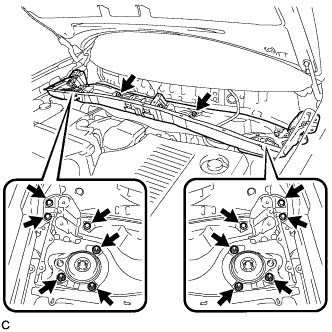 |
Remove the 8 bolts, 6 nuts, and the outer cowl top panel sub-assembly.
| 11. DISCONNECT HEATER OUTLET WATER HOSE |
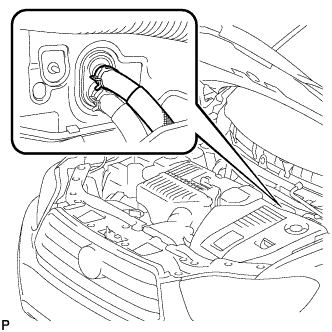 |
Using pliers, grip the claws of the clip and slide the clip to disconnect the heater outlet water hose.
| 12. DISCONNECT HEATER INLET WATER HOSE |
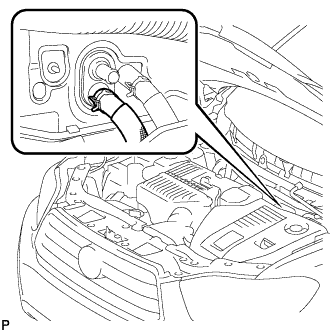 |
Using pliers, grip the claws of the clip and slide the clip to disconnect the heater inlet water hose.
| 13. DISCONNECT COOLER REFRIGERANT LIQUID PIPE A |
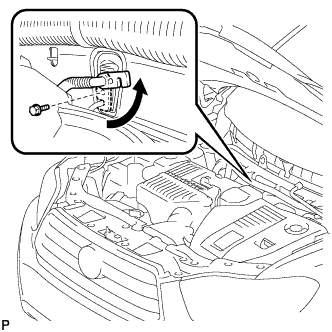 |
Remove the bolt, and slide the hook connector.
Disconnect the cooler refrigerant liquid pipe A.
Remove the O-ring from the cooler refrigerant liquid pipe A.
| 14. DISCONNECT NO. 1 COOLER REFRIGERANT SUCTION PIPE |
Disconnect the No. 1 cooler refrigerant suction pipe.
Remove the O-ring from the No. 1 cooler refrigerant suction pipe.
| 15. REMOVE LOWER NO. 3 STEERING WHEEL COVER |
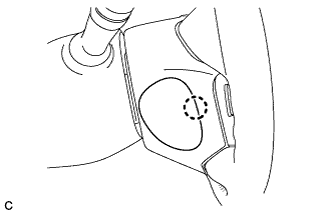 |
Disengage the claw and remove the lower No. 3 steering wheel cover.
| 16. REMOVE LOWER NO. 2 STEERING WHEEL COVER |
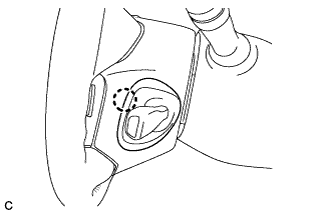 |
Disengage the claw and remove the lower No. 2 steering wheel cover.
| 17. REMOVE STEERING PAD |
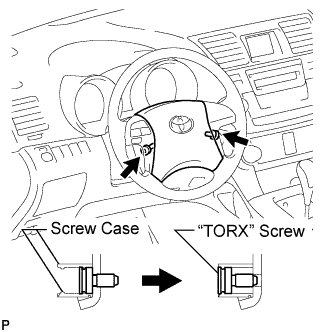 |
Using a "TORX" socket wrench (T30), loosen the 2 "TORX" screws until the groove along the screw circumference catches on the screw case.
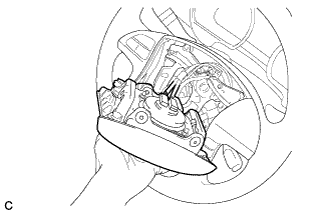 |
Pull out the steering pad from the steering wheel assembly and support the steering pad with one hand as shown in the illustration.
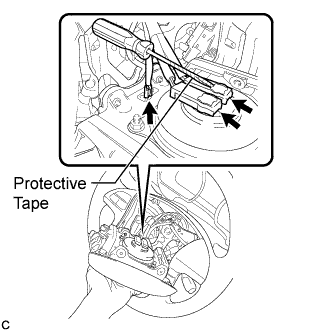 |
Disconnect the horn connector from the steering pad.
Using a screwdriver with the tip wrapped with protective tape, disconnect the 2 airbag connectors and remove the steering pad.
| 18. REMOVE STEERING WHEEL ASSEMBLY |
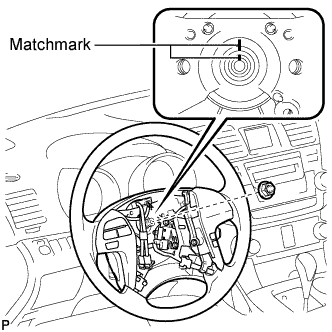 |
Remove the steering wheel assembly set nut.
Put matchmarks on the steering wheel assembly and the steering main shaft.
Disconnect the connectors from the spiral cable.
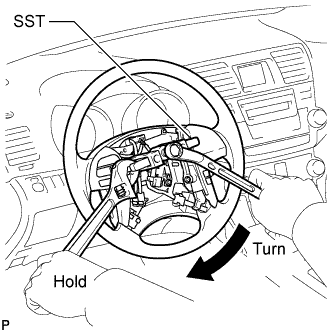 |
Using SST, remove the steering wheel assembly.
| 19. REMOVE STEERING COLUMN COVER |
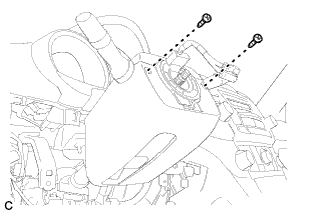 |
Remove the 2 screws.
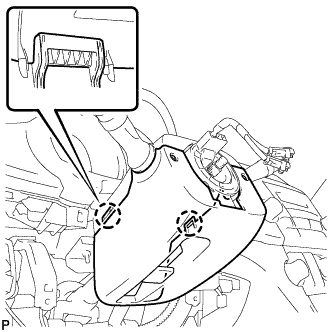 |
Disengage the 2 claws to remove the lower steering column cover.
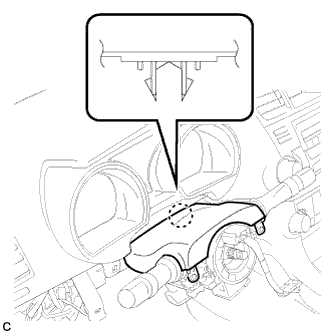 |
Disengage the claw to remove the upper steering column cover.
| 20. REMOVE TURN SIGNAL SWITCH ASSEMBLY WITH SPIRAL CABLE SUB-ASSEMBLY |
Disconnect the connectors from the turn signal switch assembly with spiral cable sub-assembly.
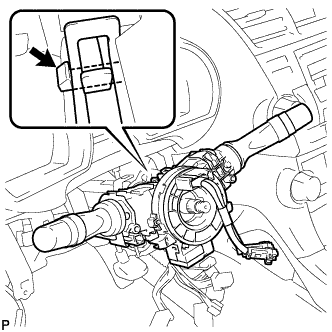 |
Using pliers, grip the claws of the clip and remove the turn signal switch assembly with spiral cable sub-assembly.
| 21. REMOVE INSTRUMENT CLUSTER FINISH PANEL ASSEMBLY |
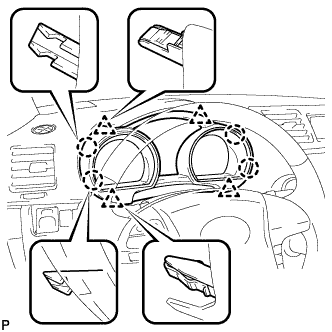 |
Disengage the 4 claws and 4 clips, and remove the instrument cluster finish panel assembly.
| 22. REMOVE COMBINATION METER ASSEMBLY |
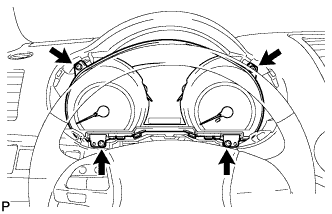 |
Remove the 4 screws.
Disconnect the connector and remove the combination meter assembly.
| 23. REMOVE CENTER INSTRUMENT PANEL REGISTER ASSEMBLY |
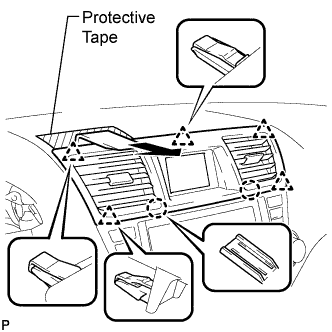 |
Apply protective tape to the areas shown in the illustration.
Using a moulding remover, disengage the 2 claws and 5 clips, and then remove the center instrument panel register assembly as shown in the illustration.
| 24. REMOVE CENTER INSTRUMENT CLUSTER FINISH PANEL ASSEMBLY |
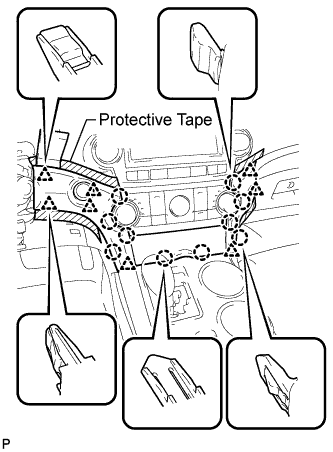 |
Apply protective tape to the areas shown in the illustration.
Using a moulding remover, disengage the 10 claws and 8 clips starting from the upper part of the center instrument cluster finish panel assembly.
Disconnect each connector and remove the center instrument cluster finish panel assembly.
| 25. REMOVE HEATER CONTROL AND ACCESSORY ASSEMBLY (for Manual Air Conditioning System) |
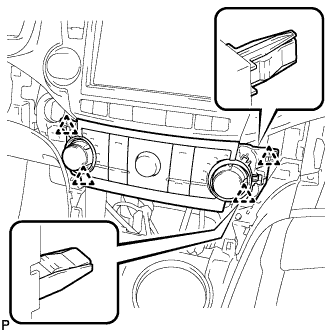 |
Disengage the 4 clips and remove the heater control and accessory assembly.
Disconnect the connector.
| 26. REMOVE AIR CONDITIONING CONTROL ASSEMBLY (for Automatic Air Conditioning System) |
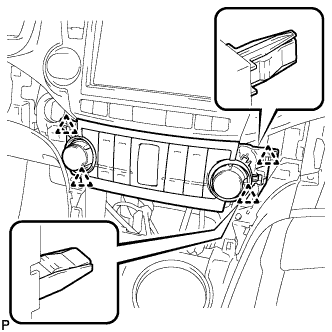 |
Disengage the 4 clips and remove the air conditioning control assembly.
Disconnect the connector.
| 27. REMOVE RADIO RECEIVER ASSEMBLY WITH BRACKET (w/o Navigation System) |
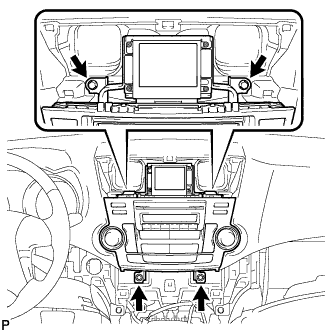 |
Remove the 4 bolts.
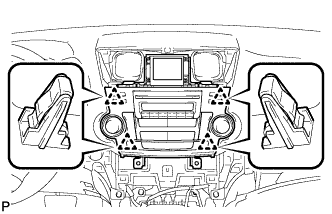 |
Pull the radio receiver assembly with bracket toward the rear of the vehicle and disengage the 4 clips.
Disconnect each connector and remove the radio receiver assembly with bracket.
| 28. REMOVE NAVIGATION RECEIVER ASSEMBLY WITH BRACKET (w/ Navigation System) |
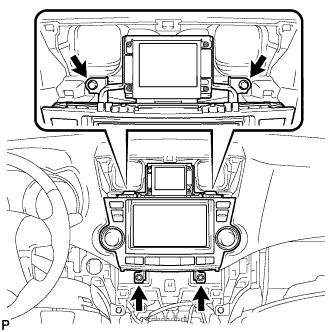 |
Remove the 4 bolts.
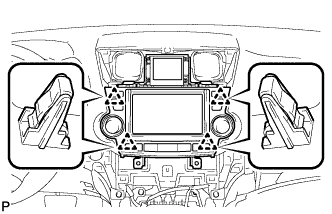 |
Pull the navigation receiver assembly with bracket toward the rear of the vehicle and disengage the 4 clips.
Disconnect each connector and remove the navigation receiver assembly with bracket.
| 29. REMOVE FRONT DOOR SCUFF PLATE LH |
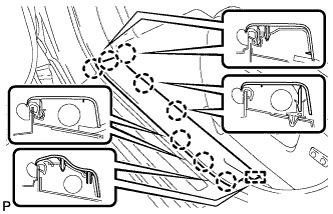 |
Disengage the 8 claws and guide, and remove the front door scuff plate LH.
| 30. REMOVE COWL SIDE TRIM SUB-ASSEMBLY LH |
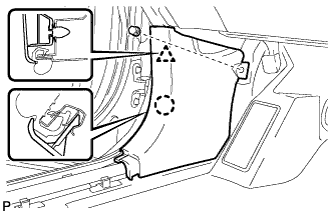 |
Remove the clip.
Disengage the clip and claw, and remove the cowl side trim sub-assembly LH.
| 31. REMOVE LOWER INSTRUMENT PANEL FINISH PANEL SUB-ASSEMBLY |
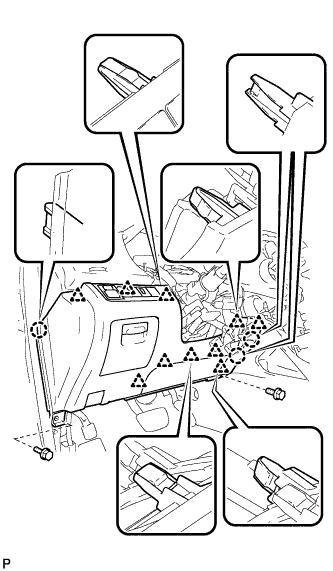 |
Remove the 2 bolts <B>.
Disengage the 3 claws and 10 clips.
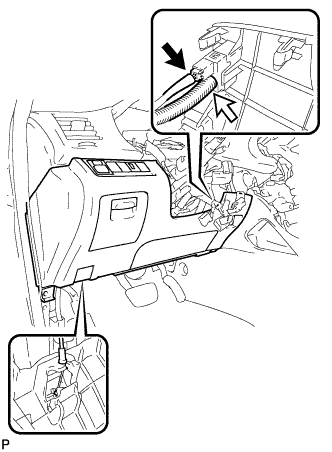 |
Disconnect each connector and the aspirator duct.
Disconnect the hood lock control cable assembly and remove the lower instrument panel finish panel sub-assembly.
| 32. REMOVE FRONT DOOR SCUFF PLATE RH |
| 33. REMOVE COWL SIDE TRIM SUB-ASSEMBLY RH |
| 34. REMOVE NO. 2 INSTRUMENT PANEL UNDER COVER SUB-ASSEMBLY |
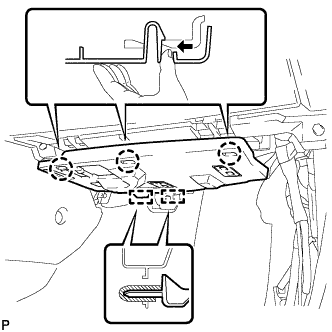 |
Disengage the 3 claws.
Disengage the 2 guides and remove the No. 2 instrument panel under cover sub-assembly.
| 35. REMOVE LOWER INSTRUMENT PANEL SUB-ASSEMBLY |
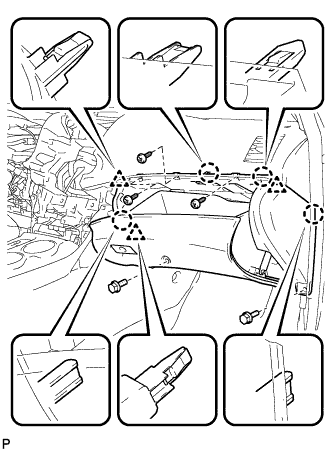 |
Remove the 2 bolts <B> and 3 screws <E>.
Disengage the 4 claws and 3 clips.
Disconnect each connector and clamp, and remove the lower instrument panel sub-assembly.
| 36. REMOVE UPPER CONSOLE PANEL SUB-ASSEMBLY |
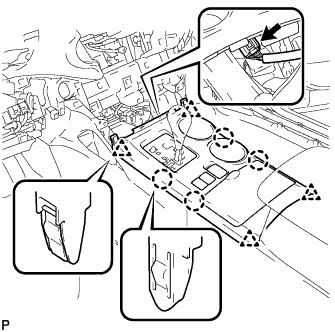 |
Disengage the 4 claws and 4 clips.
Disconnect the connector and remove the upper console panel sub-assembly.
| 37. REMOVE NO. 2 CONSOLE BOX DUCT (w/o Rear Air Conditioning System) |
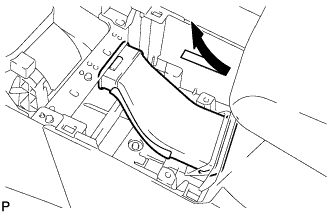 |
Remove the No. 2 console box duct as shown in the illustration.
| 38. REMOVE LOWER REAR CONSOLE BOX |
Remove the lower rear console box.
| 39. REMOVE CONSOLE BOX ASSEMBLY (w/o Rear Air Conditioning System) |
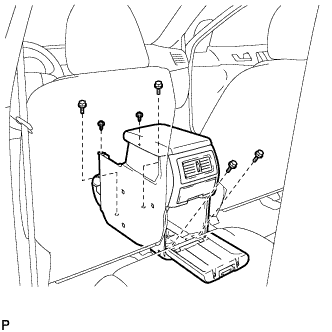 |
Remove the 4 bolts and 2 screws.
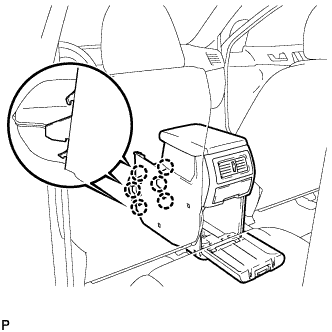 |
Disengage the 6 claws and remove the console box assembly.
| 40. REMOVE CONSOLE BOX ASSEMBLY (w/ Rear Air Conditioning System) |
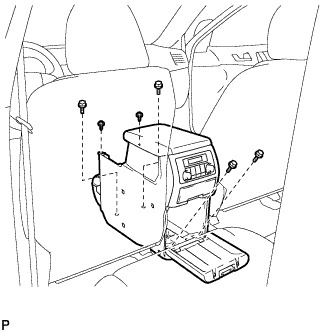 |
Remove the 4 bolts and 2 screws.
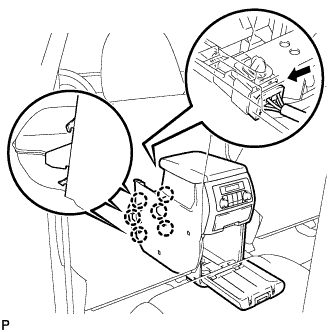 |
Disconnect the connector.
Disengage the 6 claws, and remove the console box assembly.
| 41. REMOVE FRONT NO. 1 CONSOLE BOX INSERT |
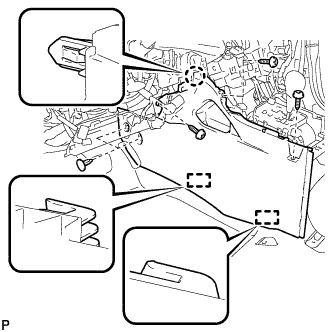 |
Using a clip remover, remove the 2 clips.
Remove the 3 screws <E>.
Disengage the claw and 2 guides, and then remove the front No. 1 console box insert.
| 42. REMOVE FRONT NO. 2 CONSOLE BOX INSERT |
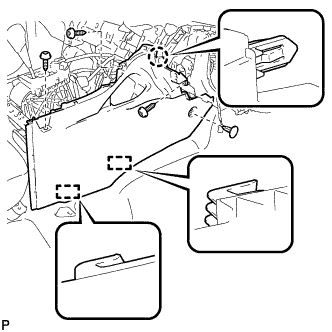 |
Using a clip remover, remove the clip.
Remove the 3 screws <E>.
Disengage the claw and 2 guides, and then remove the front No. 2 console box insert.
| 43. REMOVE POWER SWITCH |
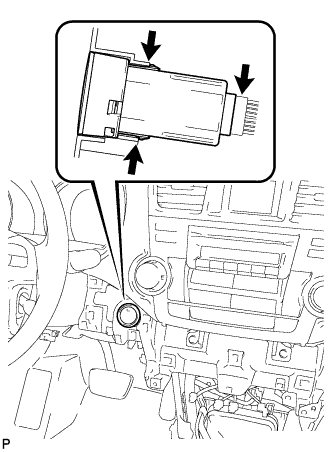 |
Disconnect the switch connector.
Disengage the 2 claws and remove the switch.
| 44. DISCONNECT FRONT DOOR OPENING TRIM WEATHERSTRIP LH |
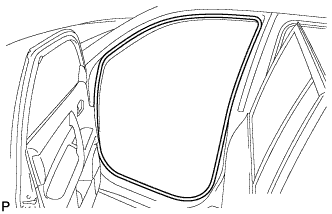 |
Remove the front door opening trim weatherstrip LH.
| 45. REMOVE FRONT PILLAR GARNISH LH |
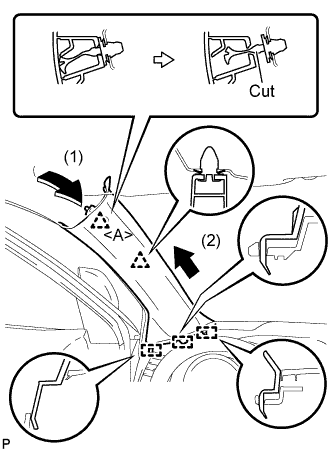 |
Pull the upper part of the garnish toward the inside of the cabin and disengage the 2 clips.
Cut off the clip <A>.
Disengage the 3 guides and remove the front pillar garnish LH.
Remove the clip <A>.
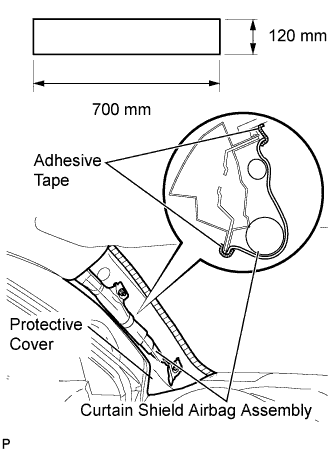 |
Protect the curtain shield airbag assembly.
Cover the airbag with a 700 mm (27.56 in.) x 120 mm (4.72 in.) cloth or piece of nylon and fix the ends of the cover with tape, as shown in the illustration.
| 46. DISCONNECT FRONT DOOR OPENING TRIM WEATHERSTRIP RH |
| 47. REMOVE FRONT PILLAR GARNISH RH |
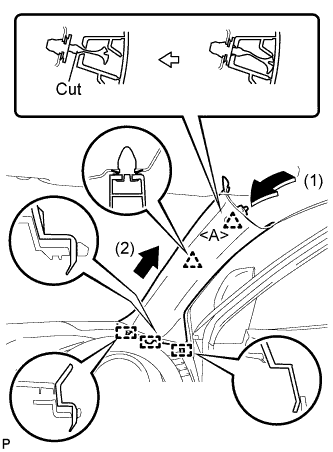 |
Pull the upper part of the garnish toward the inside of the cabin and disengage the 2 clips.
Cut off the clip <A>.
Disengage the 3 guides and remove the front pillar garnish RH.
Remove the clip <A>.
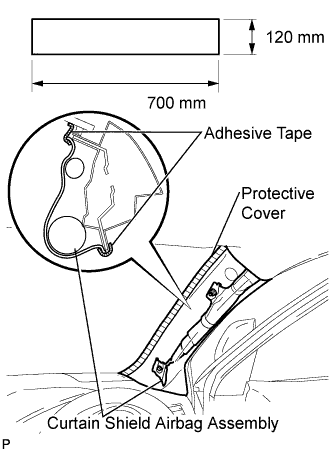 |
Protect the curtain shield airbag assembly.
Cover the airbag with a 700 mm (27.56 in.) x 120 mm (4.72 in.) cloth or piece of nylon and fix the ends of the cover with tape, as shown in the illustration.
| 48. REMOVE NO. 1 INSTRUMENT PANEL SPEAKER PANEL SUB-ASSEMBLY |
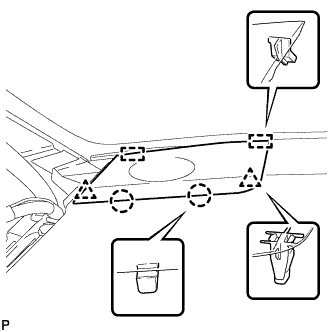 |
Disengage the 2 claws and 2 clips.
Disengage the 2 guides and remove the No. 1 instrument panel speaker panel sub-assembly.
| 49. REMOVE FRONT NO. 2 SPEAKER ASSEMBLY (for LH Side) |
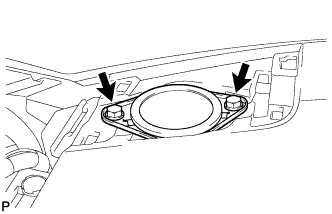 |
Remove the 2 bolts and front No. 2 speaker assembly.
Disconnect the connector.
| 50. REMOVE NO. 2 INSTRUMENT PANEL SPEAKER PANEL SUB-ASSEMBLY |
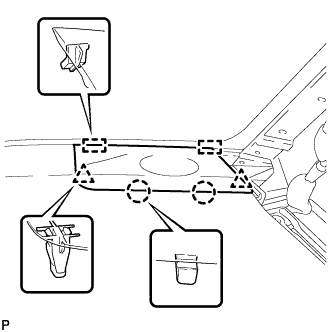 |
Disengage the 2 claws and 2 clips.
Disengage the 2 guides and remove the No. 2 instrument panel speaker panel sub-assembly.
| 51. REMOVE FRONT NO. 2 SPEAKER ASSEMBLY (for RH Side) |
|
Remove the 2 bolts and front No. 2 speaker assembly.
Disconnect the connector.
| 52. DISCONNECT INSTRUMENT PANEL WIRE ASSEMBLY |
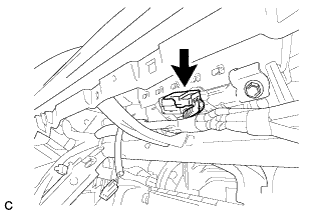 |
Disconnect the connector.
| 53. REMOVE INSTRUMENT PANEL SAFETY PAD ASSEMBLY |
Disconnect each connector.
Remove the 2 passenger airbag bolts <A>.
Disengage each clamp.
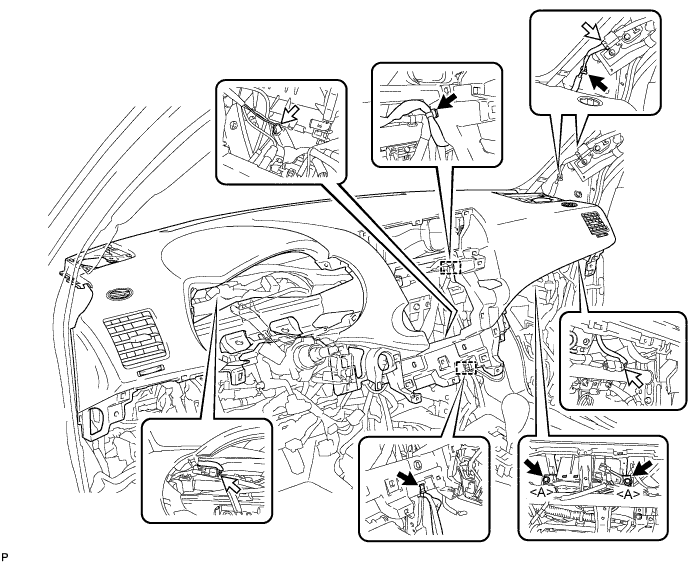
Remove the 2 clips.
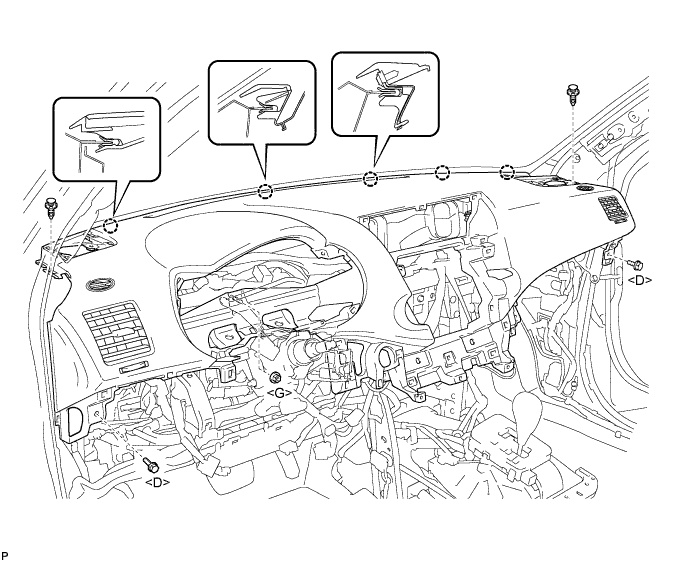
Remove the 2 bolts <D> and nut <G>.
Disengage the 5 claws and remove the instrument panel safety pad assembly.
| 54. REMOVE DRIVER SIDE KNEE AIRBAG ASSEMBLY |
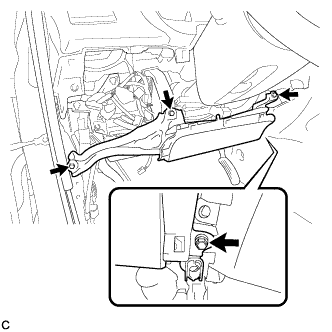 |
Remove the 4 bolts.
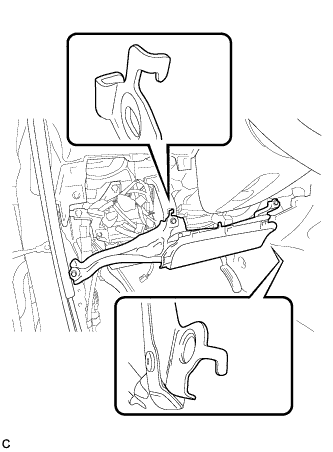 |
Disengage the 2 hooks.
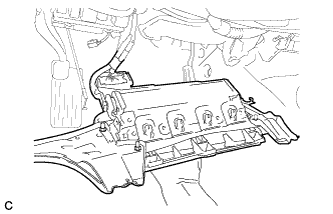 |
Pull out the driver side knee airbag assembly from the vehicle and support the driver side knee airbag assembly with one hand as shown in the illustration.
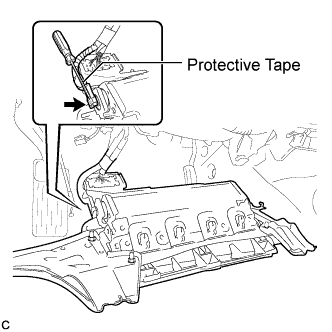 |
Using a screwdriver with the tip wrapped with protective tape, disconnect the driver side knee airbag connector.
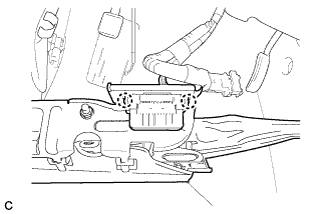 |
Disengage the 2 claws and separate the DLC3 from the driver side knee airbag assembly.
| 55. REMOVE BRAKE PEDAL RETURN SPRING |
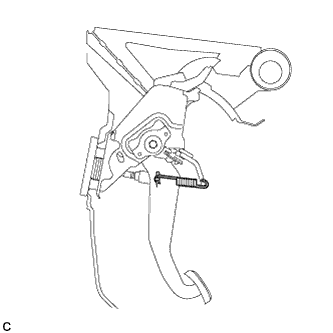 |
Remove the brake pedal return spring from the push rod pin and instrument panel reinforcement.
| 56. REMOVE STOP LIGHT SWITCH ASSEMBLY |
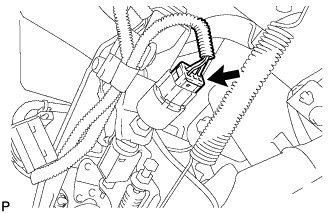 |
Disconnect the connector.
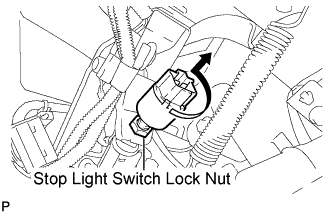 |
Loosen the stop light switch lock nut and remove the stop light switch assembly.
| 57. SEPARATE PUSH ROD PIN |
Remove the clip and push rod pin, and separate the brake master cylinder push rod clevis from the brake pedal sub-assembly.
| 58. REMOVE BRAKE PEDAL SUPPORT SUB-ASSEMBLY |
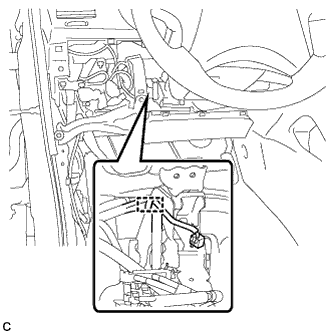 |
Disconnect the connector and disengage the clamp.
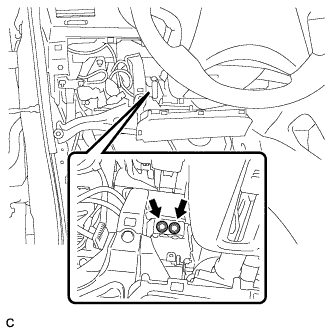 |
Remove the 2 bolts and separate the brake pedal support sub-assembly from the instrument panel reinforcement.
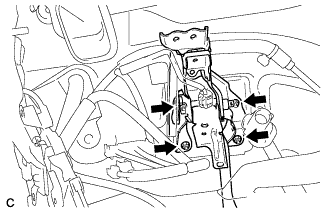 |
Remove the 4 nuts and brake pedal support sub-assembly from the body.
| 59. REMOVE NO. 1 AIR DUCT SUB-ASSEMBLY |
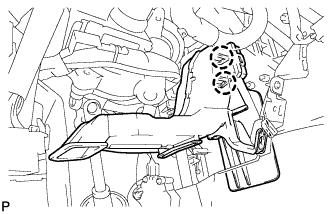 |
Disengage the 2 claws and remove the No. 1 air duct sub-assembly.
| 60. SEPARATE STEERING INTERMEDIATE SHAFT SUB-ASSEMBLY |
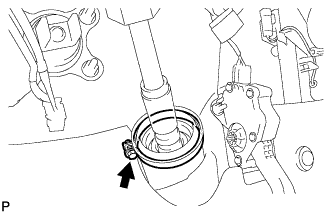 |
Loosen the bolt.
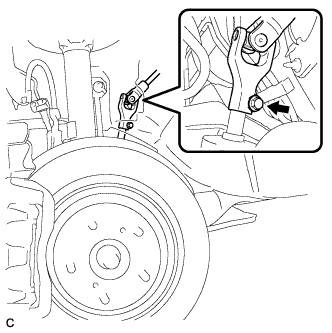 |
Remove the bolt and slide the steering intermediate shaft sub-assembly.
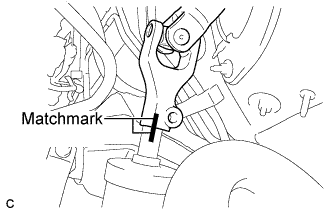 |
Put matchmarks on the steering intermediate shaft sub-assembly and the power steering link assembly.
Separate the steering intermediate shaft sub-assembly from the power steering link assembly.
| 61. REMOVE STEERING COLUMN ASSEMBLY |
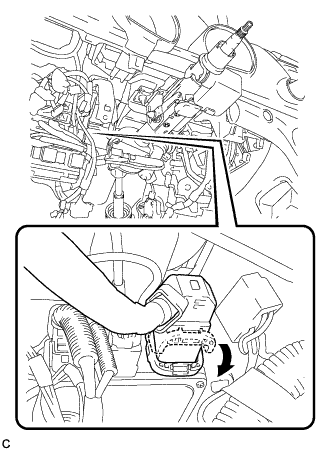 |
Disconnect the connector from the power steering ECU assembly.
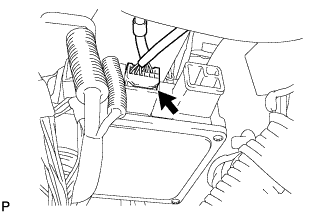 |
Disconnect the connector from the power steering ECU assembly.
Disconnect the connectors and disengage the wire harness clamps from the steering column assembly.
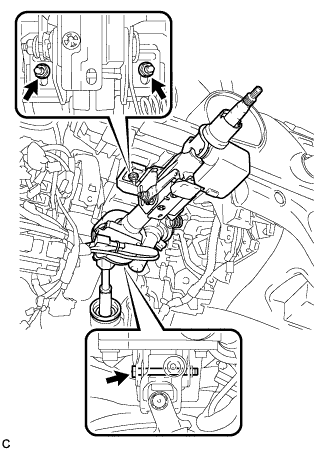 |
Remove the bolt, 2 nuts, and the steering column assembly.
| 62. DISCONNECT INSTRUMENT PANEL JUNCTION BLOCK ASSEMBLY |
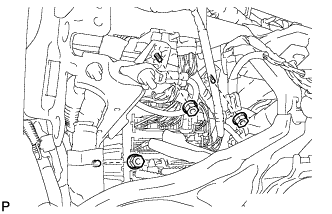 |
Remove the 3 nuts and disconnect the instrument panel junction block assembly.
| 63. REMOVE POWER STEERING ECU ASSEMBLY |
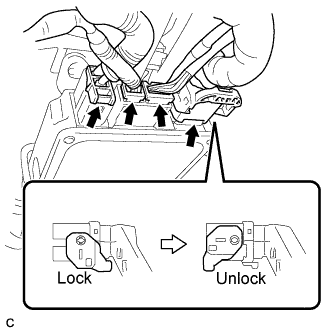 |
Disconnect the 4 connectors from the power steering ECU assembly.
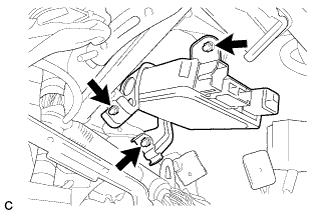 |
Remove the 3 nuts and the power steering ECU assembly.
| 64. REMOVE CERTIFICATION ECU (SMART KEY ECU ASSEMBLY) |
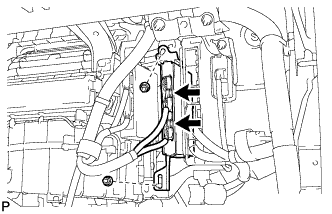 |
Disconnect the connectors.
Remove the 2 nuts and the certification ECU (smart key ECU assembly).
| 65. REMOVE AIR CONDITIONING AMPLIFIER ASSEMBLY |
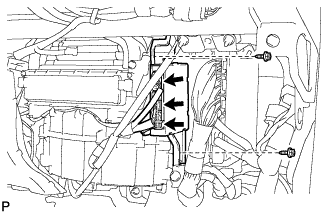 |
Disconnect each connector.
Remove the 2 screws and the air conditioning amplifier assembly.
| 66. REMOVE REAR NO. 1 AIR DUCT |
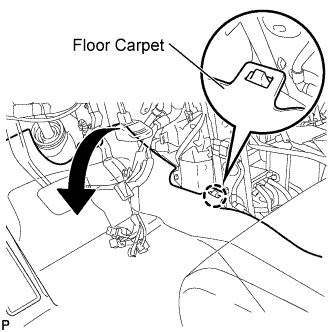 |
Disengage the claw.
Turn back the floor carpet as shown in the illustration.
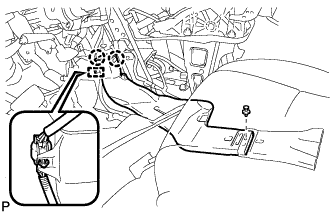 |
Remove the clip.
Disengage the clamp.
Disengage the 2 claws and remove the rear No. 1 air duct.
| 67. REMOVE REAR NO. 3 AIR DUCT |
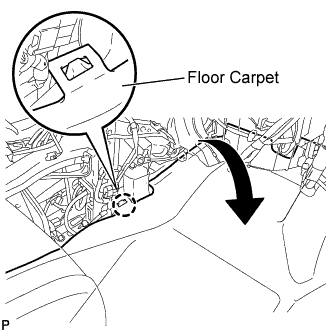 |
Disengage the claw.
Turn back the floor carpet as shown in the illustration.
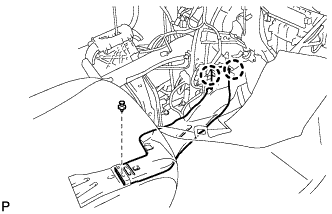 |
Remove the clip.
Disengage the 2 claws and remove the rear No. 3 air duct.
| 68. REMOVE NO. 1 CONSOLE BOX DUCT (w/o Rear Air Conditioning System) |
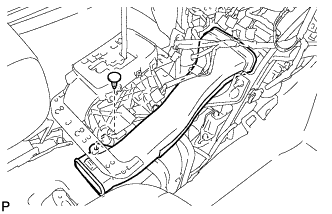 |
Remove the clip and the No. 1 console box duct.
| 69. REMOVE CENTER HEATER TO REGISTER DUCT |
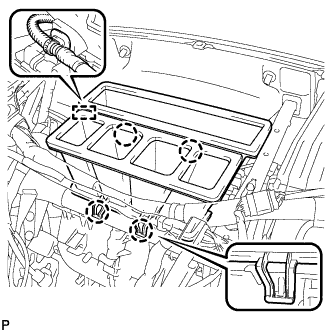 |
Disengage the clamp.
Disengage the 4 claws and remove the center heater to register duct.
| 70. REMOVE NO. 1 INSTRUMENT PANEL BRACE SUB-ASSEMBLY |
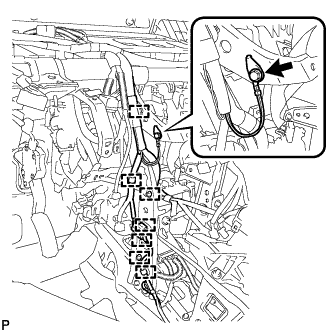 |
Remove the bolt and disconnect the earth wire.
Disengage each clamp.
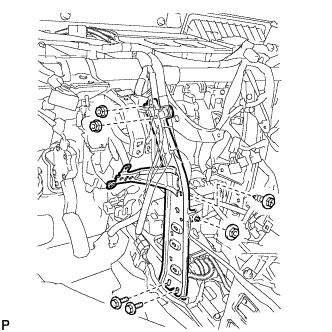 |
Remove the 2 bolts.
Remove the screw.
Remove the 3 nuts and the No. 1 instrument panel brace sub-assembly.
| 71. REMOVE NO. 2 INSTRUMENT PANEL BRACE SUB-ASSEMBLY |
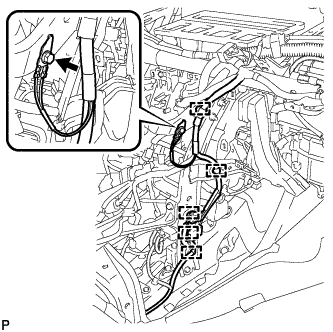 |
Remove the bolt and disconnect the earth wire.
Disengage each clamp.
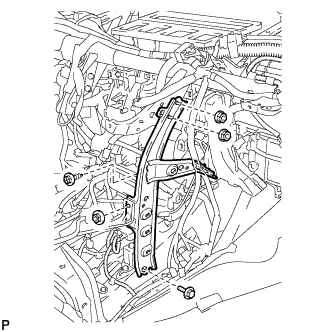 |
Remove the bolt.
Remove the screw.
Remove the 3 nuts and the No. 2 instrument panel brace sub-assembly.
| 72. REMOVE INSTRUMENT PANEL REINFORCEMENT ASSEMBLY WITH AIR CONDITIONING UNIT |
Disengage each clamp.
Remove the 2 bolts and disconnect the 2 earth wires.
Disconnect each connector.
Remove the 2 nuts and bolt.
Disconnect the blower motor connector.
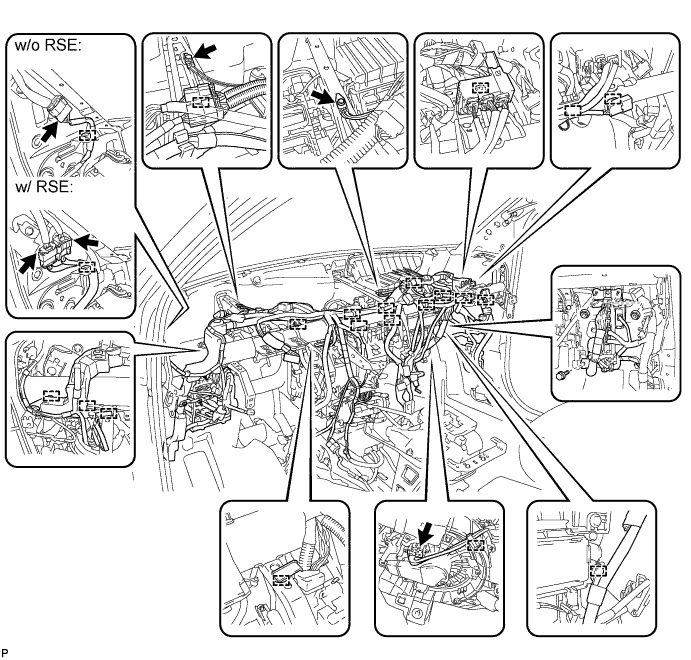
Remove the 2 caps and the 2 bolts from the engine compartment side.
Disconnect the cooler drain hose.
Remove the nut.
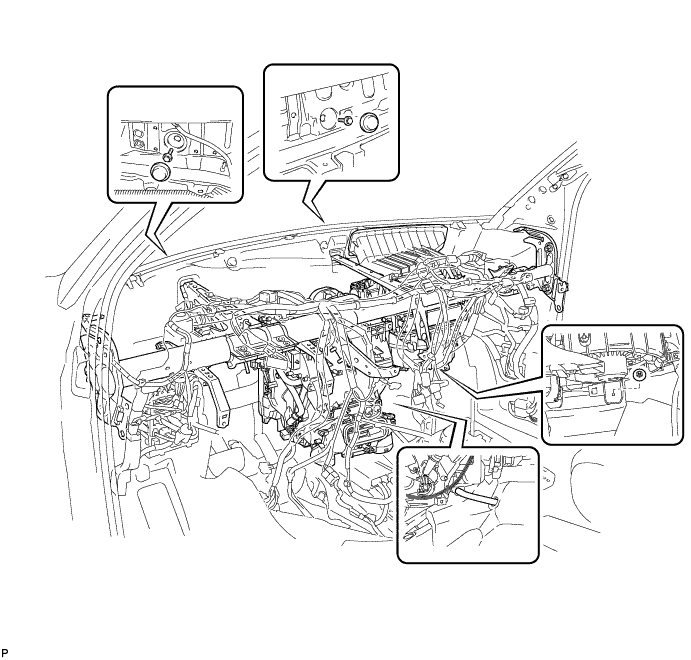
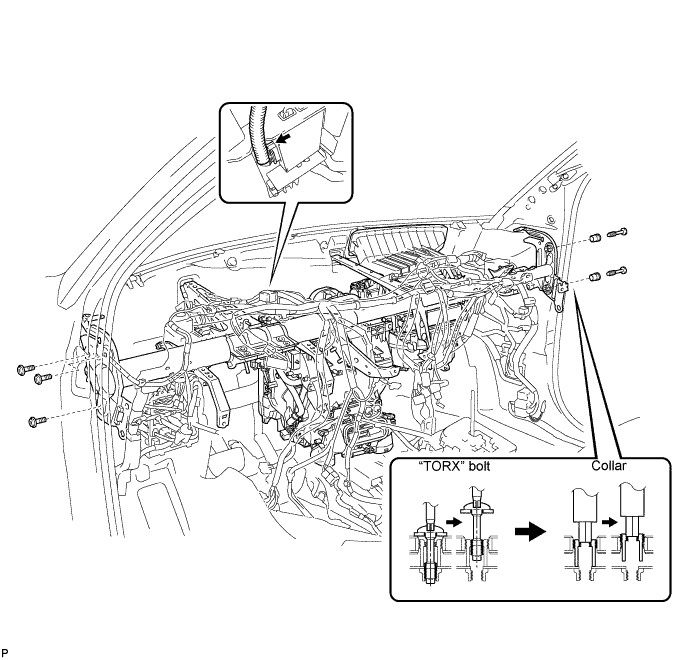
Using a "TORX" socket wrench (T40), remove the 5 "TORX" bolts.
Using a 12 mm hexagon wrench, remove the 2 collars and the instrument panel reinforcement assembly with air conditioning unit.
Disconnect the connector.
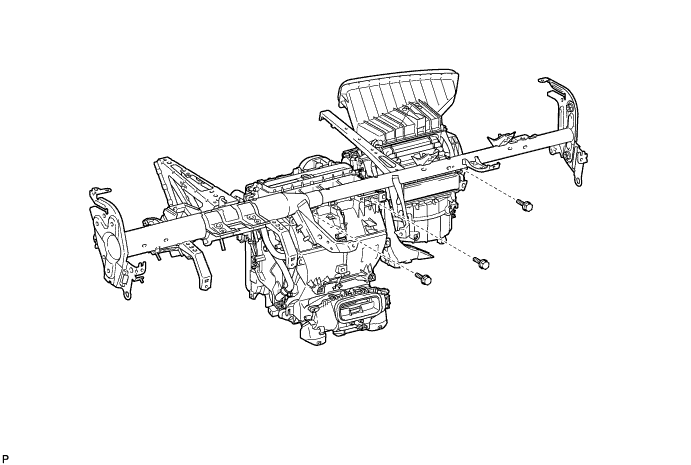
| 73. REMOVE AIR CONDITIONING UNIT |
Remove the 3 bolts and the air conditioning unit from the instrument panel reinforcement assembly.
| 74. REMOVE BLOWER ASSEMBLY |
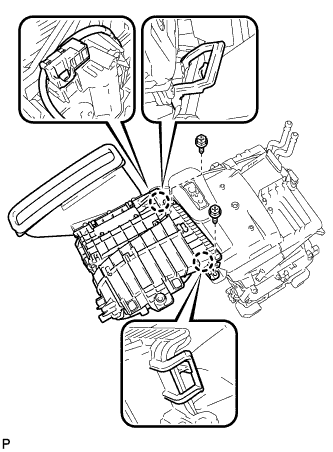 |
Disconnect the connector.
Remove the 2 screws.
Disengage the 2 claws and remove the blower assembly.
| 75. REMOVE FRONT AIR OUTLET CONTROL SERVO MOTOR SUB-ASSEMBLY |
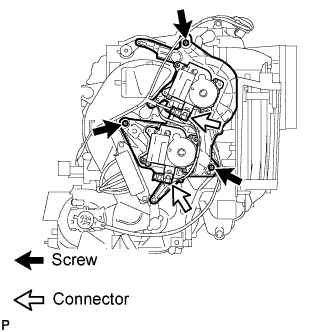 |
Disconnect the 2 connectors.
Remove the 3 screws and remove the front air outlet control servo motor sub-assembly.