Home › Engine / Hybrid System › 2GR-FE LUBRICATION › OIL PUMP › 2013.12–2014.08
RM3160E _51 Engine / Hybrid System _019668 2GR-FE LUBRICATION _0105664 OIL PUMP A

2GR-FE LUBRICATION  OIL PUMP  INSTALLATION  


PROCEDURE

Hide 11301C 1.INSTALL TIMING CHAIN CASE OIL SEAL
a.
A125109N09
1.063,1.281 0.448,1.49 0.448,1.49 1,1.427 false 0.135,1.417 0.438,1.594 0.302,0.177 10 false SST

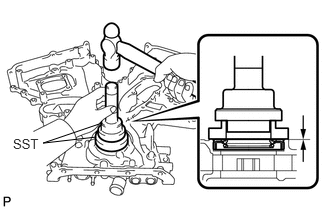
Using SST, tap in a new timing chain case oil seal until its surface is flush with the timing chain cover sub-assembly edge.

SST
09223-22010  09506-35010  

NOTICE:
·

Keep the lip free from foreign matter.

·

Do not tap in the timing chain case oil seal at an angle.

·

Make sure that the timing chain case oil seal edge does not stick out of the timing chain cover sub-assembly.


Hide 11302 2.INSTALL TIMING CHAIN COVER SUB-ASSEMBLY

a.

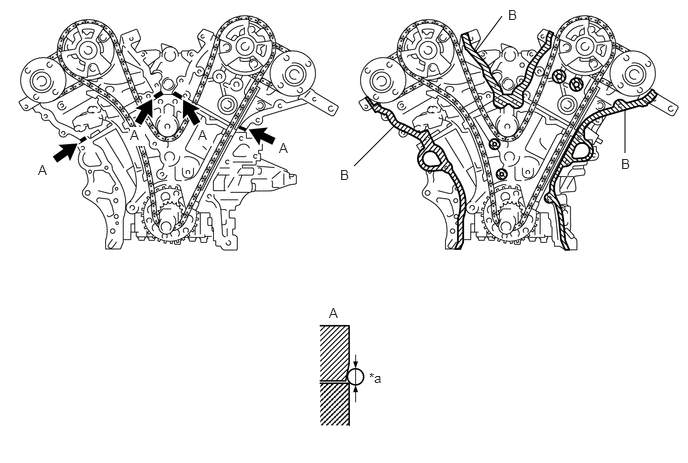
Apply seal packing in a continuous line to the engine unit as shown in the following illustration.
A314951C01
3.688,1.729 4.104,1.313 false 6.51,1.594 6.51,1.135 false 4.958,0.531 5.229,0.167 false 3.542,1.74 3.698,1.938 0.156,0.198 10 false B 0.396,1.688 0.552,1.885 0.156,0.198 10 false A 6.469,1.625 6.625,1.823 0.156,0.198 10 false B 5.292,0.073 5.448,0.271 0.156,0.198 10 false B 2.906,1.458 3.063,1.656 0.156,0.198 10 false A 2.063,1.323 2.219,1.521 0.156,0.198 10 true A 1.354,1.323 1.51,1.521 0.156,0.198 10 true A 3.427,3.177 3.583,3.375 0.156,0.198 10 false A 3.844,3.854 4,4.052 0.156,0.198 10 false *a
*a Seal Packing Diameter
V100135

Seal Packing


Seal Packing:

Toyota Genuine Seal Packing Black, Three Bond 1207B or equivalent


Seal Packing Diameter:

3.0 mm (0.118 in.) or more


NOTICE:
·

Be sure to clean the contact surfaces, especially the surfaces (B) shown in the illustration.

·

If there is oil on the contact surfaces, wipe them with an oil-free cloth before applying seal packing.

·

Install the timing chain cover sub-assembly within 3 minutes of applying seal packing.

·

Do not start the engine for at least 2 hours after installation.


b.

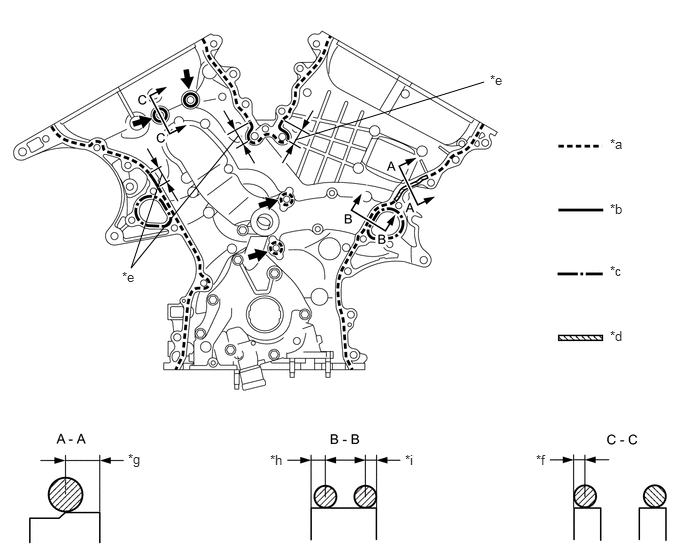
Apply seal packing in a continuous line to the timing chain cover sub-assembly as shown in the following illustration.
A187885C06
1.688,1.813 1.365,2.792 1.365,2.792 2.479,1.417 false 5.042,0.854 3.073,1.458 false 5.104,0.75 6.229,1.104 1.125,0.354 10 false *e 6.354,1.417 6.552,1.646 0.198,0.229 10 false *a 6.354,2.094 6.552,2.323 0.198,0.229 10 false *b 6.354,2.74 6.552,2.969 0.198,0.229 10 false *c 6.354,3.417 6.552,3.646 0.198,0.229 10 false *d 2.813,4.708 3.729,4.969 0.917,0.26 10 false *h 4.219,4.708 5.135,5.063 0.917,0.354 10 false *i 1.333,4.698 1.927,5.01 0.594,0.313 10 false *g 5.583,4.708 6.021,5.052 0.438,0.344 10 false *f 1.271,2.802 2.396,3.156 1.125,0.354 10 false *e
*a Dashed line area
(Seal packing: Toyota Genuine Seal Packing Black, Three Bond 1207B or equivalent)
*b Continuous line area
(Seal packing: Toyota Genuine Seal Packing Black, Three Bond 1207B or equivalent)
*c Alternate long and short dashed line area
(Seal packing: Toyota Genuine Seal Packing 1282B, Three Bond 1282B or equivalent)
*d Diagonal line area
(Seal packing: Toyota Genuine Seal Packing Black, Three Bond 1207B or equivalent)
V100135

Be sure to apply seal packing - -


Seal Packing:

Toyota Genuine Seal Packing Black, Three Bond 1207B or equivalent

Toyota Genuine Seal Packing 1282B, Three Bond 1282B or equivalent


NOTICE:
·

If there is oil on the contact surfaces, wipe them with an oil-free cloth before applying seal packing.

·

Install the timing chain cover sub-assembly within 3 minutes and tighten the bolts within 15 minutes of applying seal packing.

·

Do not start the engine for at least 2 hours after installation.


Seal Packing Application Chart:
Area Seal Packing Diameter Application Position from Inside Seal Line
Dashed Line Area 3.5 mm (0.138 in.) or more 3.0 to 4.0 mm (0.118 to 0.157 in.)
Continuous Line Area 4.5 mm (0.177 in.) or more 1.0 to 2.0 mm (0.0394 to 0.0787 in.)
Alternate Long and Short Dashed Line Area 3.5 mm (0.138 in.) or more 2.0 to 3.0 mm (0.0787 to 0.118 in.)
Diagonal Line Area 6.0 mm (0.236 in.) or more 5.0 mm (0.197 in.)


c.

Install a new gasket.


d.
A132229C06
2.417,1.635 2.958,1.708 false 0.75,1.625 1.281,1.688 false 1.333,1.604 1.5,1.76 0.167,0.156 10 false *a 2.99,1.635 3.146,1.792 0.156,0.156 10 false *1
*1 Crankshaft
*a Drive Rotor Spline


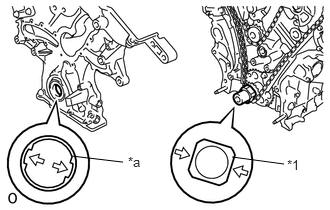
Align the drive rotor spline and the crankshaft as shown in the illustration. Install the drive rotor spline and timing chain cover sub-assembly to the crankshaft.


e.

Type X:

i.
A187948C04
1.781,0.656 1.896,0.813 0.115,0.156 10 false A 1.052,1.813 1.167,1.969 0.115,0.156 10 true B 0.083,1.677 0.219,1.833 0.135,0.156 10 false C 2.438,2.635 2.635,2.792 0.198,0.156 10 false *a 0.677,2.656 0.875,2.813 0.198,0.156 10 false *a 1.313,1.531 1.427,1.688 0.115,0.156 10 false B 2.302,2.281 2.417,2.438 0.115,0.156 10 false B 3.292,1.292 3.406,1.448 0.115,0.156 10 false B 2.76,1.813 2.875,1.969 0.115,0.156 10 false B 2.771,2.052 2.885,2.208 0.115,0.156 10 false B 2.115,1.49 2.229,1.646 0.115,0.156 10 true B 1.875,2.01 1.99,2.167 0.115,0.156 10 true B 1.271,2.208 1.385,2.365 0.115,0.156 10 true B 0.792,2.302 0.906,2.458 0.115,0.156 10 true B 0.531,1.969 0.646,2.125 0.115,0.156 10 false B 1.26,1.875 1.375,2.031 0.115,0.156 10 true B 2.896,1.667 3.031,1.823 0.135,0.156 10 false C 1.969,0.438 2.104,0.594 0.135,0.156 10 false C 1.583,0.885 1.719,1.042 0.135,0.156 10 false C 1.25,1.354 1.385,1.51 0.135,0.156 10 false C 1.208,1.198 1.344,1.354 0.135,0.156 10 false C 1.073,0.969 1.208,1.125 0.135,0.156 10 false C 0.74,2.469 0.875,2.625 0.135,0.156 10 false C 0.396,1.896 0.531,2.052 0.135,0.156 10 false C 0.292,1.76 0.427,1.917 0.135,0.156 10 false C
*a Nut


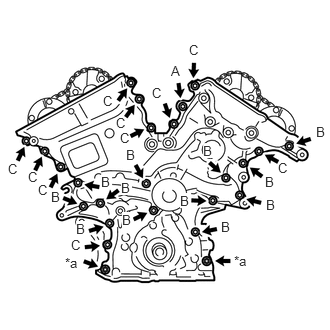
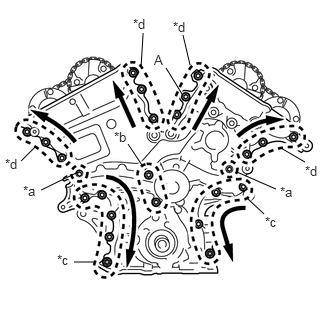
Temporarily tighten the timing chain cover sub-assembly with the 23 bolts and 2 nuts.

Bolt Length:
Item Length
Bolt (A) 40 mm (1.57 in.)
Bolt (B) 55 mm (2.17 in.)
Bolt (C) 25 mm (0.984 in.)


NOTICE:

Make sure that there is no oil on the threads of the bolts (B) and (C).


f.

Type Y:

i.
A187948C04
1.781,0.656 1.896,0.813 0.115,0.156 10 false A 1.052,1.813 1.167,1.969 0.115,0.156 10 true B 0.083,1.677 0.219,1.833 0.135,0.156 10 false C 2.438,2.635 2.635,2.792 0.198,0.156 10 false *a 0.677,2.656 0.875,2.813 0.198,0.156 10 false *a 1.313,1.531 1.427,1.688 0.115,0.156 10 false B 2.302,2.281 2.417,2.438 0.115,0.156 10 false B 3.292,1.292 3.406,1.448 0.115,0.156 10 false B 2.76,1.813 2.875,1.969 0.115,0.156 10 false B 2.771,2.052 2.885,2.208 0.115,0.156 10 false B 2.115,1.49 2.229,1.646 0.115,0.156 10 true B 1.875,2.01 1.99,2.167 0.115,0.156 10 true B 1.271,2.208 1.385,2.365 0.115,0.156 10 true B 0.792,2.302 0.906,2.458 0.115,0.156 10 true B 0.531,1.969 0.646,2.125 0.115,0.156 10 false B 1.26,1.875 1.375,2.031 0.115,0.156 10 true B 2.896,1.667 3.031,1.823 0.135,0.156 10 false C 1.969,0.438 2.104,0.594 0.135,0.156 10 false C 1.583,0.885 1.719,1.042 0.135,0.156 10 false C 1.25,1.354 1.385,1.51 0.135,0.156 10 false C 1.208,1.198 1.344,1.354 0.135,0.156 10 false C 1.073,0.969 1.208,1.125 0.135,0.156 10 false C 0.74,2.469 0.875,2.625 0.135,0.156 10 false C 0.396,1.896 0.531,2.052 0.135,0.156 10 false C 0.292,1.76 0.427,1.917 0.135,0.156 10 false C
*a Nut


Temporarily tighten the timing chain cover sub-assembly with the 23 bolts and 2 nuts.

Bolt Length:
Item Length
Bolt (A) 40 mm (1.57 in.)
Bolt (B) 55 mm (2.17 in.)
Bolt (C) 28 mm (1.102 in.)


NOTICE:

Make sure that there is no oil on the threads of the bolts (B) and (C).


g.
A187949C06
0.219,1.677 0.365,1.531 false 0.427,1.979 0.813,1.792 false 0.771,2.729 0.979,2.729 false 1.49,0.344 1.469,0.698 false 1.906,0.365 1.979,0.677 false 3.177,1.688 2.927,1.542 false 2.875,1.969 2.469,1.792 false 2.75,2.229 2.573,2.063 false 1.333,1.5 1.479,1.719 false 1.729,0.708 1.896,0.979 false 0.24,1.906 0.417,2.094 0.177,0.188 10 false *a 1.188,1.344 1.365,1.531 0.177,0.188 10 false *b 0.594,2.625 0.771,2.802 0.177,0.177 10 false *c 0.052,1.625 0.229,1.802 0.177,0.177 10 false *d 2.917,1.917 3.094,2.104 0.177,0.188 10 false *a 2.76,2.229 2.938,2.406 0.177,0.177 10 false *c 3.177,1.698 3.354,1.875 0.177,0.177 10 false *d 1.802,0.198 1.979,0.375 0.177,0.177 10 false *d 1.385,0.167 1.563,0.344 0.177,0.177 10 false *d 1.604,0.542 1.719,0.708 0.115,0.167 10 false A
*a Area 1
*b Area 2
*c Area 3
*d Area 4


Fully tighten the bolts in this order: Area 1 and Area 2.

Torque:
21 N*m (214 kgf*cm, 15 ft.*lbf)


h.

Fully tighten the bolts and nuts in Area 3.

Torque:
21 N*m (214 kgf*cm, 15 ft.*lbf)

HINT:

Tighten the bolts and nuts from top to bottom as shown in the illustration.


i.

Fully tighten the bolts in Area 4.

Torque:
Bolt (A) : 43 N*m (438 kgf*cm, 32 ft.*lbf)

Torque:
except Bolt (A) : 21 N*m (214 kgf*cm, 15 ft.*lbf)

HINT:

Tighten the bolts from bottom to top as shown in the illustration.


Hide 12101 3.INSTALL OIL PAN SUB-ASSEMBLY