2GR-FE ENGINE MECHANICAL CAMSHAFT INSTALLATION
CAUTION / NOTICE / HINT
- HINT:
-
Perform "Inspection After Repair" after replacing the camshaft, No. 2 camshaft, No. 3 camshaft, No. 4 camshaft, camshaft timing gear assembly or camshaft timing exhaust gear assembly.
-
Click hereEngine / Hybrid System>2GR-FE ENGINE CONTROL>SFI SYSTEM>INITIALIZATION
PROCEDURE

 13053
1.INSTALL NO. 3 CAMSHAFT
Apply a light coat of engine oil to the No. 3 camshaft journals and camshaft housing sub-assembly LH.
Install the No. 3 camshaft to the camshaft housing sub-assembly LH.
- HINT:
-
Perform "Inspection After Repair" after replacing the No. 3 camshaft.
-
Click hereEngine / Hybrid System>2GR-FE ENGINE CONTROL>SFI SYSTEM>INITIALIZATION
13054
2.INSTALL NO. 4 CAMSHAFT
Apply a light coat of engine oil to the No. 4 camshaft journals and camshaft housing sub-assembly LH.
Install the No. 4 camshaft to the camshaft housing sub-assembly LH.
- HINT:
-
Perform "Inspection After Repair" after replacing the No. 4 camshaft.
-
Click hereEngine / Hybrid System>2GR-FE ENGINE CONTROL>SFI SYSTEM>INITIALIZATION
3.INSTALL CAMSHAFT BEARING CAP (for Bank 2)
Apply engine oil to the 5 camshaft bearing caps.
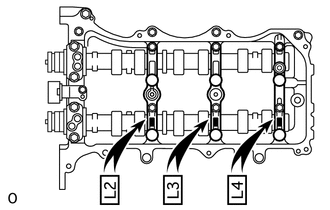
Confirm the marks and numbers on the camshaft bearing caps and place them in each proper position and direction.
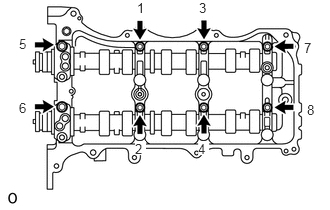
Temporarily tighten the 8 bolts in the order shown in the illustration.
- Torque:
- 10 N*m (102 kgf*cm, 7 ft.*lbf)
11104A
4.INSTALL CAMSHAFT HOUSING SUB-ASSEMBLY LH
- HINT:
-
Type A and Type B can be distinguished by the shape of the compression spring.
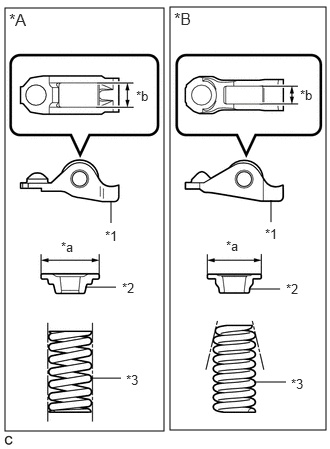
| *A | Type A |
| *B | Type B |
| *1 | No. 1 Valve Rocker Arm Sub-assembly |
| *2 | Valve Spring Retainer |
| *3 | Inner Compression Spring |
| *a | Valve Spring Retainer Diameter |
| *b | No. 1 Valve Rocker Arm Sub-assembly Roller Width |
| Type | No. 1 Valve Rocker Arm Sub-assembly Roller Width | Valve Spring Retainer Diameter | Inner Compression Spring Shape |
|---|---|---|---|
| A | 10.7 mm (0.421 in.) | 23.4 mm (0.921 in.) | Straight |
| B | 8.0 mm (0.315 in.) | 18.9 mm (0.744 in.) | Taper |
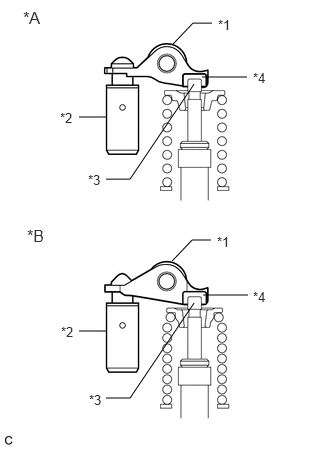
| *A | Type A |
| *B | Type B |
| *1 | No. 1 Valve Rocker Arm Sub-assembly |
| *2 | Valve Lash Adjuster Assembly |
| *3 | Valve Stem |
| *4 | Valve Stem Cap |
Make sure that the No. 1 valve rocker arm sub-assemblies are installed as shown in the illustration.
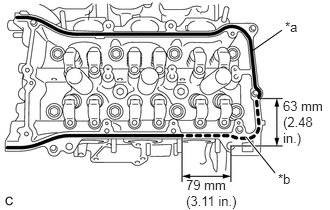
| *a | Continuous Line Area (Seal Packing) |
| *b | Dashed line area (Seal Packing) |
Apply seal packing in a continuous line as shown in the illustration.
- Seal Packing:
Toyota Genuine Seal Packing Black, Three Bond 1207B or equivalent
| Area | Seal Packing Diameter |
|---|---|
| Continuous Line Area | 2.7 to 4.5 mm (0.107 to 0.177 in.) |
| Dashed Line Area | 3.5 to 4.5 mm (0.138 to 0.177 in.) |
- NOTICE:
- ·
Remove any oil from the contact surface.
·Install the camshaft housing sub-assembly LH and tighten the bolts within 3 minutes.
·Do not start the engine for at least 2 hours after installation.
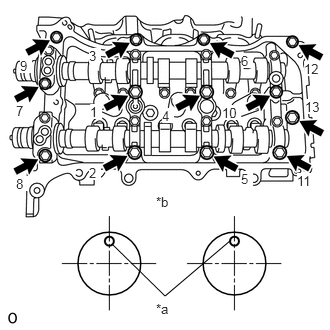
| *a | Knock Pin |
| *b | Front View |
Install the camshaft housing sub-assembly LH and tighten the 13 bolts in the order shown in the illustration.
- Torque:
- 28 N*m (286 kgf*cm, 21 ft.*lbf)
- NOTICE:
- ·
When installing the camshaft housing sub-assembly LH, correctly position the camshafts as shown in the illustration. Failure to do so may result in damage due to contact between the pistons and valves. If a camshaft is rotated, valve contact with a piston at TDC may occur.
·If any of the bolts are loosened during installation, remove the camshaft housing sub-assembly LH, clean the installation surfaces, and reapply seal packing.
·If the camshaft housing sub-assembly LH is removed because any of the bolts are loosened during installation, make sure that the previously applied seal packing does not enter any oil passages.
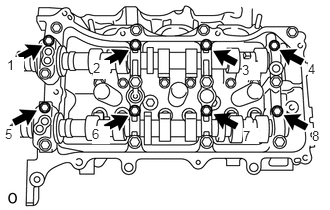
Tighten the 8 bolts in the order shown in the illustration.
- Torque:
- 16 N*m (163 kgf*cm, 12 ft.*lbf)
13511
5.INSTALL CAMSHAFT
Apply a light coat of engine oil to the camshaft journals and camshaft housing sub-assembly RH.
Install the camshaft to the camshaft housing sub-assembly RH.
- HINT:
-
Perform "Inspection After Repair" after replacing the camshaft.
-
Click hereEngine / Hybrid System>2GR-FE ENGINE CONTROL>SFI SYSTEM>INITIALIZATION
13512
6.INSTALL NO. 2 CAMSHAFT
Apply a light coat of engine oil to the No. 2 camshaft journals and camshaft housing sub-assembly RH.
Install the No. 2 camshaft to the camshaft housing sub-assembly RH.
- HINT:
-
Perform "Inspection After Repair" after replacing the No. 2 camshaft.
-
Click hereEngine / Hybrid System>2GR-FE ENGINE CONTROL>SFI SYSTEM>INITIALIZATION
7.INSTALL CAMSHAFT BEARING CAP (for Bank 1)
Apply engine oil to the camshaft bearing caps.
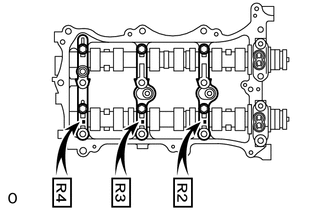
Confirm the marks and numbers on the camshaft bearing caps and place them in their proper positions and directions.
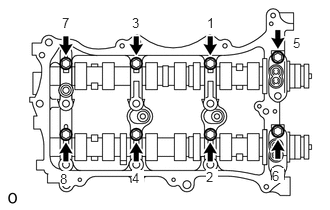
Temporarily tighten the 8 bolts in the order shown in the illustration.
- Torque:
- 10 N*m (102 kgf*cm, 7 ft.*lbf)
11103C
8.INSTALL CAMSHAFT HOUSING SUB-ASSEMBLY RH
- HINT:
-
Type A and Type B can be distinguished by the shape of the compression spring.
| *A | Type A |
| *B | Type B |
| *1 | No. 1 Valve Rocker Arm Sub-assembly |
| *2 | Valve Spring Retainer |
| *3 | Inner Compression Spring |
| *a | Valve Spring Retainer Diameter |
| *b | No. 1 Valve Rocker Arm Sub-assembly Roller Width |
| Type | No. 1 Valve Rocker Arm Sub-assembly Roller Width | Valve Spring Retainer Diameter | Inner Compression Spring Shape |
|---|---|---|---|
| A | 10.7 mm (0.421 in.) | 23.4 mm (0.921 in.) | Straight |
| B | 8.0 mm (0.315 in.) | 18.9 mm (0.744 in.) | Taper |
| *A | Type A |
| *B | Type B |
| *1 | No. 1 Valve Rocker Arm Sub-assembly |
| *2 | Valve Lash Adjuster Assembly |
| *3 | Valve Stem |
| *4 | Valve Stem Cap |
Make sure that the No. 1 valve rocker arm sub-assemblies are installed as shown in the illustration.
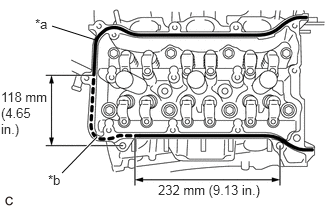
| *a | Continuous Line Area (Seal Packing) |
| *b | Dashed line area (Seal Packing) |
Apply seal packing in a continuous line as shown in the illustration.
- Seal Packing:
Toyota Genuine Seal Packing Black, Three Bond 1207B or equivalent
| Area | Seal Packing Diameter |
|---|---|
| Continuous Line Area | 2.7 to 4.5 mm (0.107 to 0.177 in.) |
| Dashed Line Area | 3.5 to 4.5 mm (0.138 to 0.177 in.) |
- NOTICE:
- ·
Remove any oil from the contact surface.
·Install the camshaft housing sub-assembly RH and tighten the bolts within 3 minutes.
·Do not start the engine for at least 2 hours after installation.
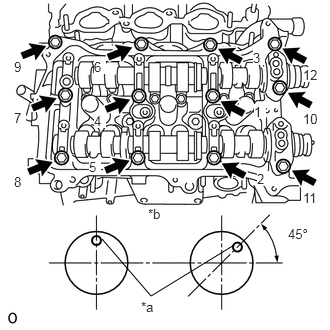
| *a | Knock Pin |
| *b | Front View |
Install the camshaft housing sub-assembly RH and tighten the 12 bolts in the order shown in the illustration.
- Torque:
- 28 N*m (286 kgf*cm, 21 ft.*lbf)
- NOTICE:
- ·
When installing the camshaft housing sub-assembly RH, correctly position the camshafts as shown in the illustration.
Failure to do so may result in damage due to contact between the pistons and valves. If a camshaft is rotated, valve contact with a piston at TDC may occur.
·If any of the bolts are loosened during installation, remove the camshaft housing sub-assembly RH, clean the installation surfaces, and reapply seal packing.
·If the camshaft housing sub-assembly RH is removed because any of the bolts are loosened during installation, make sure that the previously applied seal packing does not enter any oil passages.
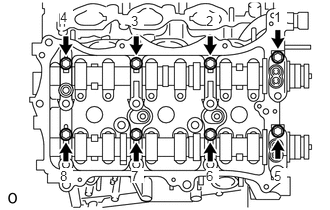
Tighten the 8 bolts in the order shown in the illustration.
- Torque:
- 16 N*m (163 kgf*cm, 12 ft.*lbf)
13560A
9.INSTALL NO. 3 CHAIN TENSIONER ASSEMBLY
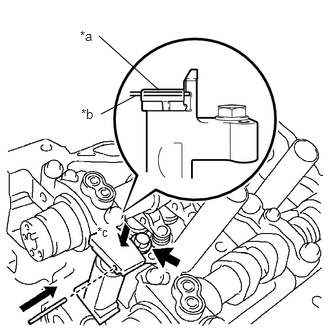
| *a | Plunger |
| *b | Pin |
| *c | Push |
Install the No. 3 chain tensioner assembly with the bolt.
- Torque:
- 21 N*m (214 kgf*cm, 15 ft.*lbf)
While pushing down the No. 3 chain tensioner assembly, insert a 1.0 mm (0.0394 in.) diameter pin into the hole to secure it.
13080
10.INSTALL CAMSHAFT TIMING GEAR ASSEMBLY, CAMSHAFT TIMING EXHAUST GEAR ASSEMBLY AND NO. 2 CHAIN SUB-ASSEMBLY (for Bank 2)
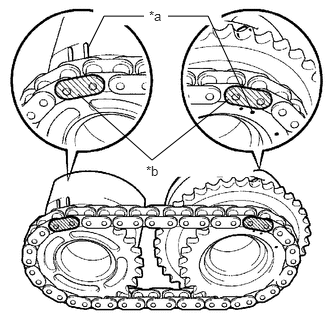
| *a | Timing Mark |
| *b | Mark Plate |
Align the mark plates (yellow) with the timing marks of the camshaft timing gear assembly as shown in the illustration.
Apply a light coat of engine oil to the bolt threads and bolt-seating surface.
Align the knock pin of the No. 3 camshaft and No. 4 camshaft with the pin hole of the camshaft timing gear assembly and camshaft timing exhaust gear assembly. Install the camshaft timing gear assembly and camshaft timing exhaust gear assembly with the No. 2 chain sub-assembly installed.
Using SST to hold the hexagonal portion of each camshaft, tighten the bolts of the camshaft timing gear assembly and the camshaft timing exhaust gear assembly.
- SST
- 09922-10010
- Torque:
- 100 N*m (1020 kgf*cm, 74 ft.*lbf)
Remove the pin from the No. 3 chain tensioner assembly.
- HINT:
-
Perform "Inspection After Repair" after replacing the camshaft timing gear assembly or camshaft timing exhaust gear assembly.
-
Click hereEngine / Hybrid System>2GR-FE ENGINE CONTROL>SFI SYSTEM>INITIALIZATION
13550
11.INSTALL NO. 2 CHAIN TENSIONER ASSEMBLY
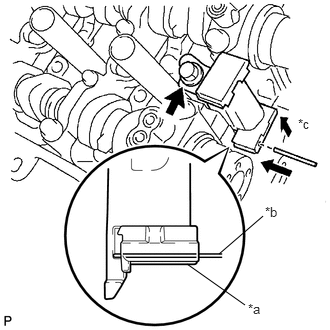
| *a | Plunger |
| *b | Pin |
| *c | Push |
Install the No. 2 chain tensioner assembly with the bolt.
- Torque:
- 21 N*m (214 kgf*cm, 15 ft.*lbf)
While pushing up the No. 2 chain tensioner assembly, insert a 1.0 mm (0.0394 in.) diameter pin into the hole to secure it.
13050
12.INSTALL CAMSHAFT TIMING GEAR ASSEMBLY, CAMSHAFT TIMING EXHAUST GEAR ASSEMBLY AND NO. 2 CHAIN SUB-ASSEMBLY (for Bank 1)
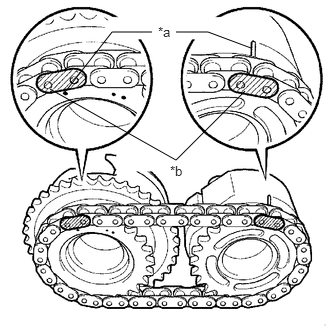
| *a | Timing Mark |
| *b | Mark Plate |
Align the mark plates (yellow) with the timing marks of the camshaft timing gear assembly as shown in the illustration.
Apply a light coat of engine oil to the bolt threads and bolt-seating surface.
Align the knock pin of the camshaft and No. 2 camshaft with the pin hole of the camshaft timing gear assembly and camshaft timing exhaust gear assembly. Install the camshaft timing gear assembly and camshaft timing exhaust gear assembly with the No. 2 chain sub-assembly installed.
Using SST to hold the hexagonal portion of each camshaft, tighten the bolts of the camshaft timing gear assembly and the camshaft timing exhaust gear assembly.
- SST
- 09922-10010
- Torque:
- 100 N*m (1020 kgf*cm, 74 ft.*lbf)
Remove the pin from the No. 2 chain tensioner assembly.
- HINT:
-
Perform "Inspection After Repair" after replacing the camshaft timing gear assembly or camshaft timing exhaust gear assembly.
-
Click hereEngine / Hybrid System>2GR-FE ENGINE CONTROL>SFI SYSTEM>INITIALIZATION
13530
13.INSTALL IDLE SPROCKET ASSEMBLY
13506
14.INSTALL CHAIN SUB-ASSEMBLY
13559
15.INSTALL CHAIN TENSIONER SLIPPER
13540
16.INSTALL NO. 1 CHAIN TENSIONER ASSEMBLY
17.INSPECT VALVE TIMING
11301C
18.INSTALL TIMING CHAIN CASE OIL SEAL
11302
19.INSTALL TIMING CHAIN COVER SUB-ASSEMBLY
12101
20.INSTALL OIL PAN SUB-ASSEMBLY
Install 2 new O-rings.
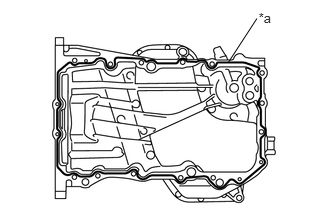
| *a | Seal Packing |
Apply seal packing in a continuous line as shown in the illustration.
- Seal Packing:
Toyota Genuine Seal Packing Black, Three Bond 1207B or equivalent
- Seal Packing Diameter:
2.5 to 3.5 mm (0.0985 to 0.1377 in.)
- NOTICE:
- ·
Remove any oil from the contact surfaces.
·Install the oil pan sub-assembly within 3 minutes of applying seal packing.
·Do not start the engine for at least 2 hours after installation.
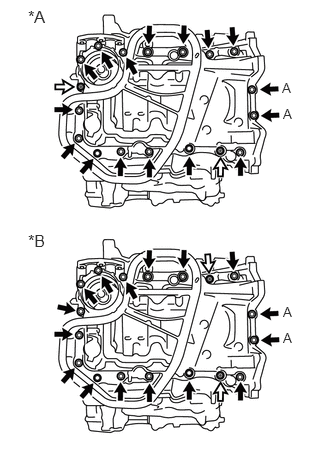
| *A | Type A |
| *B | Type B |

|
Bolt |

|
Nut |
Install the oil pan sub-assembly with the 16 bolts and 2 nuts.
- Torque:
- Bolt (A) : 10 N*m (102 kgf*cm, 7 ft.*lbf)
- Except Bolt (A) : 21 N*m (214 kgf*cm, 15 ft.*lbf)
15104
21.INSTALL OIL STRAINER SUB-ASSEMBLY
12102A
22.INSTALL NO. 2 OIL PAN SUB-ASSEMBLY
11201
23.INSTALL CYLINDER HEAD COVER SUB-ASSEMBLY
11202
24.INSTALL CYLINDER HEAD COVER SUB-ASSEMBLY LH
16323
25.INSTALL WATER INLET HOUSING
12315
26.INSTALL NO. 1 FRONT ENGINE MOUNTING BRACKET LH
15781
27.INSTALL NO. 1 OIL COOLER BRACKET
15710
28.INSTALL OIL COOLER ASSEMBLY
13471
29.INSTALL CRANKSHAFT PULLEY
15771
30.INSTALL NO. 1 OIL PIPE
15771M
31.INSTALL OIL PIPE
11401G
32.INSTALL CRANKSHAFT POSITION SENSOR
25860A
33.INSTALL NO. 1 VACUUM SWITCHING VALVE
16173
34.INSTALL WATER PUMP PULLEY
16604
35.INSTALL NO. 2 IDLER PULLEY SUB-ASSEMBLY
11322F
36.INSTALL NO. 2 TIMING GEAR COVER
11452
37.INSTALL ENGINE OIL LEVEL DIPSTICK GUIDE
16620
38.INSTALL V-RIBBED BELT TENSIONER ASSEMBLY
27020
39.INSTALL GENERATOR ASSEMBLY
12315A
40.INSTALL ENGINE MOUNTING BRACKET RH
17105
41.INSTALL EXHAUST MANIFOLD SUB-ASSEMBLY LH (TWC: Front Catalyst)
17168
42.INSTALL NO. 2 EXHAUST MANIFOLD HEAT INSULATOR
17119
43.INSTALL NO. 2 MANIFOLD STAY
12142
44.INSTALL NO. 2 ENGINE OIL LEVEL DIPSTICK GUIDE
17104
45.INSTALL EXHAUST MANIFOLD SUB-ASSEMBLY RH (TWC: Front Catalyst)
17111
46.INSTALL INTAKE MANIFOLD
19500
47.INSTALL IGNITION COIL ASSEMBLY
48.INSTALL ENGINE HANGERS
49.REMOVE ENGINE FROM ENGINE STAND