DOOR / HATCH POWER BACK DOOR SYSTEM Jam Protection Function Activates During Power Back Door Operation
DESCRIPTION
If the jam protection function activates during back door operation, one of the following may be the cause: 1) improper fit of the back door or a foreign object stuck in the back door, 2) malfunction in the power back door sensor assembly circuit or 3) multiplex network door ECU malfunction.
WIRING DIAGRAM
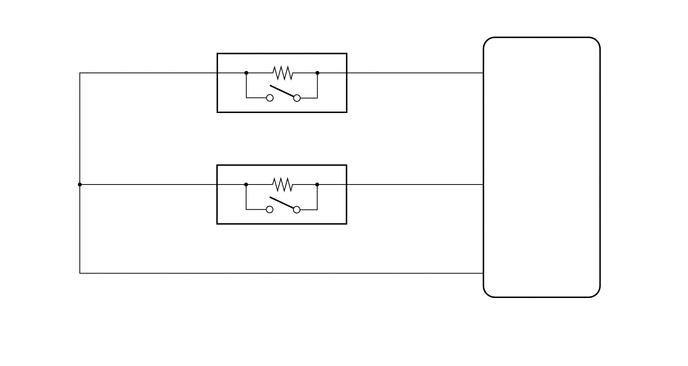
PROCEDURE
Check if there are any foreign objects interfering with back door operation.
- Result:
Result Proceed to There are no foreign objects A There are foreign objects B
A
B
Check back door operation.
Turn the door control switch on.
Open/close the back door by hand.
- Result:
Result Proceed to The back door fully opens and closes smoothly A The back door does not fully open or close smoothly B
A
B
Connect the GTS to the DLC3.
Turn the engine switch on (IG).
Turn the GTS on.
Enter the following menus: Body Electrical / Back Door / Data List.
Read the Data List according to the display on the GTS.
- Body Electrical > Back Door > Data List
-
Tester Display Measurement Item Range Normal Condition Diagnostic Note PBD Touch Sensor (Right) Power back door sensor assembly RH signal ON, OFF or Open ON: Power back door sensor assembly RH pressed
OFF: Power back door sensor assembly RH not pressed
Open: Power back door sensor assembly RH circuit open- PBD Touch Sensor (Left) Power back door sensor assembly LH signal ON, OFF or Open ON: Power back door sensor assembly LH pressed
OFF: Power back door sensor assembly LH not pressed
Open: Power back door sensor assembly LH circuit open-
- Body Electrical > Back Door > Data List
-
Tester Display PBD Touch Sensor (Right) PBD Touch Sensor (Left) - 50003 159 5,6
- Result:
Result Proceed to On the GTS screen, ON or OFF is displayed accordingly A On the GTS screen, ON or OFF is not displayed accordingly or Open is displayed for the power back door sensor assembly RH B On the GTS screen, ON or OFF is not displayed accordingly or Open is displayed for the power back door sensor assembly LH C
A
B
C
Remove the power back door sensor assembly RH.
Click hereVehicle Exterior>DOOR / HATCH>POWER BACK DOOR TOUCH SENSOR>REMOVAL
Inspect the power back door sensor assembly RH.
Click hereVehicle Exterior>DOOR / HATCH>POWER BACK DOOR TOUCH SENSOR>INSPECTION
- Result:
Proceed to OK NG
OK
NG
Disconnect the X24 power back door sensor assembly RH connector.
Disconnect the X6 multiplex network door ECU connector.
Measure the resistance according to the value(s) in the table below.
- Standard Resistance:
Tester Connection Condition Specified Condition X24-1 (OSR) - X6-16 (OSR) Always Below 1 Ω X24-2 (OSRE) - X6-17 (OSE) Always Below 1 Ω X24-1 (OSR) or X6-16 (OSR) - Body ground Always 10 kΩ or higher X24-2 (OSRE) or X6-17 (OSE) - Body ground Always 10 kΩ or higher
- Result:
Proceed to OK NG
OK
NG
Remove the power back door sensor assembly LH.
Click hereVehicle Exterior>DOOR / HATCH>POWER BACK DOOR TOUCH SENSOR>REMOVAL
Inspect the power back door sensor assembly LH.
Click hereVehicle Exterior>DOOR / HATCH>POWER BACK DOOR TOUCH SENSOR>INSPECTION
- Result:
Proceed to OK NG
OK
NG
Disconnect the X2 power back door sensor assembly LH connector.
Disconnect the X6 multiplex network door ECU connector.
Measure the resistance according to the value(s) in the table below.
- Standard Resistance:
Tester Connection Condition Specified Condition X2-1 (OSL) - X6-18 (OSL) Always Below 1 Ω X2-2 (OSLE) - X6-17 (OSE) Always Below 1 Ω X2-1 (OSL) or X6-18 (OSL) - Body ground Always 10 kΩ or higher X2-2 (OSLE) or X6-17 (OSE) - Body ground Always 10 kΩ or higher
- Result:
Proceed to OK NG
OK
NG