POWER OUTLETS (INT) POWER OUTLET SOCKET INSTALLATION
PROCEDURE

 85532
1.INSTALL USB CHARGER SOCKET
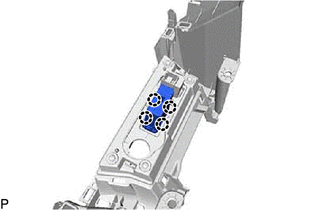
Engage the 4 claws to install the USB charger socket.
85535B
2.INSTALL NO. 1 POWER OUTLET SOCKET COVER
Engage the 2 claws to install the No. 1 power outlet socket cover.
85530
3.INSTALL NO. 1 POWER OUTLET SOCKET ASSEMBLY
Engage the claw to install the No. 1 power outlet socket assembly.
55434F
4.INSTALL CENTER LOWER INSTRUMENT PANEL FINISH PANEL
55471A
5.INSTALL INSTRUMENT CLUSTER FINISH PANEL ORNAMENT
6.INSTALL LOWER INSTRUMENT PANEL SUB-ASSEMBLY
55607
7.INSTALL NO. 2 INSTRUMENT PANEL UNDER COVER SUB-ASSEMBLY
55435A
8.INSTALL INSTRUMENT PANEL FINISH PANEL END RH
9.INSTALL FRONT DOOR OPENING TRIM WEATHERSTRIP RH
62111A
10.INSTALL COWL SIDE TRIM SUB-ASSEMBLY RH
- HINT:
-
Use the same procedure as for the LH side.
67913
11.INSTALL FRONT DOOR SCUFF PLATE RH
- HINT:
-
Use the same procedure as for the LH side.
58816B
12.INSTALL CONSOLE BOX INSERT
58817A
13.INSTALL FRONT NO. 2 CONSOLE BOX INSERT
55446E
14.INSTALL NO. 2 SWITCH HOLE BASE
15.INSTALL CENTER INSTRUMENT CLUSTER FINISH PANEL WITH AIR CONDITIONING CONTROL ASSEMBLY
55045
16.INSTALL LOWER INSTRUMENT PANEL FINISH PANEL SUB-ASSEMBLY
53601
17.CONNECT HOOD LOCK CONTROL LEVER SUB-ASSEMBLY
55606
18.INSTALL NO. 1 INSTRUMENT PANEL UNDER COVER SUB-ASSEMBLY
55436A
19.INSTALL INSTRUMENT PANEL FINISH PANEL END LH
20.INSTALL FRONT DOOR OPENING TRIM WEATHERSTRIP LH
62112A
21.INSTALL COWL SIDE TRIM SUB-ASSEMBLY LH
67914
22.INSTALL FRONT DOOR SCUFF PLATE LH
23.INSTALL CONSOLE BOX ASSEMBLY