PARK ASSIST / MONITORING TOYOTA PARKING ASSIST-SENSOR SYSTEM(for 6 Sensor Type) Clearance Warning Buzzer Circuit
DESCRIPTION
This circuit consists of the No. 1 clearance warning buzzer and clearance warning ECU assembly. An ECU-excited type buzzer is used. The ECU operates the buzzers using a sound pattern that changes depending on the distance to the obstacle.
WIRING DIAGRAM
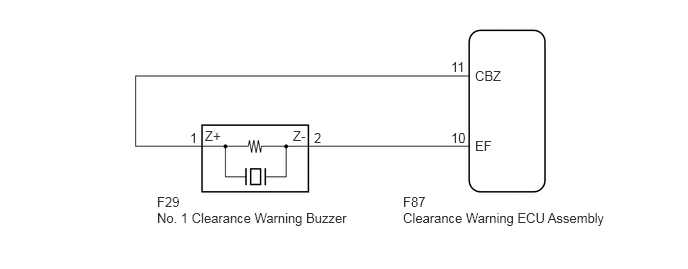
PROCEDURE
Connect the GTS to the DLC3.
Turn the ignition switch to ON.
Turn the GTS on.
Enter the following menus: Body Electrical / Clearance Sonar / Active Test.
Check that the buzzer operates by performing the Active Test.
- Body Electrical > Clearance Sonar > Active Test
-
Tester Display Measurement Item Control Range Diagnostic Note Buzzer No. 1 clearance warning buzzer Operate or Stop Confirm that the vehicle is stopped and the ignition switch is on
- Body Electrical > Clearance Sonar > Active Test
-
Tester Display Buzzer - 50004 170 4
- OK:
The No. 1 clearance warning buzzer sounds.
- Result:
Proceed to OK NG
OK
NG
Disconnect the F87 clearance warning ECU assembly connector.
Disconnect the F29 No. 1 clearance warning buzzer connector.
Measure the resistance according to the value(s) in the table below.
- Standard Resistance:
Tester Connection Condition Specified Condition F87-11 (CBZ) - F29-1 (Z+) Always Below 1 Ω F87-10 (EF) - F29-2 (Z-) Always Below 1 Ω F87-11 (CBZ) or F29-1 (Z+) - Body ground Always 10 kΩ or higher F87-10 (EF) or F29-2 (Z-) - Body ground Always 10 kΩ or higher
- Result:
Proceed to OK NG
OK
NG
Replace the No. 1 clearance warning buzzer with a new or known good one.
Click hereAudio / Visual / Telematics>PARK ASSIST / MONITORING>CLEARANCE WARNING BUZZER>REMOVAL
- Result:
Proceed to NEXT
NEXT
Connect the GTS to the DLC3.
Turn the ignition switch to ON.
Turn the GTS on.
Enter the following menus: Body Electrical / Clearance Sonar / Active Test.
Check that the buzzer operates by performing the Active Test.
- Body Electrical > Clearance Sonar > Active Test
-
Tester Display Measurement Item Control Range Diagnostic Note Buzzer No. 1 clearance warning buzzer Operate or Stop Confirm that the vehicle is stopped and the ignition switch is on
- Body Electrical > Clearance Sonar > Active Test
-
Tester Display Buzzer - 50004 170 4
- OK:
The No. 1 clearance warning buzzer sounds.
- Result:
Proceed to OK NG
OK
NG