Home › Drivetrain › MF1A (TRANSFER / 4WD / AWD) › DYNAMIC TORQUE CONTROL 4WD/AWD SYSTEM › from 2016.11
RM3160E _52 Drivetrain _019685 MF1A TRANSFER / 4WD / AWD _0109466 DYNAMIC TORQUE CONTROL 4WD/AWD SYSTEM J

MF1A TRANSFER / 4WD / AWD  DYNAMIC TORQUE CONTROL 4WD/AWD SYSTEM  TC and CG Terminal Circuit  


DESCRIPTION

Connecting terminals TC and CG of the DLC3 causes the 4WD ECU assembly to display a DTC on the multi-information display.

HINT:

When each warning light remains blinking, a short to ground in the wiring of terminal TC of the DLC3 or an internal short to ground in each ECU is suspected.


WIRING DIAGRAM
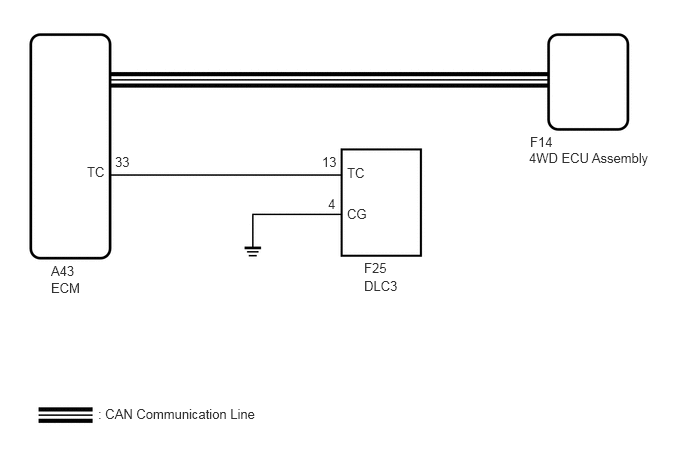
C256466E39
5.51,1.563 6.875,1.781 1.365,0.219 10 false 4WD ECU Assembly 3.792,2.708 4.073,2.854 0.281,0.146 10 false F25 3.792,2.896 4.198,3.042 0.406,0.146 10 false DLC3 3.615,2.146 3.865,2.302 0.25,0.156 10 false CG 3.615,1.719 3.844,1.875 0.229,0.156 10 false TC 0.531,2.917 1.094,3.354 0.563,0.438 10 false ECM 0.906,1.708 1.135,1.865 0.229,0.156 10 false TC 1.021,4.229 2.99,4.406 1.969,0.177 10 false : CAN Communication Line 1.198,1.604 1.729,2.188 0.531,0.583 10 false 33 3.354,1.604 3.552,1.802 0.198,0.198 10 false 13 3.417,2.042 3.573,2.24 0.156,0.198 10 false 4 0.531,2.74 2.365,2.938 1.833,0.198 10 false A43 5.521,1.396 5.802,1.594 0.281,0.198 10 false F14

CAUTION / NOTICE / HINT

HINT:

Check the condition of each related circuit connector before troubleshooting.

Click hereGeneral>INTRODUCTION>HOW TO TROUBLESHOOT ECU CONTROLLED SYSTEMS>ELECTRONIC CIRCUIT INSPECTION PROCEDURE


PROCEDURE

1.CHECK FOR DTC (CAN COMMUNICATION SYSTEM)
a.

Check if CAN communication system DTCs are output.

Click herePower Source / Network>NETWORKING>CAN COMMUNICATION SYSTEM>DIAGNOSIS SYSTEM


Result:
Result Proceed to
CAN communication system DTCs are not output A
CAN communication system DTCs are output B


A

2.INSPECT DLC3

B

GO TO CAN COMMUNICATION SYSTEM (HOW TO PROCEED WITH TROUBLESHOOTING)

2.INSPECT DLC3
a.
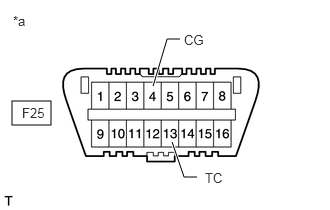
C166029C80
0.125,1.052 0.531,1.302 0.406,0.25 1.594,0.896 1.74,0.406 1.74,0.406 1.875,0.406 true 1.792,1.479 1.917,1.844 1.917,1.844 2.052,1.844 true 0.135,0.135 0.448,0.333 0.313,0.198 10 false *a 0.229,1.094 0.688,1.292 0.458,0.198 10 false F25 1.917,0.333 2.229,0.531 0.313,0.198 10 false CG 2.135,1.771 2.448,1.969 0.313,0.198 10 false TC
*a Front view of DLC3


Turn the ignition switch to ON.


b.

Measure the voltage according to the value(s) in the table below.

Standard Voltage:
Tester Connection Condition Specified Condition
F25-13 (TC) - F25-4 (CG) Ignition switch ON 11 to 14 V


Result:
Proceed to
OK
NG


OK

3.REPLACE ECM

NG

4.CHECK HARNESS AND CONNECTOR (TC OF DLC3 - TC OF ECM AND BODY GROUND)
3.REPLACE ECM
a.
C166029C80
0.125,1.052 0.531,1.302 0.406,0.25 1.594,0.896 1.74,0.406 1.74,0.406 1.875,0.406 true 1.792,1.479 1.917,1.844 1.917,1.844 2.052,1.844 true 0.135,0.135 0.448,0.333 0.313,0.198 10 false *a 0.229,1.094 0.688,1.292 0.458,0.198 10 false F25 1.917,0.333 2.229,0.531 0.313,0.198 10 false CG 2.135,1.771 2.448,1.969 0.313,0.198 10 false TC
*a Front view of DLC3


Replace the ECM.

Click hereEngine / Hybrid System>2GR-FKS (ENGINE CONTROL)>ECM>COMPONENTS


b.

Using SST, connect terminals 13 (TC) and 4 (CG) of the DLC3.


SST
09843-18040  

c.

Turn the ignition switch to ON.


d.

Check that the "DIAG AWD FF" or "DIAG AWD XX (DTC)" is displayed.


Result:
Result Proceed to
"DIAG AWD FF" or "DIAG AWD XX (DTC)" is displayed A
"DIAG AWD FF" and "DIAG XX (DTC)" are not displayed B


A

END

B

4.CHECK HARNESS AND CONNECTOR (TC OF DLC3 - TC OF ECM AND BODY GROUND)
a.

Turn the ignition switch off.


b.

Disconnect the A43 ECM connector.


c.

Measure the resistance according to the value(s) in the table below.

Standard Resistance:
Tester Connection Condition Specified Condition
F25-13 (TC) - A43-33 (TC) Always Below 1 Ω
F25-13 (TC) - Body ground Always 10 kΩ or higher


Result:
Proceed to
OK
NG


OK

5.CHECK HARNESS AND CONNECTOR (CG OF DLC3 - BODY GROUND)

NG

REPAIR OR REPLACE HARNESS OR CONNECTOR

5.CHECK HARNESS AND CONNECTOR (CG OF DLC3 - BODY GROUND)
a.
C166029C81
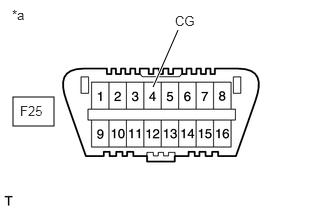
0.135,1.01 0.563,1.313 0.427,0.302 1.594,0.906 1.854,0.313 true 1.823,0.135 2.188,0.313 0.365,0.177 10 false CG 0.125,0.073 0.344,0.25 0.219,0.177 10 false *a 0.208,1.073 0.531,1.25 0.323,0.177 10 false F25
*a Front view of DLC3


Measure the resistance according to the value(s) in the table below.

Standard Resistance:
Tester Connection Condition Specified Condition
F25-4 (CG) - Body ground Always Below 1 Ω


Result:
Proceed to
OK
NG


OK

6.REPLACE ECM

NG

REPAIR OR REPLACE HARNESS OR CONNECTOR

6.REPLACE ECM
a.
C166029C80
0.125,1.052 0.531,1.302 0.406,0.25 1.594,0.896 1.74,0.406 1.74,0.406 1.875,0.406 true 1.792,1.479 1.917,1.844 1.917,1.844 2.052,1.844 true 0.135,0.135 0.448,0.333 0.313,0.198 10 false *a 0.229,1.094 0.688,1.292 0.458,0.198 10 false F25 1.917,0.333 2.229,0.531 0.313,0.198 10 false CG 2.135,1.771 2.448,1.969 0.313,0.198 10 false TC
*a Front view of DLC3


Replace the ECM.

Click hereEngine / Hybrid System>2GR-FKS (ENGINE CONTROL)>ECM>COMPONENTS


b.

Using SST, connect terminals 13 (TC) and 4 (CG) of the DLC3.


SST
09843-18040  

c.

Turn the ignition switch to ON.


d.

Check that the "DIAG AWD FF" or "DIAG AWD XX (DTC)" is displayed.


Result:
Result Proceed to
"DIAG AWD FF" or "DIAG AWD XX (DTC)" is displayed A
"DIAG AWD FF" and "DIAG XX (DTC)" are not displayed B


A

END

B