2GR-FKS FUEL FUEL PUMP REMOVAL
PROCEDURE

 1. PRECAUTION
- NOTICE:
-
After turning the ignition switch off, waiting time may be required before disconnecting the cable from the negative (-) battery terminal. Therefore, make sure to read the disconnecting the cable from the negative (-) battery terminal notices before proceeding with work.
-
Click hereGeneral>INTRODUCTION>REPAIR INSTRUCTION>PRECAUTION
2. DISCHARGE FUEL SYSTEM PRESSURE
3.DISCONNECT CABLE FROM NEGATIVE BATTERY TERMINAL
- NOTICE:
-
When disconnecting the cable, some systems need to be initialized after the cable is reconnected.
-
Click hereGeneral>INTRODUCTION>REPAIR INSTRUCTION>INITIALIZATION
4.REMOVE REAR NO. 1 SEAT ASSEMBLY
for 60/40 Split Seat Type LH Side: Click hereVehicle Interior>SEAT>REAR NO. 1 SEAT ASSEMBLY(for 60/40 Split Seat Type LH Side)>REMOVAL
for 60/40 Split Seat Type RH Side: Click hereVehicle Interior>SEAT>REAR NO. 1 SEAT ASSEMBLY(for 60/40 Split Seat Type RH Side)>REMOVAL
58410B
5.REMOVE DECK BOARD ASSEMBLY
58409A
6.REMOVE NO. 3 DECK BOARD SUB-ASSEMBLY
64742C
7.REMOVE DECK SIDE TRIM BOX LH
64993
8.REMOVE REAR DECK FLOOR BOX
58387B
9.REMOVE REAR FLOOR FINISH PLATE
64910J
10.REMOVE TONNEAU COVER ASSEMBLY
11.REMOVE REAR NO. 2 SEAT ASSEMBLY
72138M
12.REMOVE REAR OUTER SEAT TRACK BRACKET COVER LH
67918A
13.REMOVE REAR DOOR SCUFF PLATE LH
14.REMOVE REAR DOOR OPENING TRIM WEATHERSTRIP LH
72137S
15.REMOVE REAR OUTER SEAT TRACK BRACKET COVER RH
- HINT:
-
Use the same procedure as for the LH side.
67917A
16.REMOVE REAR DOOR SCUFF PLATE RH
- HINT:
-
Use the same procedure as for the LH side.
17.REMOVE REAR DOOR OPENING TRIM WEATHERSTRIP RH
- HINT:
-
Use the same procedure as for the LH side.
64713F
18.REMOVE FRONT DECK SIDE TRIM COVER LH
73370C
19.DISCONNECT REAR NO. 1 SEAT OUTER BELT ASSEMBLY LH
64715E
20.REMOVE NO. 2 DECK SIDE TRIM COVER
64735
21.REMOVE DECK TRIM SIDE SERVICE HOLE COVER
73570
22.DISCONNECT REAR NO. 2 SEAT OUTER BELT ASSEMBLY LH
64974
23.REMOVE DECK TRIM POCKET COVER (for LH Side)
64725F
24.REMOVE NO. 1 LUGGAGE COMPARTMENT TRIM HOOK (for LH Side)
66311
25.REMOVE ROPE HOOK (for LH Side)
64740C
26.REMOVE DECK TRIM SIDE PANEL ASSEMBLY LH
64712F
27.REMOVE FRONT DECK SIDE TRIM COVER RH
- HINT:
-
Use the same procedure as for the LH side.
73360C
28.DISCONNECT REAR NO. 1 SEAT OUTER BELT ASSEMBLY RH
- HINT:
-
Use the same procedure as for the LH side.
64714H
29.REMOVE NO. 1 DECK SIDE TRIM COVER
73297E
30.REMOVE DECK TRIM SIDE BELT HOLE COVER RH
73560
31.DISCONNECT REAR NO. 2 SEAT OUTER BELT ASSEMBLY RH
- HINT:
-
Use the same procedure as for the LH side.
62627D
32.REMOVE SIDE TRIM COVER RH (w/o Rear Automatic Air Conditioning System)
88625T
33.REMOVE COOLER (NO. 2 ROOM TEMP. SENSOR) THERMISTOR (w/ Rear Automatic Air Conditioning System)
81330
34.REMOVE NO. 1 LUGGAGE COMPARTMENT LIGHT ASSEMBLY
64974
35.REMOVE DECK TRIM POCKET COVER (for RH Side)
- HINT:
-
Use the same procedure as for the LH side.
64725F
36.REMOVE NO. 1 LUGGAGE COMPARTMENT TRIM HOOK (for RH Side)
- HINT:
-
Use the same procedure as for the LH side.
66311
37.REMOVE ROPE HOOK (for RH Side)
- HINT:
-
Use the same procedure as for the LH side.
64730B
38.REMOVE DECK TRIM SIDE PANEL ASSEMBLY RH
58325E
39.REMOVE REAR FLOOR SERVICE HOLE COVER
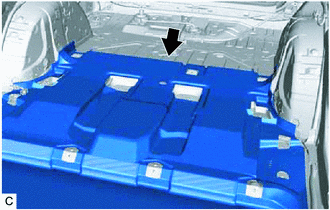
Turn back the front floor carpet.
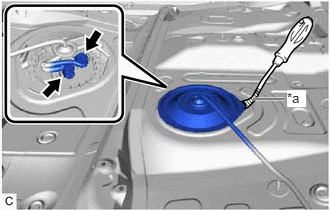
| *a | Protective Tape |
Using a clip remover with its tip wrapped with protective tape, remove the rear floor service hole cover and butyl tape.
Disconnect the 2 fuel pump connectors.
77209F
40.DISCONNECT FUEL TANK MAIN TUBE SUB-ASSEMBLY
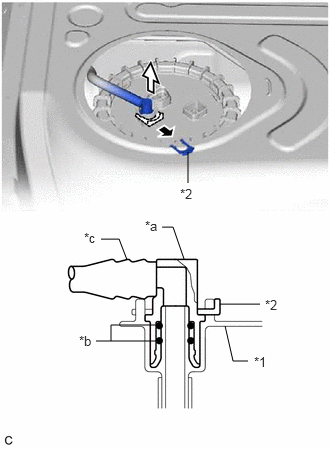
| *1 | Fuel Suction Plate Sub-assembly |
| *2 | Tube Joint Clip |
| *a | Fuel Tube Joint |
| *b | O-ring |
| *c | Nylon Tube |

|
Pull off |

|
Pull off |
Remove the tube joint clip, and pull off the fuel tube joint of the fuel tank main tube sub-assembly.
- NOTICE:
- ·
Remove any foreign matter on the fuel tube joint before performing this work.
·Do not scratch or allow any foreign matter to get on the parts when disconnecting them as the fuel tube connector has O-rings that seal the pipe (fuel pipe).
·Be sure to disconnect the fuel tube joint by hand.
·Do not bend, twist, pinch or kink the nylon tube.
·Cover the disconnected fuel tube joint with a plastic bag to prevent damage and contamination.
·If the fuel tube joint and fuel suction plate sub-assembly are stuck, push and pull to release them.
77144
41.REMOVE FUEL PUMP GAUGE RETAINER
- NOTICE:
-
Before performing these procedures, first cover the connectors and fuel tube joint of the fuel suction tube with pump and gauge assembly with vinyl tape and then clean any dirt and foreign matter in order to prevent contamination of the fuel system.
Install SST (fuel pump holding tool assy) to the fuel pump gauge retainer.
Insert SST (claw No. 1) between the service hole and fuel pump gauge retainer as shown in the illustration.
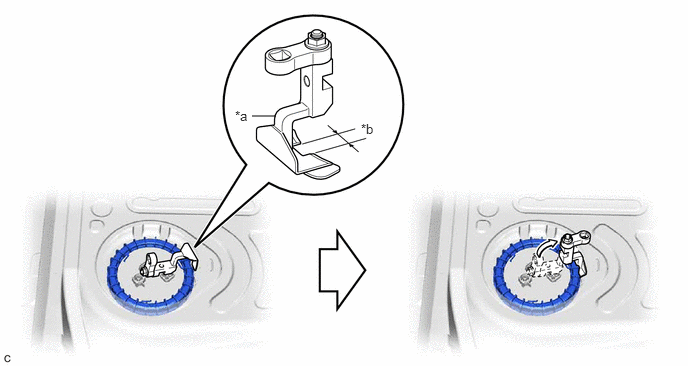
| *a | SST (Claw No. 1) | *b | Wide |
- SST
- 09808-14050 (09882-14050)
Align the detent of the tank suction tube support and cutout of SST (claw No. 1).
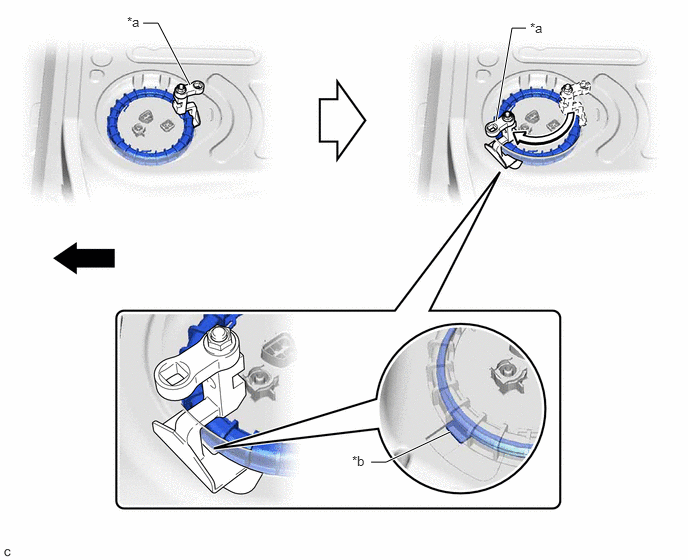
| *a | SST (Claw No. 1) | *b | Detent of Tank Suction Tube Support |
|
|
Front | - | - |
Insert SST (claw) between the service hole and fuel pump gauge retainer as shown in the illustration.
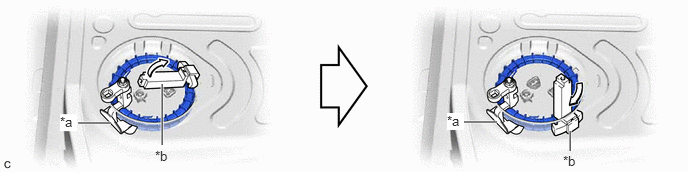
| *a | SST (Claw No. 1) | *b | SST (Claw) |
- SST
- 09808-14040 (09882-14040)
Insert SST (claw No. 2) between the service hole and fuel pump gauge retainer, and align it with the second detent of the tank suction tube support.
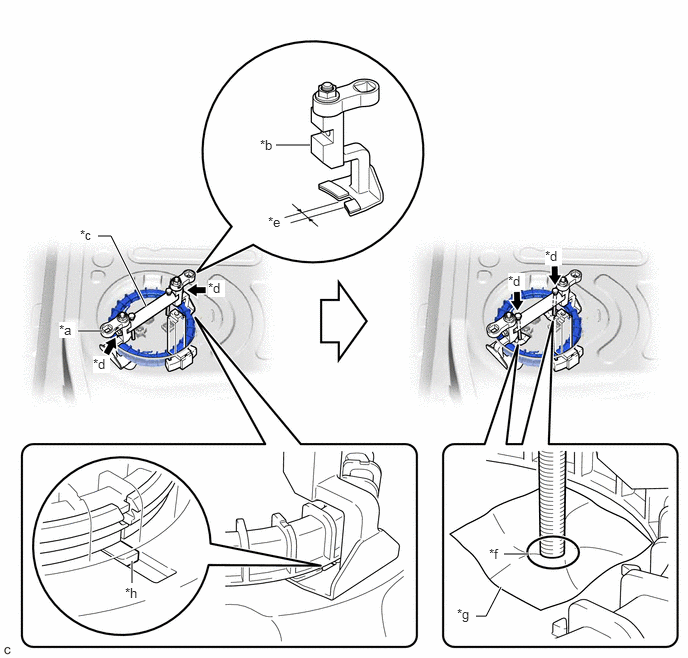
| *a | SST (Claw No. 1) | *b | SST (Claw No. 2) |
| *c | SST (Bridge) | *d | SST (Bolt) |
| *e | Narrow | *f | Contact |
| *g | Cloth | *h | Detent of Tank Suction Tube Support |
- SST
- 09808-14050 (09881-14050, 09882-14050, 09883-14050, 09884-14050)
Install SST (bridge) to SST (claw No. 1) and SST (claw No. 2) with 2 SST (bolt).
Place a piece of cloth or equivalent on the fuel suction tube with pump and gauge assembly and lightly tighten 2 SST (bolt) of SST (bridge) until they come into contact with the fuel suction tube with pump and gauge assembly.
- NOTICE:
-
If a piece of cloth or equivalent is not placed between the fuel suction tube with pump and gauge assembly and 2 SST (bolt), the fuel suction tube with pump and gauge assembly may be damaged.
Install SST (fuel pump retainer tool assy) to the fuel pump gauge retainer.
Position SST (claw) next to SST (claw No. 1) so that the protrusions of the fuel pump gauge retainer are aligned with the grooves of SST (claw). Insert the second SST (claw) between the service hole and fuel pump gauge retainer, and position it next to SST (claw No. 2) so that it is opposite to SST (claw), and the protrusions of the fuel pump gauge retainer are aligned with the grooves of SST (claw).
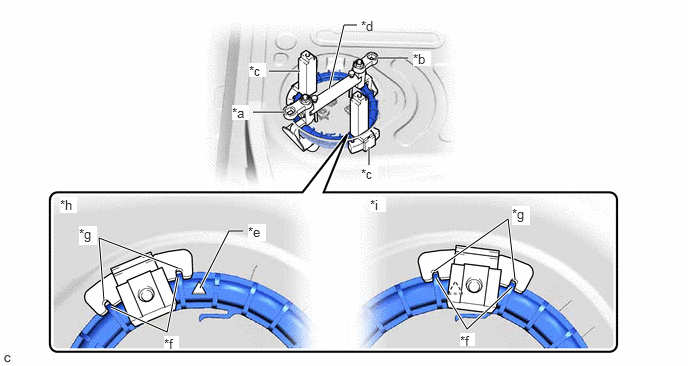
| *a | SST (Claw No. 1) | *b | SST (Claw No. 2) |
| *c | SST (Claw) | *d | SST (Bridge) |
| *e | Triangle Mark | *f | Protrusion of Fuel Pump Gauge Retainer |
| *g | Groove of SST (Claw) | *h | Correct |
| *i | Incorrect | - | - |
- SST
- 09808-14040 (09882-14040)
- NOTICE:
-
Ensure that SST (claw) does not cover the triangle mark of the fuel pump gauge retainer.
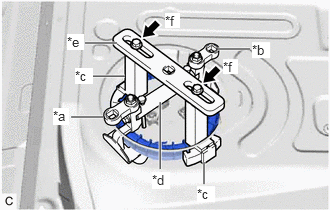
| *a | SST (Claw No. 1) |
| *b | SST (Claw No. 2) |
| *c | SST (Claw) |
| *d | SST (Bridge) |
| *e | SST (Plate) |
| *f | SST (Bolt and Washer Set) |
While ensuring that SST (plate) is centered, install SST (plate) to 2 SST (claw) with 2 SST (bolt and washer set).
- SST
- 09808-14040 (09881-14040, 09883-14040)
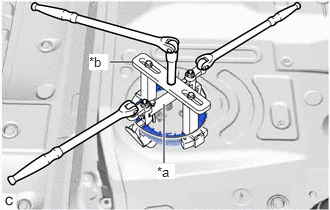
| *a | SST (Fuel Pump Holding Tool Assy) |
| *b | SST (Fuel Pump Retainer Tool Assy) |
Attach 2 breaker bars to SST (fuel pump holding tool assy) and 1 breaker bar to SST (fuel pump retainer tool assy).
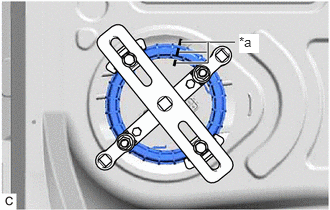
| *a | Paint Mark |
Place paint marks on the fuel suction tube with pump and gauge assembly, fuel pump gauge retainer and fuel tank assembly as shown in the illustration.
While holding the 2 breaker bars attached to SST (fuel pump holding tool assy), turn the breaker bar attached to SST (fuel pump retainer tool assy) to loosen the fuel pump gauge retainer. [*1]
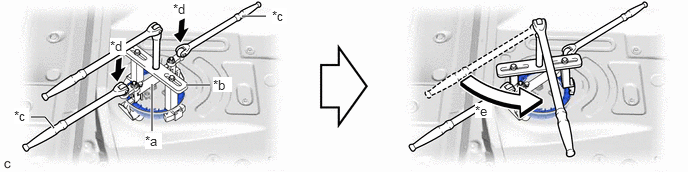
| *a | SST (Fuel Pump Holding Tool Assy) | *b | SST (Fuel Pump Retainer Tool Assy) |
| *c | Holding | *d | Push down |
| *e | Turn | - | - |
- NOTICE:
-
Push down on the 2 locations shown in the illustration to prevent SST (fuel pump holding tool assy) from turning.
Check that only the paint mark on the fuel pump gauge retainer has moved.
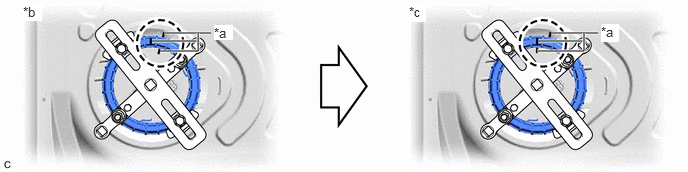
| *a | Paint Mark | *b | Correct |
| *c | Incorrect | - | - |
- HINT:
-
If the paint mark on the fuel suction tube with pump and gauge assembly has also moved, tighten the fuel pump gauge retainer until the paint marks are aligned at the original position. Then repeat from step [*1].
Loosen the fuel pump gauge retainer by using SST (fuel pump retainer tool assy) until the fuel pump gauge retainer turns approximately 360°.
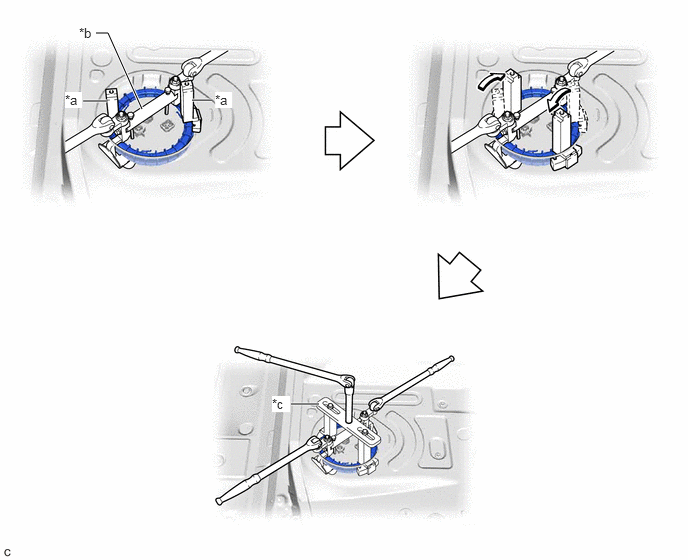
| *a | SST (Claw) | *b | SST (Fuel Pump Holding Tool Assy) |
| *c | SST (Fuel Pump Retainer Tool Assy) | - | - |
Remove SST (fuel pump retainer tool assy) and SST (fuel pump holding tool assy) from the fuel pump gauge retainer.
Check that the fuel pump gauge retainer can be loosened by hand.
- HINT:
-
If the fuel pump gauge retainer cannot be loosened by hand, use SST (fuel pump retainer tool assy) to loosen the fuel pump gauge retainer.
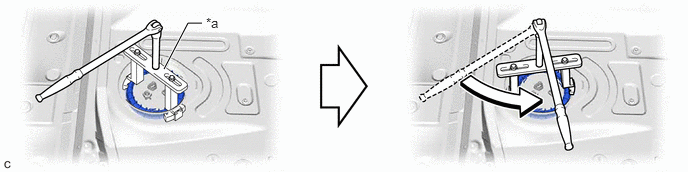 1.708,0.719 1.958,0.24 1.958,0.24 2.104,0.24 true 2.146,0.156 2.458,0.313 0.313,0.156 10 false *a
*a SST (Fuel Pump Retainer Tool Assy) - -
- SST
- 09808-14040 (09881-14040, 09882-14040, 09883-14040)
While holding the fuel suction tube with pump and gauge assembly by hand, remove the fuel pump gauge retainer.
77020A
42.REMOVE FUEL SUCTION TUBE WITH PUMP AND GAUGE ASSEMBLY
Remove the fuel suction tube with pump and gauge assembly from the fuel tank assembly.
- NOTICE:
-
Be careful not to bend the arm of the fuel sender gauge assembly.
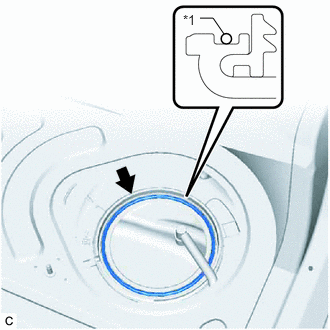
| *1 | Fuel Suction Tube Set Gasket |
Remove the fuel suction tube set gasket from the fuel tank assembly.