POWER DISTRIBUTION INTEGRATION RELAY ON-VEHICLE INSPECTION
PROCEDURE

 82644
1.INSPECT SEMICONDUCTOR PWR INTEGRATION ECU (SIGNAL READING CHECK)
- NOTICE:
-
Both present and history signal readings will be cleared if the semiconductor pwr integration ECU is removed. Make sure not to remove it before inspection.
- HINT:
-
The signal readings of the semiconductor pwr integration ECU can be checked by checking the voltage at the diagnosis terminal.
Signal reading check
Turn the ignition switch to ON.
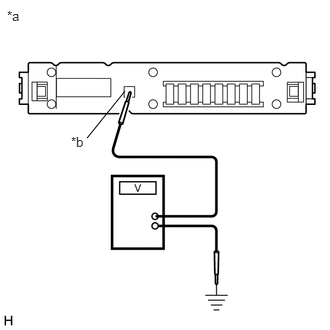
| *a | Component with harness connected
(Semiconductor Pwr Integration ECU) |
| *b | Diagnosis Terminal |
Connect the positive (+) terminal of a voltmeter to the diagnosis terminal of the semiconductor pwr integration ECU and the negative (-) terminal to body ground.
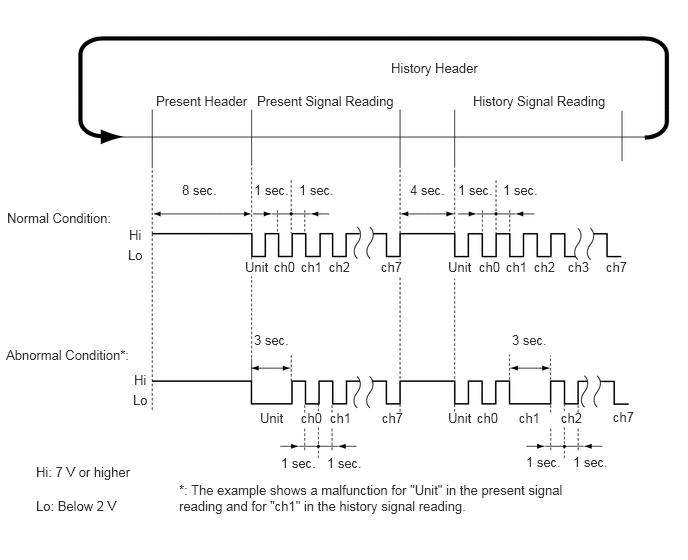
Using the illustration below as a reference, determine whether any channels are malfunctioning based on the observed signal reading.
- HINT:
- ·
Present signal reading and history signal reading will be displayed alternately after the ignition switch is turned to ON. By measuring the duration of each header, the present signal reading and history signal reading can be recognized.
·A unit malfunction indicates an internal malfunction of the semiconductor pwr integration ECU. If a malfunction is detected for any channel from channel 0 to 7, an electrical load connected to the semiconductor pwr integration ECU may be malfunctioning or there may be a short in the semiconductor pwr integration ECU circuit or in the wire harness.
·The present signal reading will be stored as a history signal reading when electrical loads are operated after a malfunctioning part returns to normal.
·Both present and history signal readings can be cleared by disconnecting the cable from the negative (-) battery terminal.
·Depending on the specification, different electrical loads connected to channels 0 to 7 are provided. Refer to the table below:
Channel Connected Electrical Load ch0 Cooler compressor assembly (Magnetic clutch assembly)* ch1 Rear window defogger wire ch2 Windshield deicer wire ch3 Front fog lights ch4 Daytime running lights ch5 - ch6 High beam headlight RH ch7 High beam headlight LH
*: for 2GR-FKS
82644
2.INSPECT SEMICONDUCTOR PWR INTEGRATION ECU (RESULTS OF SIGNAL READING CHECK)
Results of signal reading check
Depending on the signal reading, perform troubleshooting according to the table below.
| Output Signal Reading | Repair Method |
|---|---|
| Normal | Continue troubleshooting for each system. |
| The unit is malfunctioning | Replace the semiconductor pwr integration ECU. |
| A malfunction in a channel (ch0 to ch7) | 1.
Check for a short in the wire harnesses between the semiconductor pwr integration ECU and each electrical load. 2.
Inspect each of the electrical loads. 3.
Replace the semiconductor pwr integration ECU. |
- HINT:
-
Make sure to clear the signal readings by disconnecting the cable from the negative (-) battery terminal after replacement or repair of the malfunctioning part.
If no signal readings are output, perform troubleshooting according to the following troubleshooting procedure.
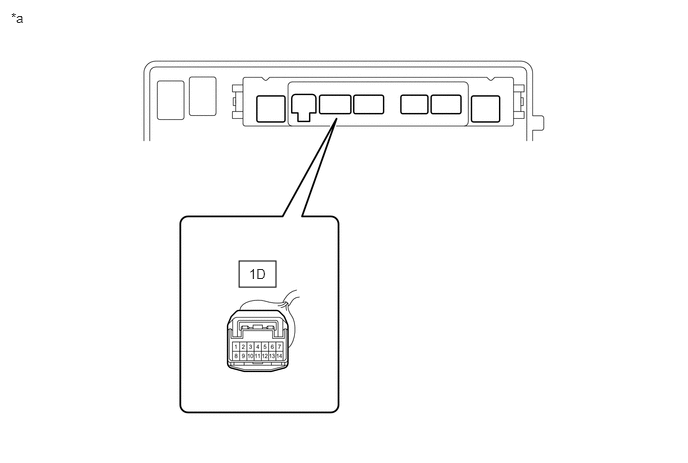
| *a | Component without semiconductor pwr integration ECU
(No. 1 Engine Room Relay Block and No. 1 Junction Block Assembly) |
- | - |
Remove the semiconductor pwr integration ECU.
Click herePower Source / Network>POWER DISTRIBUTION>INTEGRATION RELAY>REMOVAL
Measure the voltage according to the value(s) in the table below.
- Standard Voltage:
Tester Connection Condition Specified Condition 1D-11 - Body ground Ignition switch ON 11 to 14 V
If the result is not as specified, repair or replace the wire harness or connector.