U760E AUTOMATIC TRANSMISSION / TRANSAXLE AUTOMATIC TRANSAXLE SYSTEM P0741 Torque Converter Clutch Solenoid Performance (Shift Solenoid Valve SL)
SYSTEM DESCRIPTION
The ECM uses signals from the throttle position sensor, air-flow meter, turbine (input) speed sensor, intermediate (counter gear) speed sensor and crankshaft position sensor to help determine the engagement timing of the lock-up clutch. The ECM monitors the engagement of the clutch using the turbine (input) speed sensor, intermediate (counter gear) speed sensor and crankshaft position sensor.
Then the ECM compares the engagement condition of the lock-up clutch with the lock-up schedule in the ECM memory to detect shift solenoid valve SL, valve body and torque converter mechanical problems.
| DTC No. | Detection Item | DTC Detection Condition | Trouble Area | MIL | Memory |
|---|---|---|---|---|---|
| P0741 | Torque Converter Clutch Solenoid Performance (Shift Solenoid Valve SL) | Lock-up does not occur when requested. (2-trip detection logic) | ·
Shift solenoid valve SL remains closed ·
Valve body is blocked ·
Torque converter assembly ·
Automatic transaxle (clutch, brake or gear etc.) ·
Line pressure is too low |
Comes on | DTC stored |
MONITOR DESCRIPTION
Torque converter lock-up is controlled by the ECM based on the speed sensor (NT), speed sensor (NC), engine speed, engine load, engine temperature, vehicle speed, transmission fluid temperature, and gear selection. The ECM determines the lock-up status of the torque converter by comparing the engine speed (NE) to the input turbine rpm (NT). The ECM calculates the actual transmission gear by comparing the input turbine rpm (NT) to the counter gear rpm (NC). When conditions are appropriate, the ECM requests "lock-up" by applying control voltage to shift solenoid valve SL. When shift solenoid valve SL is turned on, it applies pressure to the lock-up relay valve and locks the torque converter.
If the ECM detects no lock-up after lock-up has been requested or if it detects lock-up when it is not requested, the ECM interprets this as a fault in shift solenoid valve SL or lock-up system performance. The ECM will illuminate the MIL and store this DTC.
- HINT:
-
Example:
-
When any of the following is met, the system judges it as a malfunction.
There is a difference in rotation (speed) between the input side (engine speed) and output side (input turbine speed) of the torque converter when the ECM commands lock-up.
(Engine speed is at least 70 rpm greater than the input turbine speed.)
CAUTION / NOTICE / HINT
- HINT:
-
Using the GTS to perform Active Tests allows relays, VSVs, actuators and other items to be operated without removing any parts. This non-intrusive functional inspection can be very useful because intermittent operation may be discovered before parts or wiring is disturbed. Performing Active Tests early in troubleshooting is one way to save diagnostic time. Data List information can be displayed while performing Active Tests.
PERFORM ACTIVE TEST
Warm up the engine.
Turn the ignition switch off.
Connect the GTS to the DLC3.
Turn the ignition switch to ON.
Turn the GTS on.
Enter the following menus: Powertrain / Engine and ECT / Active Test.
According to the display on the GTS, perform the Active Test.
- Powertrain > Engine > Active Test
-
Tester Display Measurement Item Control Range Diagnostic Note Activate the Lock Up Controls the shift solenoid SLU and SL to set the automatic transaxle to the lock-up condition. ON/OFF Can be used to check SLU and SL solenoid operation.
[Vehicle Condition]
·Throttle valve opening angle: Less than 20%
·Vehicle speed:60 km/h (37 mph) or more, and 6th gear
- Powertrain > Engine > Active Test
-
Tester Display Activate the Lock Up - 50004 234 115
- HINT:
This test can be conducted when the vehicle speed is 60 km/h (37 mph) or more.
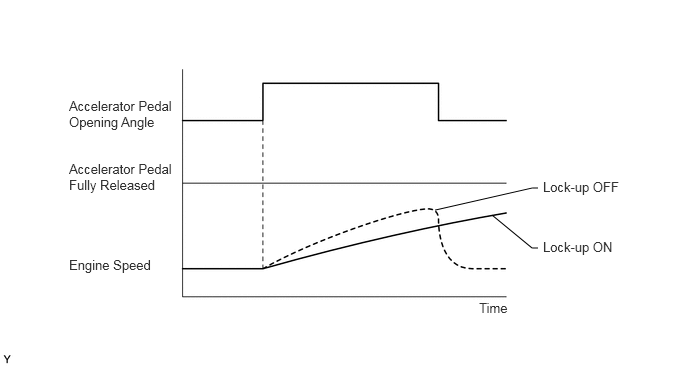
Lightly depress the accelerator pedal and check that the engine speed does not change abruptly.
- HINT:
- ·
When changing the accelerator pedal opening angle while driving, if the engine speed does not change, lock-up is on.
·Slowly release, but not fully, the accelerator pedal in order to decelerate. (Fully releasing the pedal will close the throttle valve and lock-up may be turned off.)
PROCEDURE
Connect the GTS to the DLC3.
Turn the ignition switch to ON.
Turn the GTS on.
Enter the following menus: Powertrain / Engine and ECT / Trouble Codes.
- Powertrain > Engine > Trouble Codes
- 50001 234
Read the DTCs using the GTS.
- Result:
Result Proceed to Only DTC P0741 is output A P0741 and other DTCs are output B
- HINT:
-
If any other codes besides P0741 are output, perform the troubleshooting for those DTCs first.
A
B
| *a | Component without harness connected
(Transmission Wire) |
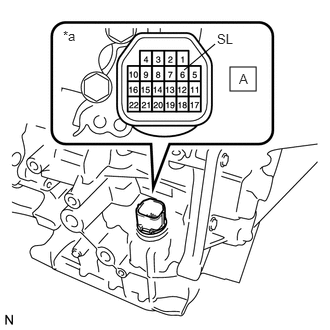
Remove the wiring harness connector from the transaxle.
Measure the resistance according to the value(s) in the table below.
- Standard Resistance:
Tester Connection Condition Specified Condition A-6 (SL) - Body ground 20°C (68°F) 11 to 15 Ω
- Result:
Proceed to OK NG
OK
NG
| *1 | Shift Solenoid Valve SL |
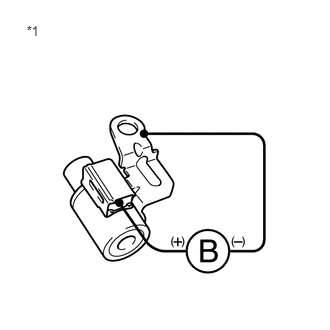
Remove shift solenoid valve SL.
When Not Using the Engine Support Bridge: Click hereDrivetrain>U760E AUTOMATIC TRANSMISSION / TRANSAXLE>VALVE BODY ASSEMBLY(When Not Using the Engine Support Bridge)>DISASSEMBLY
When Using the Engine Support Bridge: Click hereDrivetrain>U760E AUTOMATIC TRANSMISSION / TRANSAXLE>VALVE BODY ASSEMBLY(When Using the Engine Support Bridge)>DISASSEMBLY
Connect a battery positive (+) lead to the terminal of the solenoid valve connector, and a negative (-) lead to the solenoid body. Then check that the valve moves and makes an operating sound.
- OK:
Valve moves and makes an operating sound.
- Result:
Proceed to OK NG
OK
NG
When Not Using the Engine Support Bridge: Click hereDrivetrain>U760E AUTOMATIC TRANSMISSION / TRANSAXLE>VALVE BODY ASSEMBLY(When Not Using the Engine Support Bridge)>COMPONENTS
When Using the Engine Support Bridge: Click hereDrivetrain>U760E AUTOMATIC TRANSMISSION / TRANSAXLE>VALVE BODY ASSEMBLY(When Using the Engine Support Bridge)>COMPONENTS
Check the transmission valve body assembly.
When Not Using the Engine Support Bridge: Click hereDrivetrain>U760E AUTOMATIC TRANSMISSION / TRANSAXLE>VALVE BODY ASSEMBLY(When Not Using the Engine Support Bridge)>REMOVAL
When Using the Engine Support Bridge: Click hereDrivetrain>U760E AUTOMATIC TRANSMISSION / TRANSAXLE>VALVE BODY ASSEMBLY(When Using the Engine Support Bridge)>REMOVAL
- OK:
There is no foreign matter on each valve and they operate smoothly.
- Result:
Proceed to OK NG
OK
NG
When Not Using the Engine Support Bridge: Click hereDrivetrain>U760E AUTOMATIC TRANSMISSION / TRANSAXLE>VALVE BODY ASSEMBLY(When Not Using the Engine Support Bridge)>COMPONENTS
When Using the Engine Support Bridge: Click hereDrivetrain>U760E AUTOMATIC TRANSMISSION / TRANSAXLE>VALVE BODY ASSEMBLY(When Using the Engine Support Bridge)>COMPONENTS
Check the torque converter assembly.
Click hereDrivetrain>U760E AUTOMATIC TRANSMISSION / TRANSAXLE>TORQUE CONVERTER AND DRIVE PLATE>INSPECTION
- OK:
The torque converter operates normally.
- Result:
Proceed to OK NG
OK
When Not Using the Engine Support Bridge: Click hereDrivetrain>U760E AUTOMATIC TRANSMISSION / TRANSAXLE>AUTOMATIC TRANSAXLE ASSEMBLY(When Not Using the Engine Support Bridge)>COMPONENTS
When Using the Engine Support Bridge: Click hereDrivetrain>U760E AUTOMATIC TRANSMISSION / TRANSAXLE>AUTOMATIC TRANSAXLE ASSEMBLY(When Using the Engine Support Bridge)>COMPONENTS
NG
When Not Using the Engine Support Bridge: Click hereDrivetrain>U760E AUTOMATIC TRANSMISSION / TRANSAXLE>AUTOMATIC TRANSAXLE ASSEMBLY(When Not Using the Engine Support Bridge)>COMPONENTS
When Using the Engine Support Bridge: Click hereDrivetrain>U760E AUTOMATIC TRANSMISSION / TRANSAXLE>AUTOMATIC TRANSAXLE ASSEMBLY(When Using the Engine Support Bridge)>COMPONENTS
| *1 | Shift Solenoid Valve SL |
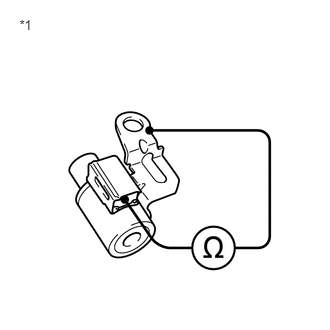
Remove shift solenoid valve SL.
Measure the resistance according to the value(s) in the table below.
- Standard Resistance:
Tester Connection Condition Specified Condition Solenoid Connector (SL) - Solenoid Body (SL) 20°C (68°F) 11 to 15 Ω
- Result:
Proceed to OK NG
OK
NG
When Not Using the Engine Support Bridge: Click hereDrivetrain>U760E AUTOMATIC TRANSMISSION / TRANSAXLE>VALVE BODY ASSEMBLY(When Not Using the Engine Support Bridge)>COMPONENTS
When Using the Engine Support Bridge: Click hereDrivetrain>U760E AUTOMATIC TRANSMISSION / TRANSAXLE>VALVE BODY ASSEMBLY(When Using the Engine Support Bridge)>COMPONENTS