EXTERIOR PANELS / TRIM REAR BUMPER REASSEMBLY
PROCEDURE

 52171A
1.INSTALL NO. 1 REAR BUMPER REINFORCEMENT
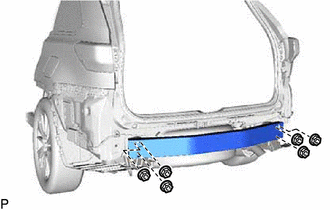
Install the No. 1 rear bumper reinforcement with the 6 nuts.
- Torque:
- 43 N*m (438 kgf*cm, 32 ft.*lbf)
52592
2.INSTALL REAR BUMPER SIDE SEAL LH
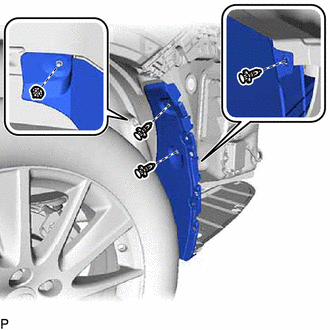
Install the rear bumper side seal LH with the 4 clips.
52591
3.INSTALL REAR BUMPER SIDE SEAL RH
- HINT:
-
Use the same procedure as for the LH side.
52156A
4.INSTALL REAR BUMPER SIDE SUPPORT LH
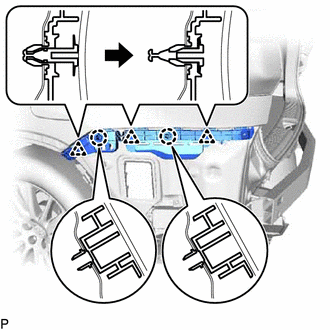
Engage the 2 claws.
Engage the 3 clips as shown in the illustration.
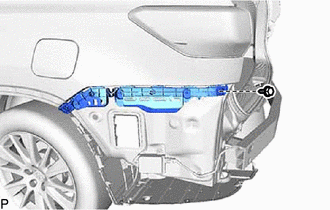
Install the rear bumper side support LH with the screw.
52155A
5.INSTALL REAR BUMPER SIDE SUPPORT RH
- HINT:
-
Use the same procedure as for the LH side.
75895B
6.INSTALL NO. 2 MOULDING TAPE
- HINT:
-
Use the same procedure for the RH side and LH side.
Clean the installation surface of the No. 2 moulding tape.
Remove any remaining double-sided tape from the rear bumper cover.
- NOTICE:
- ·
If there is any foreign matter on the rear bumper cover when the No. 2 moulding tape is installed, adhesion failure may occur.
·Do not use a screwdriver or other tool to remove the double-sided tape as the rear bumper cover may be damaged, possibly leading to adhesion failure.
Wipe off any tape adhesive residue with cleaner.
Install a new No. 2 moulding tape.
- CAUTION:
- ·
Do not touch the heat light, as doing so may cause in burns.
·Touching heated parts for a long time may result in burns.
- HINT:
-
If the temperature of the No. 2 moulding tape or its installation surface on the rear bumper cover is below 15°C (59°F), adhesion failure may occur. Use a heat light to heat the No. 2 moulding tape and its installation surface on the rear bumper cover to the recommended temperature (15 to 40°C (59 to 104°F)).
Remove the release paper from the No. 2 moulding tape.
- HINT:
-
After removing the release paper, keep the exposed adhesive free from foreign matter.
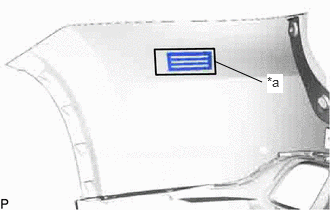
| *a | Line |
Install the No. 2 moulding tape to the rear bumper cover as shown in the illustration.
- NOTICE:
-
If the No. 2 moulding tape has been removed, it must be replaced with a new one as it may be deformed or the strength of its adhesive may be deteriorated.
- HINT:
-
Make sure not to touch the exposed adhesive of the No. 2 moulding tape or the installation surface on the rear bumper cover.
Using a squeegee, evenly press the No. 2 moulding tape to the rear bumper cover with a force of 29 N (3 kgf, 6.5lbf) or more.
- HINT:
- ·
Make sure that the corners of the No. 2 moulding tape are not damaged or peeling off.
·After installing the No. 2 moulding tape, leave the rear bumper cover in an area with an ambient temperature of 15°C (59°F) or more for 30 minutes or more to allow the adhesive to set.
Remove the protector sheet from the No. 2 moulding tape.
52753
7.INSTALL REAR BUMPER SIDE MOULDING LH (w/ Plated Moulding)
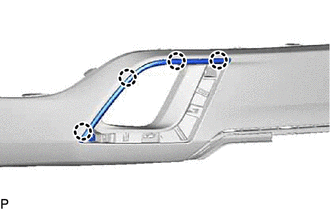
Engage the 4 claws to install the rear bumper side moulding LH.
52752
8.INSTALL REAR BUMPER SIDE MOULDING RH (w/ Plated Moulding)
- HINT:
-
Use the same procedure as for the LH side.
52724
9.INSTALL REAR BUMPER EXTENSION MOULDING LH (w/ Plated Moulding)
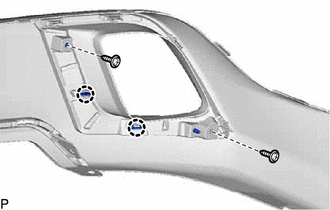
Engage the 2 claws.
Install the rear bumper extension moulding LH with the 2 screws.
52723
10.INSTALL REAR BUMPER EXTENSION MOULDING RH (w/ Plated Moulding)
- HINT:
-
Use the same procedure as for the LH side.
52169C
11.INSTALL LOWER REAR BUMPER COVER
Engage the 14 claws.
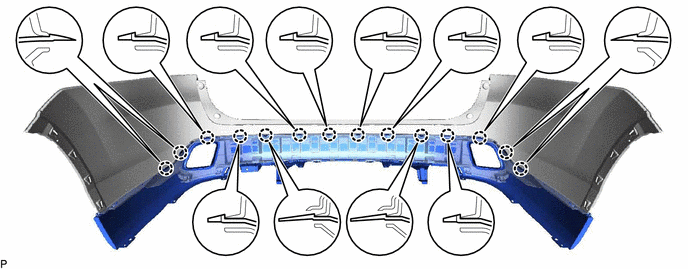
Install the 2 clips.
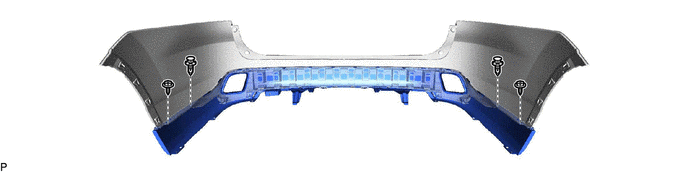
Install the lower rear bumper cover with the 2 screws.
52151G
12.INSTALL REAR BUMPER EXTENSION
Engage the 2 guides and 10 claws.
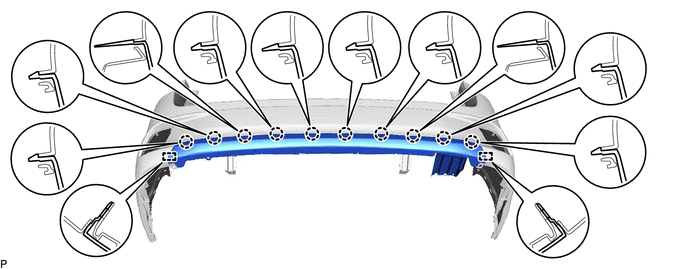
Install the 5 clips.
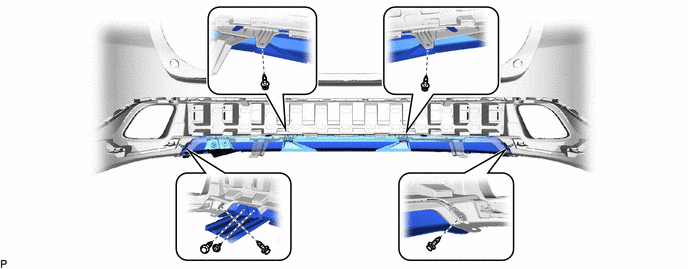
Install the rear bumper extension with the screw.
89348S
13.INSTALL REAR CENTER ULTRASONIC SENSOR RETAINER (w/ TOYOTA Parking Assist-sensor System)
52615
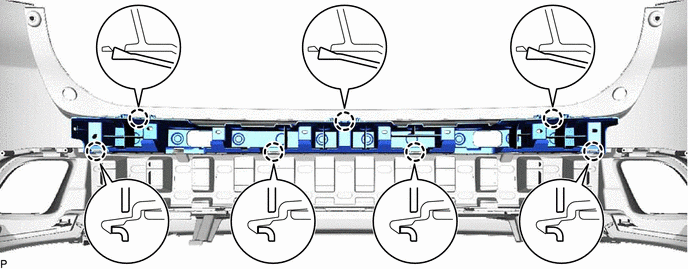
14.INSTALL REAR BUMPER ENERGY ABSORBER
Engage the 7 claws to install the rear bumper energy absorber.
82183
15.INSTALL NO. 3 LUGGAGE ROOM WIRE
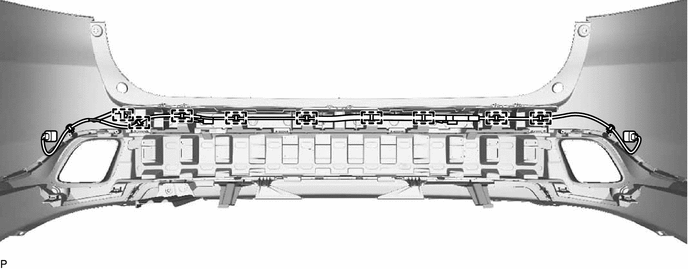
w/o Rear Fog Light with TOYOTA Parking Assist-sensor System:
Engage the 9 clamps to install the No. 3 luggage room wire.
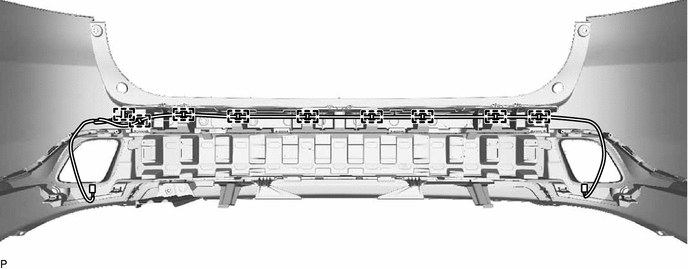
w/ Rear Fog Light without TOYOTA Parking Assist-sensor System:
Engage the 9 clamps to install the No. 3 luggage room wire.
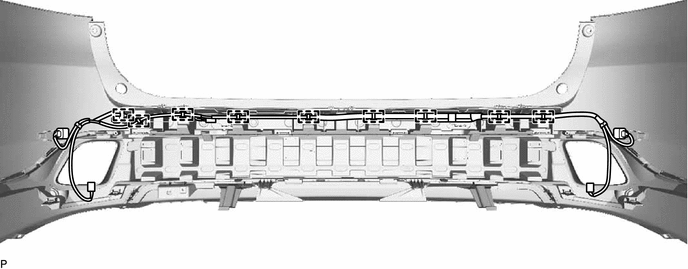
w/ Rear Fog Light and TOYOTA Parking Assist-sensor System:
Engage the 9 clamps to install the No. 3 luggage room wire.
89348R
16.INSTALL REAR CORNER ULTRASONIC SENSOR RETAINER (w/ TOYOTA Parking Assist-sensor System)
89342
17.INSTALL NO. 1 ULTRASONIC SENSOR (w/ TOYOTA Parking Assist-sensor System)
for Corner Sensor:
Click hereAudio / Visual / Telematics>PARK ASSIST / MONITORING>ULTRASONIC SENSOR(for Rear Side)>INSTALLATION
89342A
18.INSTALL NO. 1 ULTRASONIC SENSOR (w/ TOYOTA Parking Assist-sensor System)
for Back Sensor:
Click hereAudio / Visual / Telematics>PARK ASSIST / MONITORING>ULTRASONIC SENSOR(for Rear Side)>INSTALLATION
81490E
19.INSTALL REFLEX REFLECTOR ASSEMBLY LH (w/o Rear Fog Light)
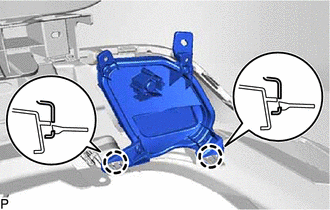
Engage the 2 claws.
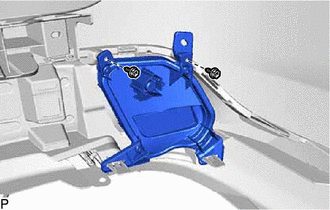
Install the reflex reflector assembly LH with the 2 screws.
Engage the clamp.
81480D
20.INSTALL REFLEX REFLECTOR ASSEMBLY RH (w/o Rear Fog Light)
- HINT:
-
Use the same procedure as for the LH side.
81490C
21.INSTALL REAR FOG LIGHT ASSEMBLY LH (w/ Rear Fog Light)
81480A
22.INSTALL REAR FOG LIGHT ASSEMBLY RH (w/ Rear Fog Light)
- HINT:
-
Use the same procedure as for the LH side.