TELEMATICS TELEMATICS TRANSCEIVER REMOVAL
CAUTION / NOTICE / HINT
The necessary procedures (adjustment, calibration, initialization, or registration) that must be performed after parts are removed and installed, or replaced during telematics transceiver removal/installation are shown below.
| Replaced Part or Performed Procedure | Necessary Procedure | Effect/Inoperative Function when Necessary Procedure not Performed | Link |
|---|---|---|---|
| Telematics transceiver | Register vehicle information | Emergency call service | ( ) |
PROCEDURE

 1.REMOVE CONSOLE BOX ASSEMBLY
67914
2.REMOVE FRONT DOOR SCUFF PLATE LH
62112A
3.REMOVE COWL SIDE TRIM SUB-ASSEMBLY LH
55606
4.REMOVE NO. 1 INSTRUMENT PANEL UNDER COVER SUB-ASSEMBLY
55446A
5.REMOVE NO. 1 SWITCH HOLE BASE
67913
6.REMOVE FRONT DOOR SCUFF PLATE RH
- HINT:
-
Use the same procedure as for the LH side.
62111A
7.REMOVE COWL SIDE TRIM SUB-ASSEMBLY RH
- HINT:
-
Use the same procedure as for the LH side.
62311B
8.DISCONNECT FRONT DOOR OPENING TRIM WEATHERSTRIP RH
55435A
9.REMOVE INSTRUMENT PANEL FINISH END PANEL RH
55607
10.REMOVE NO. 2 INSTRUMENT PANEL UNDER COVER SUB-ASSEMBLY
55303B
11.REMOVE LOWER INSTRUMENT PANEL SUB-ASSEMBLY
55434F
12.REMOVE LOWER CENTER INSTRUMENT PANEL FINISH PANEL
58817A
13.REMOVE FRONT NO. 2 CONSOLE BOX INSERT
58816B
14.REMOVE FRONT CONSOLE BOX INSERT
86740
15.REMOVE TELEMATICS TRANSCEIVER
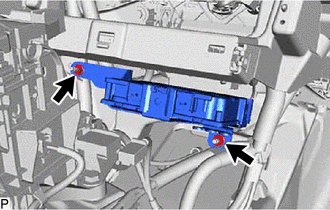
Remove the 2 nuts.
Disconnect each connector and remove the telematics transceiver.