GF2A TRANSFER / 4WD / AWD TRANSFER ASSEMBLY REASSEMBLY
PROCEDURE

 36111X
1.INSTALL TRANSFER CASE OIL SEAL
33309
2.INSTALL TRANSFER OUTPUT SHAFT COMPANION FLANGE SUB-ASSEMBLY
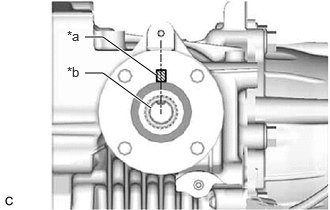
| *a | Matchmark |
| *b | Transfer Driven Pinion |
Align the matchmark on the transfer output shaft companion flange sub-assembly with the transfer driven pinion groove, and then temporarily install the transfer output shaft companion flange sub-assembly to the transfer assembly as shown in the illustration.
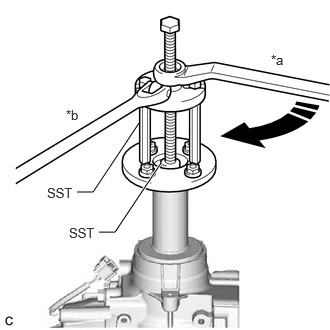
| *a | Turn |
| *b | Hold |
Using SST, install the transfer output shaft companion flange sub-assembly.
- SST
- 09950-30012 (09951-03010, 09953-03010, 09954-03010, 09955-03030)
09956-03090
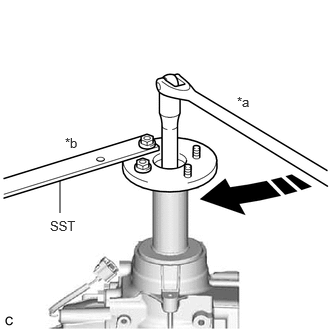
| *a | Turn |
| *b | Hold |
Using SST, temporarily install a new output shaft companion flange nut to the transfer assembly.
- SST
- 09330-00021
- Torque:
- 140 N*m (1428 kgf*cm, 103 ft.*lbf)
- CAUTION:
-
The total preload may be within the standard even when the transfer output shaft companion flange sub-assembly is loose. If the transfer output shaft companion flange sub-assembly is installed in this state, the vehicle may be damaged or lead to a serious accident.
- NOTICE:
-
Tighten the output shaft companion flange nut until there is no more looseness in the transfer output shaft companion flange sub-assembly and it turns to the right and left with the same amount of force.
- HINT:
-
After temporarily installing the output shaft companion flange nut, be sure to adjust the preload.
3.INSPECT TOTAL PRELOAD
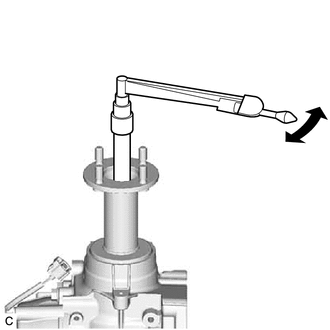
Using a torque wrench, measure the total preload (starting torque) with the teeth of the transfer driven pinion and transfer ring gear in contact.
- HINT:
- ·
The torque wrench should be installed as shown in the illustration.
·For a more accurate measurement, rotate the bearing forward and backward several times before the measurement.
·Use the preload value measured prior to disassembling the transfer assembly as the standard value.
·Adjust within the standard value (Adjustable range within +/- 0.2 N*m of the measured preload value).
If the preload is not as specified, perform the procedures below.
If the measured preload is higher than the standard value:
Replace the rear drive pinion bearing and transfer pinion bearing spacer, and then adjust the preload again.
If the measured preload is lower than the standard value:
Tighten the output shaft companion flange nut, and then adjust the preload again.
4.INSTALL OUTPUT SHAFT COMPANION FLANGE NUT
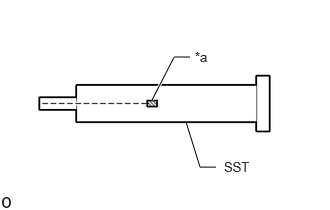
| *a | Matchmark |
Place a matchmark on SST as shown in the illustration.
- SST
- 09930-42010
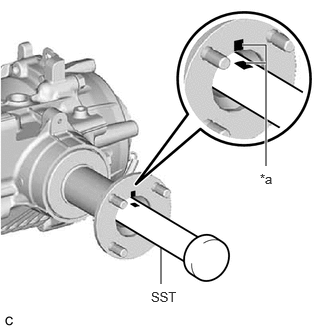
| *a | Matchmark |
Install SST aligned with the matchmark on the transfer output shaft companion flange sub-assembly as shown in the illustration.
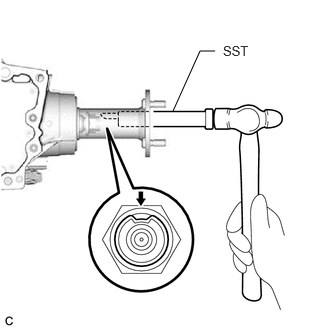
Using SST and a hammer, stake the output shaft companion flange nut.
- NOTICE:
-
Check that the matchmarks are properly aligned.
36113D
5.INSTALL TRANSFER CASE OIL SEAL RH
Coat the lip of a new transfer case oil seal RH with MP grease.
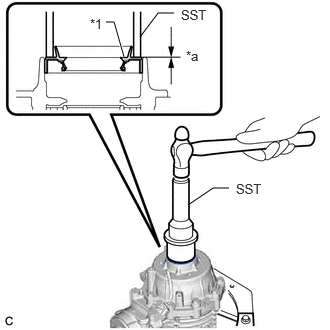
| *1 | Transfer Case Oil Seal RH |
| *a | Depth |
Using SST and a hammer, tap in the transfer case oil seal RH to the transfer assembly as shown in the illustration.
- SST
- 09223-46011
09631-32020
- Standard Depth:
-0.5 to 0.5 mm (-0.0197 to 0.0197 in.)
- NOTICE:
- ·
Tap the transfer case oil seal RH uniformly so that the transfer case oil seal RH is straight.
·Do not tap the transfer case oil seal RH in too far.
36111B
6.INSTALL TRANSFER CASE OIL SEAL
36111H
7.INSTALL TRANSFER CASE BREATHER PLUG
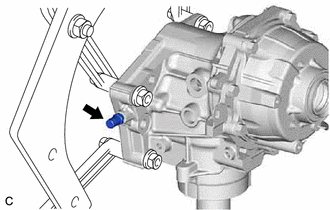
Install a new transfer case breather plug to the transfer assembly.
- Torque:
- 11.3 N*m (115 kgf*cm, 8 ft.*lbf)
84546
8.INSTALL NO. 1 4 WHEEL DRIVE POSITION SWITCH
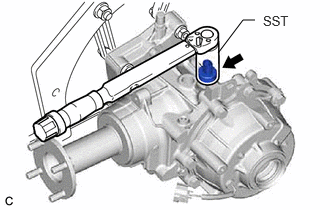
Using SST, install the No. 1 4 wheel drive position switch to the transfer assembly.
- SST
- 09816-30010
- Torque:
- 40.2 N*m (410 kgf*cm, 30 ft.*lbf)
- NOTICE:
-
Make sure that the gasket does not come off.
36114L
9.INSTALL TRANSFER FILLER PLUG
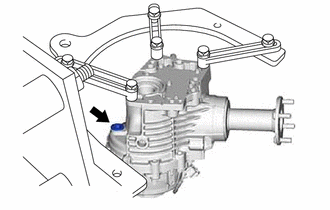
Using a 10 mm socket hexagon wrench, install the transfer filler plug and a new gasket to the transfer assembly.
- Torque:
- 39 N*m (398 kgf*cm, 29 ft.*lbf)
36114H
10.INSTALL TRANSFER DRAIN PLUG
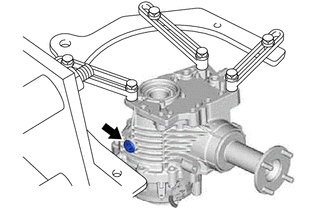
Using a 10 mm socket hexagon wrench, install the transfer drain plug and a new gasket to the transfer assembly.
- Torque:
- 39 N*m (398 kgf*cm, 29 ft.*lbf)
36114H
11.INSTALL NO. 2 TRANSFER CASE PLUG
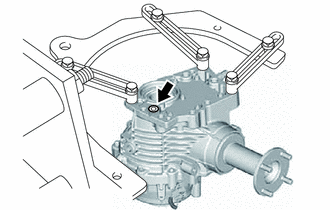
Using a 10 mm socket hexagon wrench, install the No. 2 transfer case plug and a new gasket to the transfer assembly.
- Torque:
- 39 N*m (398 kgf*cm, 29 ft.*lbf)
36114B
12.INSTALL NO. 1 TRANSFER CASE PLUG
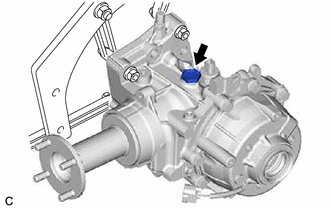
Install the No. 1 transfer case plug and a new gasket to the transfer assembly.
- Torque:
- 39 N*m (398 kgf*cm, 29 ft.*lbf)
36111G
13.INSTALL TRANSFER CASE STRAIGHT PIN
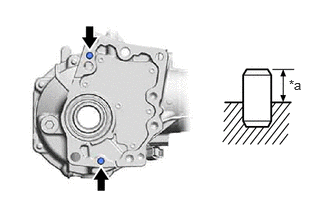
| *a | Protrusion Height |
Using a plastic hammer, install the 2 transfer case straight pins to the transfer assembly at the positions shown in the illustration.
- Protrusion Height:
10.8 to 11.8 mm (0.425 to 0.465 in.)
36100
14.REMOVE TRANSFER ASSEMBLY
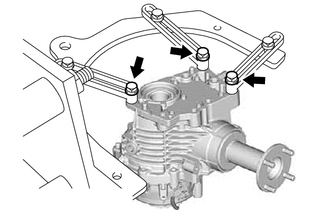
Remove the transfer assembly from the overhaul attachment.
36100A
15.INSTALL TRANSFER AND TRANSAXLE SETTING STUD BOLT
Clean the 4 bolt holes.
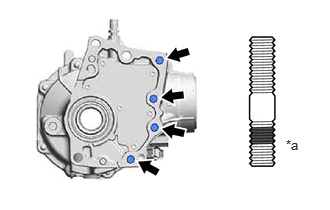
| *a | Sealed Side |
Using 2 nuts, install 4 new transfer and transaxle setting stud bolts to the transfer assembly at the positions shown in the illustration.
- Torque:
- 39.2 N*m (400 kgf*cm, 29 ft.*lbf)
- NOTICE:
-
Install the sealed side of the transfer and transaxle setting stud bolt to the transfer assembly.
31364D
16.INSTALL CLUTCH CONTROL SOLENOID WIRE
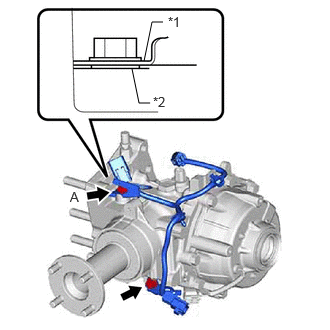
| *1 | Wiring Harness Clamp Bracket |
| *2 | Clutch Control Solenoid Wire |
Install the 2 wiring harness clamp brackets and clutch control solenoid wire to the transfer assembly with the 2 bolts.
- Torque:
- 19.6 N*m (200 kgf*cm, 14 ft.*lbf)
- HINT:
-
Tighten the ground of the clutch control solenoid wire together with the bolt (A).
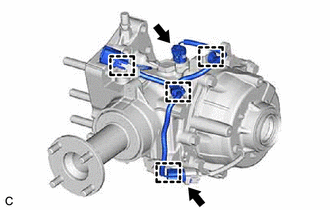
Connect the 4 clamps and 2 connectors.