P810 HYBRID TRANSMISSION / TRANSAXLE SHIFT LEVER INSTALLATION
PROCEDURE

 1.INSTALL TRANSMISSION FLOOR SHIFT ASSEMBLY
Temporarily install the transmission floor shift assembly to the shift and select lever support with the 4 bolts.
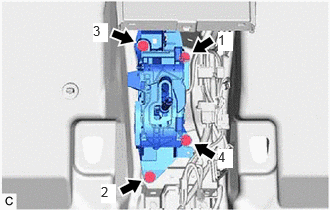
Tighten the 4 bolts in the order shown in the illustration.
- Torque:
- 12 N*m (122 kgf*cm, 9 ft.*lbf)
Engage the 2 clamps to connect the wire harness to the transmission floor shift assembly.
Connect the shift lock control ECU connector.
Connect the transmission control switch connector.
33820B
2.CONNECT TRANSMISSION CONTROL CABLE ASSEMBLY
- NOTICE:
-
Before connecting the transmission control cable assembly, check that the shift lever is in N.
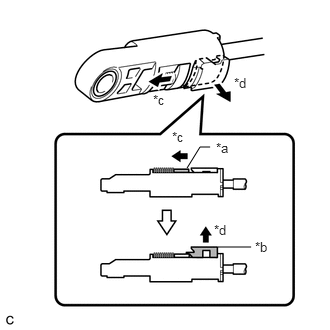
| *a | Slider |
| *b | Lock Piece |
| *c | Slide |
| *d | Pull |
Slide the slider of the transmission control cable assembly in the direction indicated by the arrow in the illustration and pull the lock piece outward.
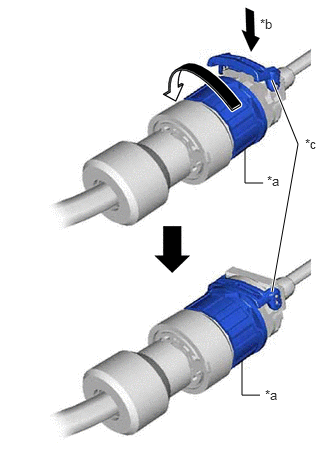
| *a | Lock Nut |
| *b | Push in |
| *c | Stopper |
Turn the lock nut of the transmission control cable assembly counterclockwise. While holding the lock nut, push in the stopper.
- NOTICE:
-
Do not turn the lock nut of the transmission control cable assembly excessively as the internal spring may come off and the transmission control cable assembly will not be reusable.
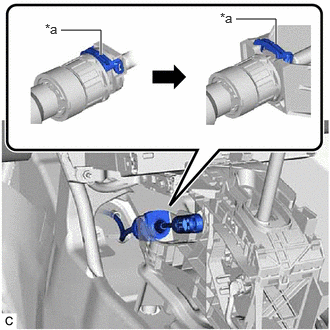
| *a | Stopper |
Connect the transmission control cable assembly to the transmission floor shift assembly.
- NOTICE:
- ·
Install the transmission control cable assembly with the stopper facing upwards.
·After installation, check that the outer part of the stopper is as shown in the illustration.
·Make sure that the transmission control cable assembly is securely locked.
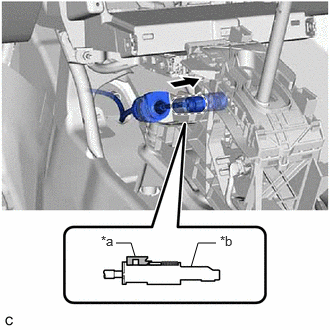
| *a | Lock Piece |
| *b | Adjuster Case |
Connect the transmission control cable assembly to the transmission floor shift assembly.
- NOTICE:
- ·
Check that the lock piece is pulled out.
·Push the end of the transmission control cable assembly all the way to the base of the transmission floor shift assembly pin.
·Connect the transmission control cable assembly so that the lock piece faces the driver side.
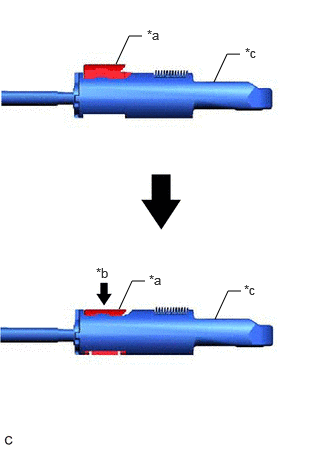
| *a | Lock Piece |
| *b | Push in |
| *c | Adjuster Case |
Push the lock piece into the adjuster case.
- NOTICE:
- ·
Check that the shift lever is in N.
·Securely push in the lock piece until the slider lock is engaged.
·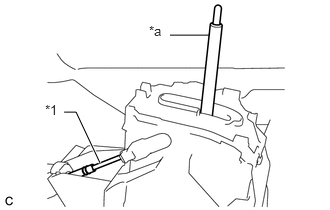 1.771,0.365 2.177,0.365 false 0.667,1.167 0.792,1.167 0.792,1.167 1.042,1.698 true 0.469,1.063 0.708,1.333 0.24,0.271 10 false *1 1.552,0.24 1.875,0.479 0.323,0.24 10 false *a
*1 Transmission Control Cable Assembly *a Lever Shaft
When pushing in the lock piece of the adjuster case to lock it, remove your hand from the lever shaft.
·When pushing in the lock piece of the adjuster case to lock it, do not move the lever shaft or transmission control cable assembly forward or backward.
After adjusting the shift lever position, check the position and operation of the shift lever. If there is a problem, adjust the shift lever position again.
58816B
3.INSTALL FRONT CONSOLE BOX INSERT
55606
4.INSTALL NO. 1 INSTRUMENT PANEL UNDER COVER SUB-ASSEMBLY
55446A
5.INSTALL NO. 1 SWITCH HOLE BASE
6.INSTALL CONSOLE BOX ASSEMBLY
7.INSTALL SHIFT LOCK RELEASE BUTTON COVER
Engage the 2 claws to install the shift lock release button cover to the shift position indicator.
8.INSPECT SHIFT LEVER POSITION