BRAKE CONTROL / DYNAMIC CONTROL SYSTEMS ELECTRONICALLY CONTROLLED BRAKE SYSTEM(for HV Model) P057113 Brake Switch "A" Circuit Open
DESCRIPTION
The No. 2 skid control ECU (brake actuator assembly) detects the brake operating conditions through a signal transmitted by the stop light switch assembly.
The No. 2 skid control ECU (brake actuator assembly) incorporates a circuit to detect an open circuit.
This DTC is output when an open circuit is detected in the stop light signal input line.
| DTC No. | Detection Item | DTC Detection Condition | Trouble Area | Note |
|---|---|---|---|---|
| P057113 | Brake Switch "A" Circuit Open | When the voltage at terminal +BS is 9.5 V or more and the stop light drive output (STPO) is off, an open in the STP circuit is detected for 0.3 seconds or more. | ·
Wire harness and connector ·
Stop light switch assembly ·
STP circuit ·
No. 2 skid control ECU (brake actuator assembly) |
Output ECU: No. 2 skid control ECU (brake actuator assembly) |
WIRING DIAGRAM
Refer to DTC C13807E.
CAUTION / NOTICE / HINT
- NOTICE:
- ·
Inspect the fuses for circuits related to this system before performing the following procedure.
·After replacing the No. 2 skid control ECU (brake actuator assembly), perform "Calibration".
PROCEDURE
Check that the stop lights come on when the brake pedal is depressed.
- Result:
Result Proceed to All stop lights illuminate when the brake pedal is depressed and turn off when the brake pedal is released. A All stop lights do not illuminate when the brake pedal is depressed. B One or more stop lights illuminate when the brake pedal is depressed but remain on when the brake pedal is released. C
A
B
C
Check the value of Stop Light SW when the brake pedal is depressed.
- Chassis > Brake/EPB > Data List
-
Tester Display Measurement Item Range Normal Condition Diagnostic Note Stop Light SW Stop light switch assembly status
(STP or STP2 terminal input)OFF / ON OFF: Brake pedal released
ON: Brake pedal depressed- HINT:
- ·
Stop light control relay off: STP terminal status displayed.
·Stop light control relay on: STP2 terminal status displayed.
- Chassis > Brake/EPB > Data List
-
Tester Display Stop Light SW - 50003 435 59
- Result:
Result Proceed to The value of Stop Light SW is ON. A Other than above. B
A
B
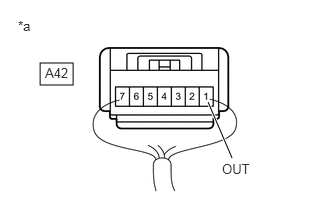
| *a | Component with harness connected
(Stop Light Switch Assembly) |
Turn the ignition switch off.
Make sure that there is no looseness at the locking part and the connecting part of the connector.
- OK:
The connector is securely connected.
Turn the ignition switch to ON.
Measure the voltage according to the value(s) in the table below.
- Standard Voltage:
Tester Connection Condition Specified Condition A42-1 (OUT) - Body ground ·Ignition switch ON
·The headlights are on
·The blower motor switch is in the HI position
·The rear window defogger is turned on
·Stop light switch assembly off (Brake pedal released)
Below 1.5 V
- Result:
Proceed to OK NG
OK
NG
Clear the DTCs.
- Chassis > Brake/EPB > Clear DTCs
- 50002 435
Turn the ignition switch off.
- Result:
Proceed to NEXT
NEXT
Based on the Freeze Frame Data and interview with the customer, attempt to reproduce the conditions when the malfunction occurred.
Check if the same DTC is output.
- Chassis > Brake/EPB > Trouble Codes
- 50001 435
- Result:
Result Proceed to DTC P057113 is not output. A DTC P057113 is output. B
A
Click hereGeneral>INTRODUCTION>HOW TO TROUBLESHOOT ECU CONTROLLED SYSTEMS>HOW TO PROCEED WITH TROUBLESHOOTING
B
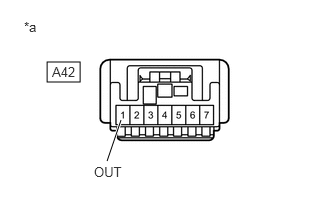
| *a | Front view of wire harness connector
(to Stop Light Switch Assembly) |
Turn the ignition switch off.
Make sure that there is no looseness at the locking part and the connecting part of the connector.
- OK:
The connector is securely connected.
Disconnect the A42 stop light switch assembly connector.
Check both the connector case and the terminals for deformation and corrosion.
- OK:
No deformation or corrosion.
Measure the voltage according to the value(s) in the table below.
- Standard Voltage:
Tester Connection Condition Specified Condition A42-1 (OUT) - Body ground Stop light switch assembly off
(Brake pedal released)Below 1.5 V
- Result:
Proceed to OK NG
OK
NG
| *a | Front view of wire harness connector
(to Stop Light Switch Assembly) |
Make sure that there is no looseness at the locking part and the connecting part of the connector.
- OK:
The connector is securely connected.
Disconnect the A57 No. 2 skid control ECU (brake actuator assembly) connector.
Check both the connector case and the terminals for deformation and corrosion.
- OK:
No deformation or corrosion.
Measure the voltage according to the value(s) in the table below.
- Standard Voltage:
Tester Connection Condition Specified Condition A42-1 (OUT) - Body ground Stop light switch assembly off
(Brake pedal released)Below 1.5 V
- Result:
Proceed to OK NG
OK
NG
Check that there is no short to +B in the STP circuit (wire harnesses, connectors, ECUs and stop lights).
- OK:
No short to +B.
- Result:
Proceed to OK NG
OK
Click hereGeneral>INTRODUCTION>HOW TO TROUBLESHOOT ECU CONTROLLED SYSTEMS>HOW TO PROCEED WITH TROUBLESHOOTING
NG
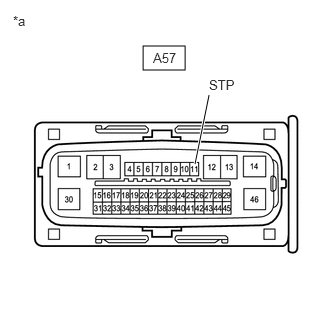
| *a | Front view of wire harness connector
(to No. 2 Skid Control ECU (Brake Actuator Assembly)) |
Turn the ignition switch off.
Make sure that there is no looseness at the locking part and the connecting part of the connector.
- OK:
The connector is securely connected.
Disconnect the A57 No. 2 skid control ECU (brake actuator assembly) connector.
Check both the connector case and the terminals for deformation and corrosion.
- OK:
No deformation or corrosion.
Measure the voltage according to the value(s) in the table below.
- Standard Voltage:
Tester Connection Condition Specified Condition A57-11 (STP) - Body ground Stop light switch assembly on
(Brake pedal depressed)11 to 14 V
- Result:
Proceed to OK NG
OK
NG
Check that there is no open in the wire harnesses and connectors from terminal OUT of the stop light switch assembly to the stop lights.
- OK:
No open.
- Result:
Proceed to OK NG
OK
NG