DRIVE SHAFT / PROPELLER SHAFT PROPELLER SHAFT ASSEMBLY INSTALLATION
PROCEDURE

 37100
1.TEMPORARILY TIGHTEN PROPELLER WITH CENTER BEARING SHAFT ASSEMBLY
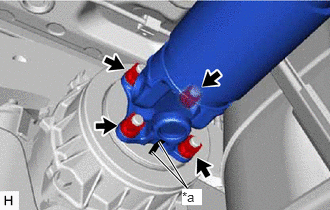
| *a | Matchmark |
When reusing a propeller with center bearing shaft assembly and rear differential carrier assembly:
Align the matchmarks on the rear differential carrier assembly and propeller with center bearing shaft assembly.
Temporarily install the 4 nuts and 4 washers.
- NOTICE:
-
Do not apply grease to the 4 bolts, 4 nuts or 4 washers.
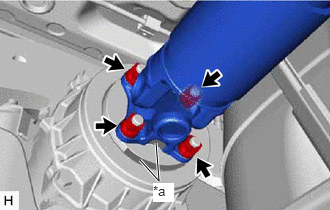
| *a | Alignment Mark |
When using a new propeller with center bearing shaft assembly or rear differential carrier assembly:
Align the alignment marks on the rear differential carrier assembly and propeller with center bearing shaft assembly.
Temporarily install the 4 nuts and 4 washers.
- NOTICE:
-
Do not apply grease to the 4 bolts, 4 nuts or 4 washers.
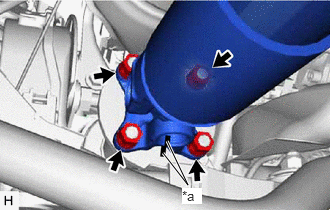
| *a | Matchmark |
Align the matchmarks on the transfer assembly and propeller with center bearing shaft assembly.
Temporarily install the 4 nuts and 4 washers.
- NOTICE:
-
Do not apply grease to the 4 bolts, 4 nuts or 4 washers.
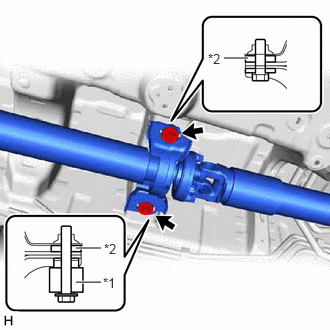
| *1 | Center Support Bearing Damper |
| *2 | Center No. 2 Support Bearing Washer |
Temporarily install the propeller with center bearing shaft assembly with the bolt, center support bearing damper and 2 center No. 2 support bearing washers (for front side).
- NOTICE:
- ·
Reuse the center No. 2 support bearing washers.
·Do not apply grease to the bolt, center support bearing damper and 2 center No. 2 support bearing washers.
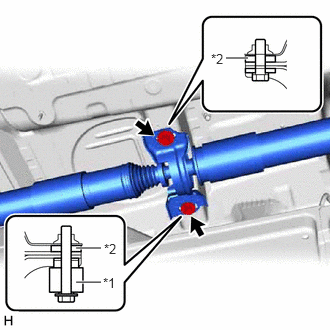
| *1 | Center Support Bearing Damper |
| *2 | Center No. 2 Support Bearing Washer |
Temporarily install the propeller with center bearing shaft assembly with the bolt, center support bearing damper and 2 center No. 2 support bearing washers (for rear side).
- NOTICE:
- ·
Reuse the center No. 2 support bearing washers.
·Do not apply grease to the bolt, center support bearing damper and 2 center No. 2 support bearing washers.
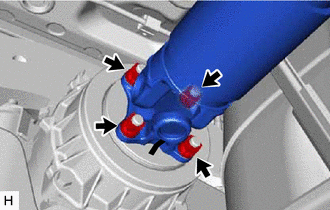
Fully tighten the 4 nuts.
- Torque:
- 73.5 N*m (749 kgf*cm, 54 ft.*lbf)
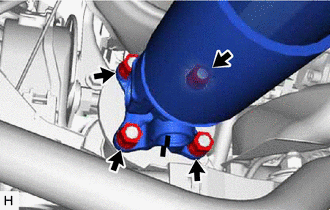
Fully tighten the 4 nuts.
- Torque:
- 73.5 N*m (749 kgf*cm, 54 ft.*lbf)
37100
2.FULLY TIGHTEN PROPELLER WITH CENTER BEARING SHAFT ASSEMBLY
With the vehicle unloaded, adjust the front and rear distance (A) between the edge surface of the center No. 2 support bearing assembly and the edge surface of the cushion respectively as shown in the illustration, and then tighten the bolts.
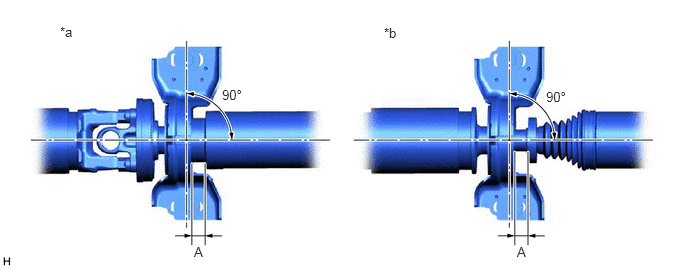
| *a | Center No. 2 Support Bearing Assembly (for Front Side) | *b | Center No. 2 Support Bearing Assembly (for Rear Side) |
- Distance (A):
11.3 to 13.3 mm (0.445 to 0.524 in.)
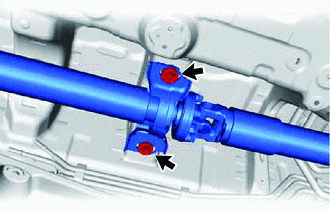
Fully tighten the bolt and center support bearing damper (for front side).
- Torque:
- 36.8 N*m (375 kgf*cm, 27 ft.*lbf)
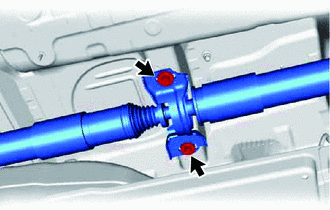
Fully tighten the bolt and center support bearing damper (for rear side).
- Torque:
- 36.8 N*m (375 kgf*cm, 27 ft.*lbf)
Check that the center line of the bracket is at a right angle to the shaft axial direction.
3.INSPECT AND ADJUST JOINT ANGLE
- NOTICE:
-
Measure the joint angle when the vehicle is raised using a four-post lift or when using a pit.
- HINT:
-
If any vibration or noise occurs, perform the joint angle check as follows and replace the center No. 2 support bearing washers with ones of the correct thickness.
Stabilize the propeller shaft and differential.
Turn the propeller shaft several times by hand to stabilize the center support bearings.
Using a jack, raise and lower the differential to stabilize the differential mounting cushion.
Check the joint angles.
Check the No. 1, No. 2 and No. 3 joint angles.
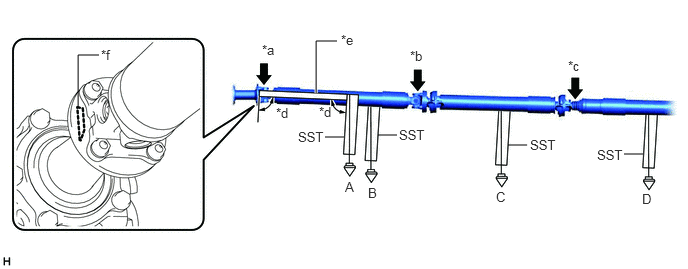
| *a | No. 1 Joint Angle (A - B) | *b | No. 2 Joint Angle (B - C) |
| *c | No. 3 Joint Angle (C - D) | *d | 90° |
| *e | Straightedge | *f | Straightedge Contact Position |
Using SST, measure the transfer assembly installation angle (A) and propeller shaft assembly installation angle (B), (C) and (D).
- SST
- 09370-50010
- Joint Angle:
Measurement Position Joint Angle for Dynamic Torque Control AWD for Dynamic Torque Vectoring AWD No. 1 Joint Angle (A - B) -2.33° +/- 1.00° -2.33° +/- 1.00° No. 2 Joint Angle (B - C) 0.72° +/- 1.00° 0.71° +/- 1.00° No. 3 Joint Angle (C - D) 0.15° +/- 1.00° 0.31° +/- 1.00°
Check the No. 4 joint angle.
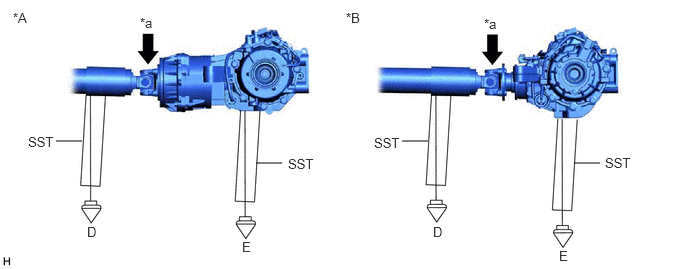
| *A | for Dynamic Torque Control AWD | *B | for Dynamic Torque Vectoring AWD |
| *a | No. 4 Joint Angle (D - E) | - | - |
Using SST, measure the rear propeller shaft assembly installation angle (D) and rear differential carrier assembly installation angle (E).
- SST
- 09370-50010
- Joint Angle:
Measurement Position Joint Angle for Dynamic Torque Control AWD for Dynamic Torque Vectoring AWD No. 4 Joint Angle (D - E) 1.86° +/- 1.00° 1.68° +/- 1.00°
If the measured angle is not within the specified range, adjust it with center No. 2 support bearing washers.
Adjust the No. 1 joint angle and No. 4 joint angle.
Select center No. 2 support bearing washers for adjustment.
- Center No. 2 Support Bearing Washer Thickness:
Part No. Thickness mm (in.) 90201-10123 2.0 mm (0.079 in.) 90201-10081 4.5 mm (0.177 in.) 90201-10083 6.5 mm (0.256 in.) 90201-10084 9.0 mm (0.354 in.)
- NOTICE:
- ·
Make sure to use center No. 2 support bearing washers of the same thickness on both the right and left sides.
·Do not use more than 1 adjusting washer per bolt.
58043
4.INSTALL REAR MAIN MUFFLER HEAT INSULATOR SUB-ASSEMBLY
Install the rear main muffler heat insulator sub-assembly to the vehicle body with the 3 bolts and 2 nuts.
- Torque:
- Bolt : 7.5 N*m (76 kgf*cm, 66 in.*lbf)
- Nut : 4.9 N*m (50 kgf*cm, 43 in.*lbf)
Install the No. 3 exhaust pipe support bracket and No. 4 exhaust pipe support bracket with the 4 bolts.
- Torque:
- 29 N*m (296 kgf*cm, 21 ft.*lbf)
58720B
5.INSTALL ENGINE SERVICE COVER ASSEMBLY
Install the engine service cover assembly to the vehicle body with the 6 bolts and 3 nuts.
- Torque:
- Bolt : 7.5 N*m (76 kgf*cm, 66 in.*lbf)
- Nut : 4.9 N*m (50 kgf*cm, 43 in.*lbf)
Install the No. 1 exhaust pipe support bracket with the 2 bolts.
- Torque:
- 29 N*m (296 kgf*cm, 21 ft.*lbf)
17420
6.INSTALL CENTER EXHAUST PIPE ASSEMBLY (TWC: Rear Catalyst)
17430
7.INSTALL TAIL EXHAUST PIPE ASSEMBLY
8.INSPECT FOR EXHAUST GAS LEAK
9.PERFORM INITIALIZATION
SFI system initialization:
Click hereEngine / Hybrid System>2GR-FKS (ENGINE CONTROL)>SFI SYSTEM>INITIALIZATION