HEATING / AIR CONDITIONING REFRIGERANT LINE(for HV Model) INSTALLATION
PROCEDURE

 1.INSTALL PIPING CLAMP (for Suction Hose Sub-assembly Side)
for Low Pressure without Sub-cool Accelerator:
Remove the vinyl tape from the suction pipe sub-assembly and suction hose sub-assembly.
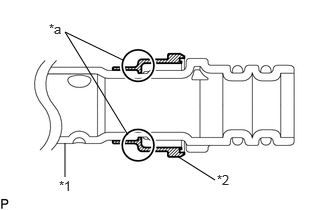
| *1 | Suction Hose Sub-assembly |
| *2 | Piping Clamp |
| *a | Groove |
Install a new piping clamp to the suction hose sub-assembly.
- NOTICE:
- ·
Securely engage the piping clamp to the groove of the suction hose sub-assembly.
·Do not open the piping clamp more than the diameter of the suction hose sub-assembly when installing it.
·Do not install the piping clamp with the large diameter section facing the wrong direction.
Sufficiently apply compressor oil to 2 new O-rings and the fitting surfaces of the suction hose sub-assembly.
- Compressor Oil:
ND-OIL 11 or equivalent
Install the 2 O-rings to the suction hose sub-assembly.
- NOTICE:
-
Keep the O-rings and O-ring fitting surfaces free from dirt and foreign matter.
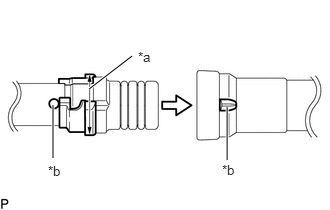
| *a | Large Diameter Section of Piping Clamp |
| *b | Alignment Mark |
Align the alignment marks and connect the suction hose sub-assembly to the suction pipe sub-assembly.
- NOTICE:
-
Connect the parts by holding the tubes, not the piping clamp.
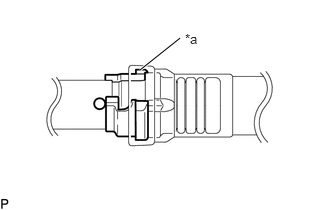
| *a | Large Diameter Section of Piping Clamp |
Securely insert the piping clamp to the point where the large diameter section of the piping clamp is covered by the suction pipe sub-assembly.
- NOTICE:
- ·
When inserting, make sure that a click sound is heard.
·Check that the suction hose sub-assembly is securely connected by pulling it.
Remove the vinyl tape from the suction pipe sub-assembly and No. 1 air conditioning accessory assembly.
Sufficiently apply compressor oil to 2 new O-rings and the fitting surfaces of the suction pipe sub-assembly.
- Compressor Oil:
ND-OIL 11 or equivalent
Install the 2 O-rings to the suction pipe sub-assembly.
- NOTICE:
-
Keep the O-rings and O-ring fitting surfaces free from dirt and foreign matter.
Connect the suction pipe sub-assembly to the No. 1 air conditioning accessory assembly.
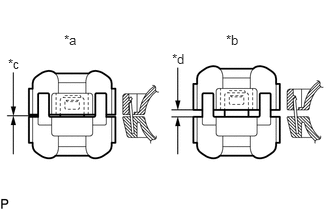
| *a | Correct |
| *b | Incorrect |
| *c | No Gap |
| *d | Gap |
Install the piping clamp to the No. 1 air conditioning accessory assembly.
- NOTICE:
-
Make sure that the piping clamp is engaged securely with no gap.
for Low Pressure with Sub-cool Accelerator:
Remove the vinyl tape from the No. 2 air conditioner tube and accessory assembly and suction hose sub-assembly.
| *1 | Suction Hose Sub-assembly |
| *2 | Piping Clamp |
| *a | Groove |
Install a new piping clamp to the suction hose sub-assembly.
- NOTICE:
- ·
Securely engage the piping clamp to the groove of the suction hose sub-assembly.
·Do not open the piping clamp more than the diameter of the suction hose sub-assembly when installing it.
·Do not install the piping clamp with the large diameter section facing the wrong direction.
Sufficiently apply compressor oil to 2 new O-rings and the fitting surfaces of the suction hose sub-assembly.
- Compressor Oil:
ND-OIL 11 or equivalent
Install the 2 O-rings to the suction hose sub-assembly.
- NOTICE:
-
Keep the O-rings and O-ring fitting surfaces free from dirt and foreign matter.
| *a | Large Diameter Section of Piping Clamp |
| *b | Alignment Mark |
Align the alignment marks and connect the suction hose sub-assembly to the No. 2 air conditioner tube and accessory assembly.
- NOTICE:
-
Connect the parts by holding the tubes, not the piping clamp.
| *a | Large Diameter Section of Piping Clamp |
Securely insert the piping clamp to the point where the large diameter section of the piping clamp is covered by the No. 2 air conditioner tube and accessory assembly.
- NOTICE:
- ·
When inserting, make sure that a click sound is heard.
·Check that the suction hose sub-assembly is securely connected by pulling it.
Remove the vinyl tape from the No. 2 air conditioner tube and accessory assembly and No. 1 air conditioning accessory assembly.
Sufficiently apply compressor oil to 2 new O-rings and the fitting surfaces of the No. 2 air conditioner tube and accessory assembly.
- Compressor Oil:
ND-OIL 11 or equivalent
Install the 2 O-rings to the No. 2 air conditioner tube and accessory assembly.
- NOTICE:
-
Keep the O-rings and O-ring fitting surfaces free from dirt and foreign matter.
Connect the No. 2 air conditioner tube and accessory assembly to the No. 1 air conditioning accessory assembly.
| *a | Correct |
| *b | Incorrect |
| *c | No Gap |
| *d | Gap |
Install the piping clamp to the No. 1 air conditioning accessory assembly.
- NOTICE:
-
Make sure that the piping clamp is engaged securely with no gap.
for High Pressure without Sub-cool Accelerator:
Remove the vinyl tape from the cooler refrigerant liquid pipe A and No. 1 air conditioning accessory assembly.
Sufficiently apply compressor oil to 2 new O-rings and the fitting surfaces of the cooler refrigerant liquid pipe A.
- Compressor Oil:
ND-OIL 11 or equivalent
Install the 2 O-rings to the cooler refrigerant liquid pipe A.
- NOTICE:
-
Keep the O-rings and O-ring fitting surfaces free from dirt and foreign matter.
Connect the cooler refrigerant liquid pipe A to the No. 1 air conditioning accessory assembly.
| *a | Correct |
| *b | Incorrect |
| *c | No Gap |
| *d | Gap |
Install the piping clamp to the No. 1 air conditioning accessory assembly.
- NOTICE:
-
Make sure that the piping clamp is engaged securely with no gap.
for High Pressure with Sub-cool Accelerator:
Remove the vinyl tape from the No. 2 air conditioner tube and accessory assembly and air conditioning tube assembly.
Sufficiently apply compressor oil to 2 new O-rings and the fitting surfaces of the No. 2 air conditioner tube and accessory assembly.
- Compressor Oil:
ND-OIL 11 or equivalent
Install the 2 O-rings to the No. 2 air conditioner tube and accessory assembly.
- NOTICE:
-
Keep the O-rings and O-ring fitting surfaces free from dirt and foreign matter.
Connect the No. 2 air conditioner tube and accessory assembly to the air conditioning tube assembly.
| *a | Correct |
| *b | Incorrect |
| *c | No Gap |
| *d | Gap |
Install the piping clamp to the air conditioning tube assembly.
- NOTICE:
-
Make sure that the piping clamp is engaged securely with no gap.
Remove the vinyl tape from the No. 2 air conditioner tube and accessory assembly and No. 1 air conditioning accessory assembly.
Sufficiently apply compressor oil to 2 new O-rings and the fitting surfaces of the No. 2 air conditioner tube and accessory assembly.
- Compressor Oil:
ND-OIL 11 or equivalent
Install the 2 O-rings to the No. 2 air conditioner tube and accessory assembly.
- NOTICE:
-
Keep the O-rings and O-ring fitting surfaces free from dirt and foreign matter.
Connect the No. 2 air conditioner tube and accessory assembly to the No. 1 air conditioning accessory assembly.
| *a | Correct |
| *b | Incorrect |
| *c | No Gap |
| *d | Gap |
Install the piping clamp to the No. 1 air conditioning accessory assembly.
- NOTICE:
-
Make sure that the piping clamp is engaged securely with no gap.
2.INSTALL PIPING CLAMP (for Air Conditioning Tube Assembly Side)
3.CHARGE AIR CONDITIONING SYSTEM WITH REFRIGERANT
4.WARM UP COMPRESSOR
5.INSPECT FOR REFRIGERANT LEAK