SEAT REAR NO. 1 SEAT ASSEMBLY(for 60/40 Split Seat Type RH Side) REASSEMBLY
CAUTION / NOTICE / HINT
- CAUTION:
-
Wear protective gloves. Sharp areas on the seat frame may injure your hands.
PROCEDURE

 71015A
1.INSTALL REAR SEAT CUSHION FRAME SUB-ASSEMBLY RH
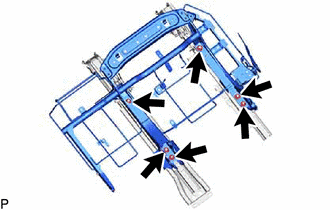
Install the rear seat cushion frame sub-assembly RH with the 6 nuts.
- Torque:
- 29 N*m (296 kgf*cm, 21 ft.*lbf)
71017
2.INSTALL REAR SEATBACK FRAME SUB-ASSEMBLY RH
Temporarily install the rear seatback frame sub-assembly RH to the No. 1 seat cushion frame sub-assembly RH as shown in the illustration.
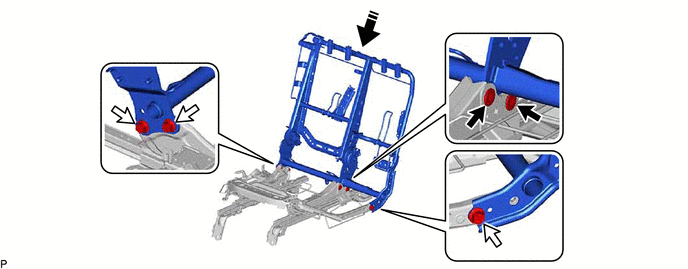

|
Bolt (A) | 
|
Bolt (B) |

|
Install in this Direction | - | - |
Temporarily install the 3 bolts (B).
Using a T55 "TORX" socket wrench, temporarily install the 2 bolts (A).
Tighten the 3 bolts (B) while pulling the rear seatback frame sub-assembly RH as shown in the illustration.
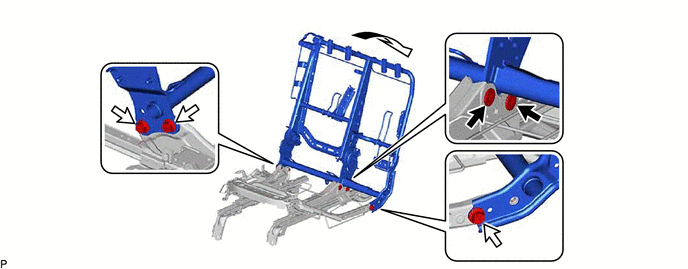
|
|
Bolt (A) |
|
Bolt (B) |
- Torque:
- 42 N*m (428 kgf*cm, 31 ft.*lbf)
Using a T55 "TORX" socket wrench, tighten the 2 bolts (A) to install the rear seatback frame sub-assembly RH.
- Torque:
- 42 N*m (428 kgf*cm, 31 ft.*lbf)
72307E
3.INSTALL NO. 2 RECLINING CONTROL LINK SUB-ASSEMBLY RH
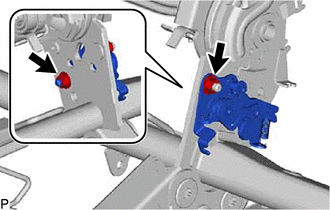
Install the No. 2 reclining control link sub-assembly RH with the 2 nuts.
- Torque:
- 21 N*m (214 kgf*cm, 15 ft.*lbf)
72307D
4.INSTALL NO. 1 RECLINING CONTROL LINK SUB-ASSEMBLY RH
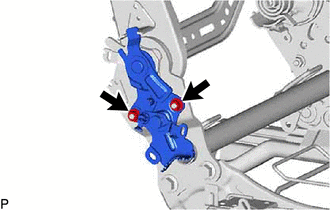
Install the No. 1 reclining control link sub-assembly RH with the 2 nuts.
- Torque:
- 21 N*m (214 kgf*cm, 15 ft.*lbf)
72704A
5.INSTALL REAR SEAT RECLINING CONTROL CABLE
Route the rear seat reclining control cable as shown in the illustration and engage the clamp.
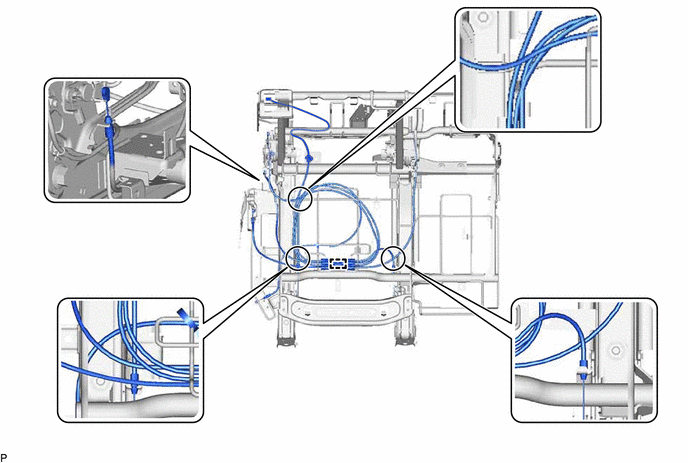
Engage the 12 clamps to install the rear seat reclining control cable.
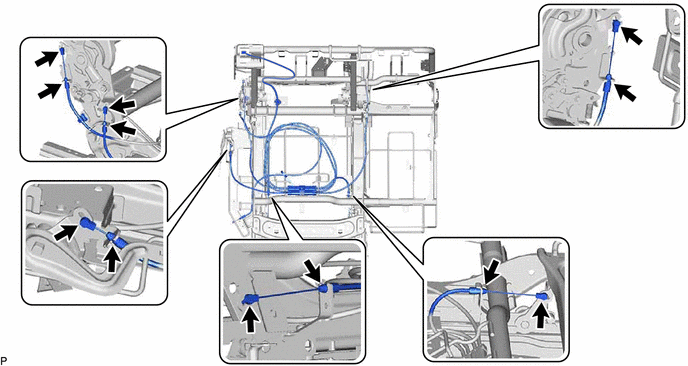
72210G
6.INSTALL REAR NO. 1 SEAT TRACK CONTROL CABLE ASSEMBLY RH
Route the rear No. 1 seat track control cable assembly RH as shown in the illustration and engage the 2 clamps.
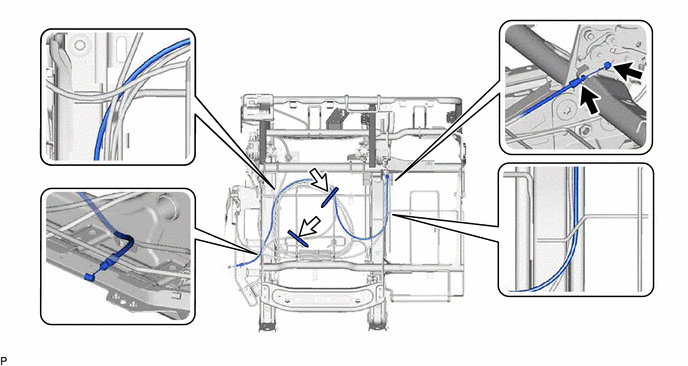
|
|
Clamp |
|
Wire Harness Clamp |
Install the rear No. 1 seat track control cable assembly RH with the 2 wire harness clamps.
7.INSTALL CONNECTOR MALE HOUSING (w/o Seat Heater System)
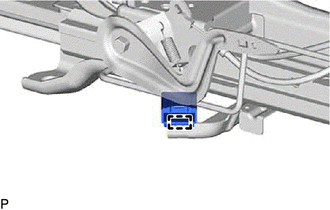
w/o Seat Belt Warning System:
Engage the clamp to install the connector male housing.
82193
8.INSTALL REAR SEAT WIRE RH (w/o Seat Heater System)
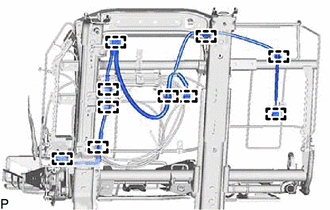
Engage the 10 clamps to install the rear seat wire RH.
82193
9.INSTALL REAR SEAT WIRE RH (w/ Seat Heater System)
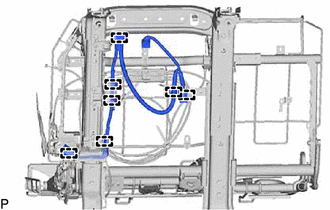
w/o Seat Belt Warning System:
Engage the 7 clamps to install the rear seat wire RH.
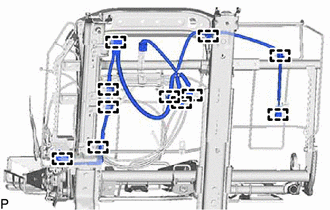
w/ Seat Belt Warning System:
Engage the 11 clamps to install the rear seat wire RH.
71691N
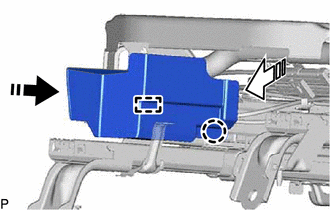
10.INSTALL REAR NO. 1 SEAT CUSHION HINGE UPPER COVER RH
|
|
Install in this Direction (1) |

|
Install in this Direction (2) |
Engage the claw and guide as shown in the illustration to install the rear No. 1 seat cushion hinge upper cover RH.
71693
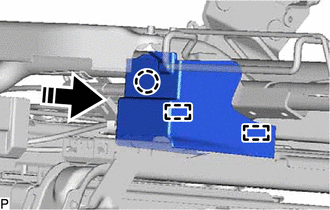
11.INSTALL REAR SEAT CUSHION HINGE LOWER COVER RH
|
|
Install in this Direction |
Engage the claw and 2 guides as shown in the illustration to install the rear seat cushion hinge lower cover RH.
72551E
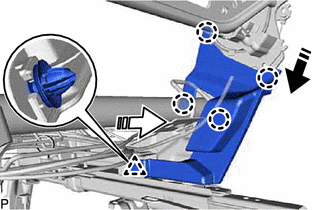
12.INSTALL RECLINING HINGE COVER RH
|
|
Install in this Direction (1) |
|
|
Install in this Direction (2) |
Engage the 4 claws and clip as shown in the illustration to install the reclining hinge cover RH.
71833A
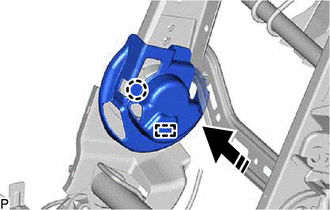
13.INSTALL REAR NO. 1 SEAT RECLINING COVER RH
|
|
Install in this Direction |
Engage the claw and guide as shown in the illustration to install the rear No. 1 seat reclining cover RH.
71485
14.INSTALL REAR SEAT HINGE COVER
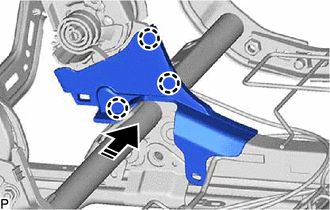
|
|
Install in this Direction |
Engage the 3 claws as shown in the illustration to install the rear seat hinge cover.
71834A
15.INSTALL REAR NO. 1 SEAT RECLINING COVER LH
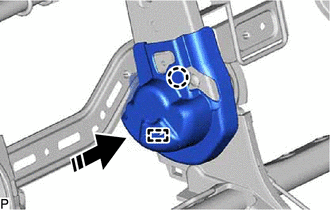
|
|
Install in this Direction |
Engage the claw and guide as shown in the illustration to install the rear No. 1 seat reclining cover LH.
71486C
16.INSTALL REAR SEAT HINGE COVER LH
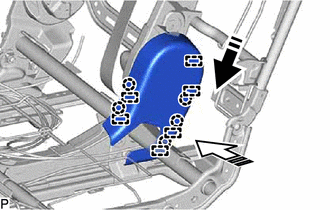
|
|
Install in this Direction (1) |
|
|
Install in this Direction (2) |
Engage the 5 claws and 6 guides as shown in the illustration to install the rear seat hinge cover LH.
71629A
17.INSTALL REAR SEAT CUSHION HINGE COVER RH
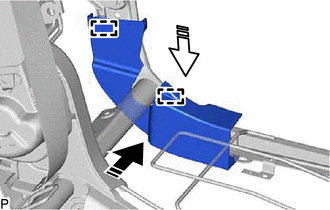
|
|
Install in this Direction (1) |
|
|
Install in this Direction (2) |
Engage the 2 guides as shown in the illustration to install the rear seat cushion hinge cover RH.
73350
18.INSTALL REAR NO. 1 SEAT CENTER LAP TYPE BELT ASSEMBLY
72597D
19.INSTALL RECLINING REMOTE CONTROL BEZEL RH
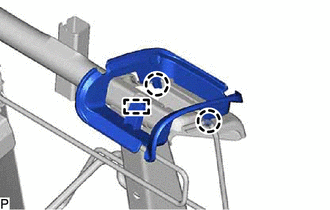
Engage the 2 claws and guide to install the reclining remote control bezel RH.
87510R
20.INSTALL SEAT HEATER ASSEMBLY (w/ Seat Heater System)
71077S
21.INSTALL SEPARATE TYPE REAR SEATBACK COVER
- HINT:
-
When installing a separate type rear seatback cover, refer to precaution in order to prevent wrinkles from forming.
-
Click hereVehicle Interior>SEAT>FRONT SEAT ASSEMBLY (for Manual Seat)>PRECAUTION
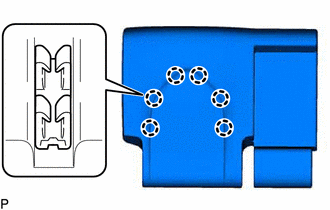
Engage the 6 claws to install the separate type rear seatback cover to the separate type rear seatback pad RH.
- NOTICE:
-
Be careful not to damage the separate type rear seatback cover.
22.INSTALL SEPARATE TYPE REAR SEATBACK COVER WITH PAD
Install the separate type rear seatback cover with pad to the rear seatback frame sub-assembly RH.
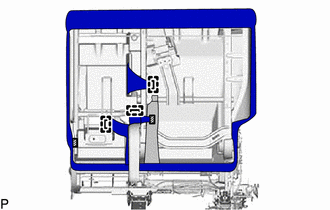

|
Fastener |
Engage the fastener and 3 hooks.
|
|
Install in this Direction |
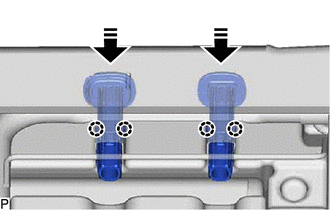
Engage the 4 claws as shown in the illustration to install the 2 rear seat headrest supports.
- HINT:
-
Use the same procedure for each rear seat headrest support.
71701B
23.INSTALL REAR SEATBACK BOARD SUB-ASSEMBLY RH
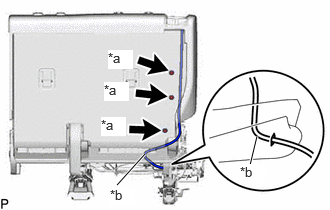
| *a | Clip |
| *b | Cable |
Engage the rear seat reclining control cable as shown in the illustration.
- NOTICE:
-
Make sure to route the cable as shown in the illustration.
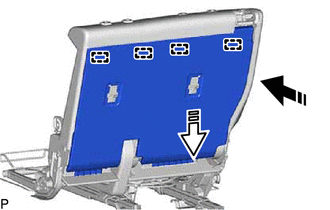
|
|
Install in this Direction (1) |
|
|
Install in this Direction (2) |
Engage the 4 guides as shown in the illustration.
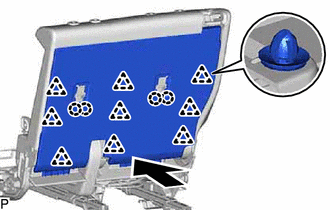
Engage the 9 clips and 4 claws as shown in the illustration to install the rear seatback board sub-assembly RH.
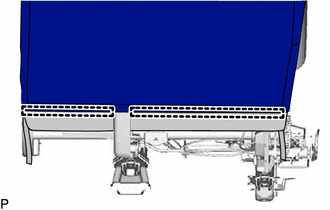
Engage the 2 hooks.
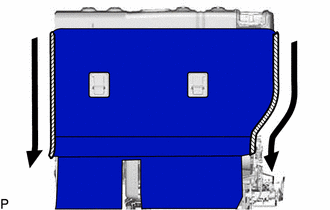
|
|
Fastener |
Close the 2 fasteners as shown in the illustration.
73178A
24.INSTALL SEAT BELT ANCHOR COVER CAP
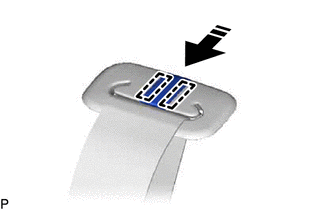
|
|
Install in this Direction |
Engage the 2 guides as shown in the illustration to install the seat belt anchor cover cap.
73373
25.INSTALL REAR SEAT SHOULDER BELT COVER
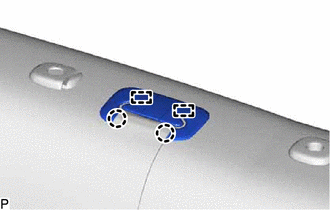
Engage the 2 guides and 2 claws to install the rear seat shoulder belt cover.
73350
26.CONNECT REAR NO. 1 SEAT CENTER LAP TYPE BELT ASSEMBLY
72996
27.INSTALL REAR SEATBACK COVER RH
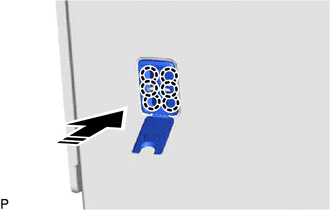
|
|
Install in this Direction |
Engage the 6 claws as shown in the illustration to install the rear seatback cover RH.
- HINT:
-
Use the same procedure for each rear seatback cover RH.
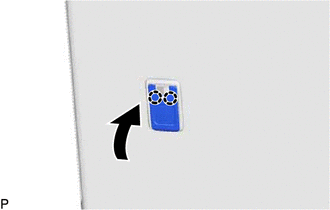
Engage the 2 claws as shown in the illustration.
- HINT:
-
Use the same procedure for each rear seatback cover RH.
72053E
28.INSTALL RECLINING REMOTE CONTROL LEVER SUB-ASSEMBLY RH
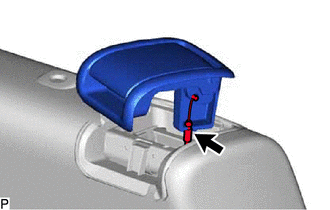
Connect the rear seat reclining control cable.
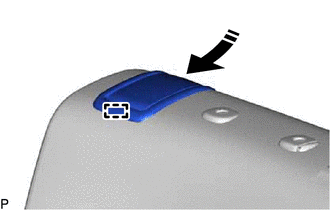
|
|
Install in this Direction |
Engage the guide as shown in the illustration.
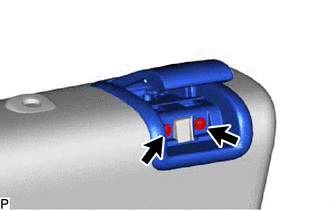
Install the reclining remote control lever sub-assembly RH with the 2 screws.
72615A
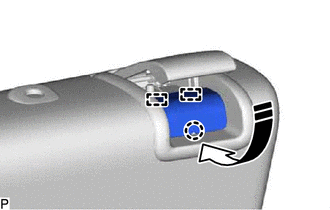
29.INSTALL REAR SEATBACK LOCK STRIKER COVER RH
|
|
Install in this Direction |
Engage the 2 guides and claw as shown in the illustration to install the rear seatback lock striker cover RH.
73380A
30.INSTALL REAR SEAT INNER BELT ASSEMBLY
71828B
31.INSTALL REAR SEAT CUSHION REAR MOULDING RH
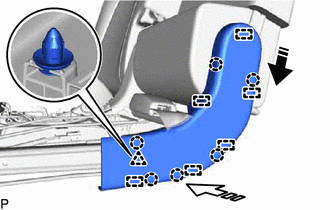
|
|
Install in this Direction (1) |
|
|
Install in this Direction (2) |
Engage the 6 claws, clip and 6 guides as shown in the illustration to install the rear seat cushion rear moulding RH.
73380X
32.INSTALL REAR SEAT INNER BELT ASSEMBLY RH
71485
33.INSTALL REAR SEAT HINGE COVER
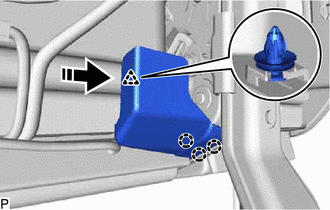
|
|
Install in this Direction |
Engage the clip and 3 claws as shown in the illustration to install the rear seat hinge cover.
87501E
34.INSTALL SEAT HEATER CONTROL SUB-ASSEMBLY RH (w/ Seat Heater System)
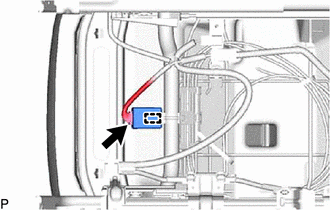
Engage the clamp to install the seat heater control sub-assembly RH.
Connect the connector.
87510P
35.INSTALL SEAT HEATER ASSEMBLY (w/ Seat Heater System)
71075S
36.INSTALL SEPARATE TYPE REAR SEAT CUSHION COVER
- HINT:
-
When installing a separate type rear seat cushion cover, refer to precaution in order to prevent wrinkles from forming.
-
Click hereVehicle Interior>SEAT>FRONT SEAT ASSEMBLY (for Manual Seat)>PRECAUTION
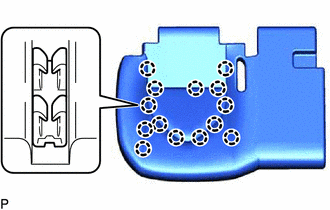
Engage the 14 claws.
- NOTICE:
-
Be careful not to damage the bench type rear seat cushion cover.
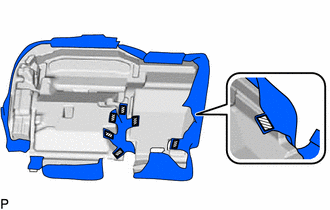
|
|
Fastener |
Engage the 7 fasteners to install the separate type rear seat cushion cover.
37.INSTALL SEPARATE TYPE REAR SEAT CUSHION COVER WITH PAD
Temporarily install the separate type rear seat cushion cover with pad to the No. 1 seat cushion frame sub-assembly RH.
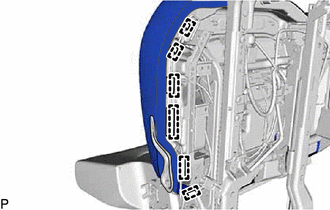
Engage the 6 hooks.
|
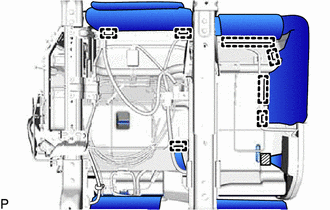
|
Fastener |
Engage the fastener and 7 hooks.
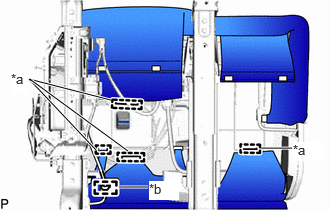
| *a | Hook |
| *b | Clamp |
Engage the 4 hooks and clamp.
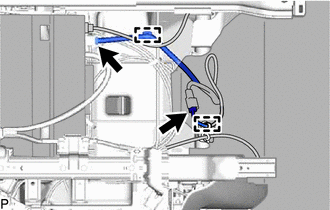
w/ Seat Heater System:
Engage the 2 clamps.
Connect the 2 connectors.
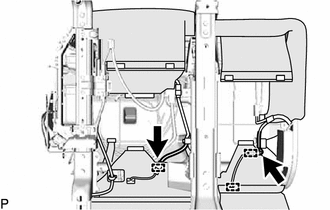
w/ Occupant Detection Sensor:
Engage the 3 clamps.
Connect the 2 connectors.
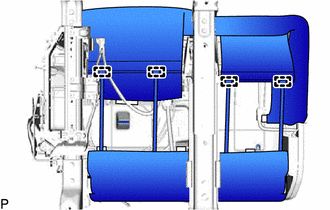
Engage the 4 hooks.
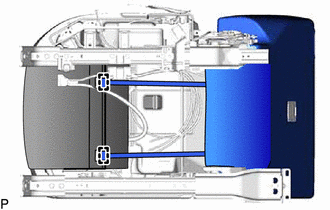
Engage the 2 hooks to install the separate type rear seat cushion cover with pad.
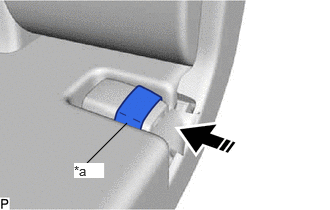
| *a | Rubber Band |
|
|
Install in this Direction |
Pass the rear seat inner belt assembly through the rubber band of the separate type rear seat cushion cover as shown in the illustration.
71825B
38.INSTALL REAR SEAT CUSHION MOULDING RH
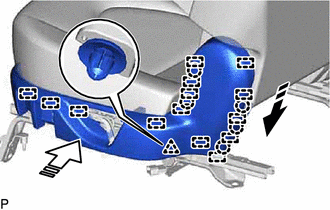
|
|
Install in this Direction (1) |
|
|
Install in this Direction (2) |
Engage the 5 claws, clip and 14 guides as shown in the illustration to install the rear seat cushion moulding RH.
72057F
39.INSTALL REAR SEAT NO. 2 LOCK CONTROL LEVER SUB-ASSEMBLY RH
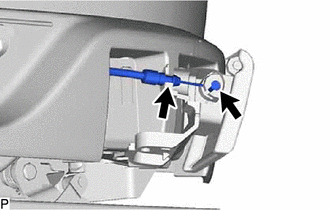
Connect the rear No. 1 seat track control cable assembly RH.
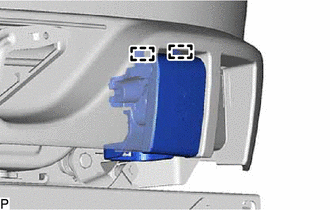
Engage the 2 guides.
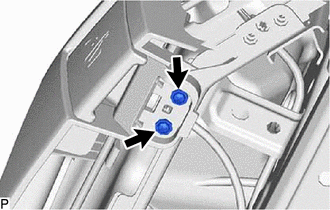
Install the rear seat No. 2 lock control lever sub-assembly RH with the 2 screws.
72057E
40.INSTALL REAR SEAT NO. 1 LOCK CONTROL LEVER SUB-ASSEMBLY RH
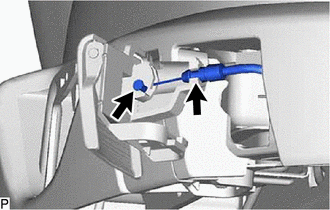
Connect the rear seat reclining control cable.
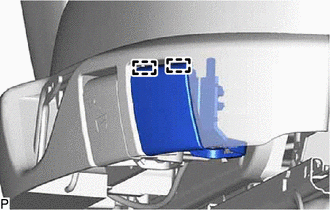
Engage the 2 guides.
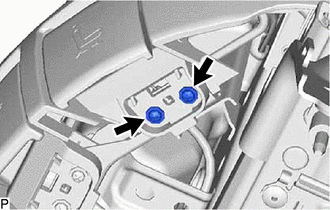
Install the rear seat No. 1 lock control lever sub-assembly RH with the 2 screws.
71848C
41.INSTALL SEAT ADJUSTER COVER CAP RH
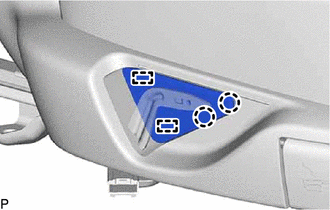
Engage the 2 guides and 2 claws to install the seat adjuster cover cap RH.
72927
42.INSTALL REAR SEAT CUSHION UNDER COVER RH
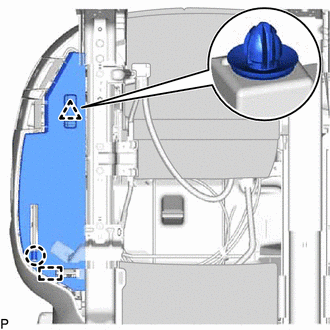
Engage the claw, clip and guide to install the rear seat cushion under cover RH.
72525J
43.INSTALL RECLINING ADJUSTER RELEASE HANDLE RH
|
|
Install in this Direction |
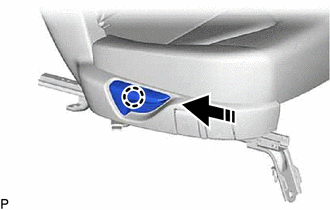
Engage the claw as shown in the illustration to install the reclining adjuster release handle RH.
71848K
44.INSTALL SEAT ADJUSTER COVER CAP
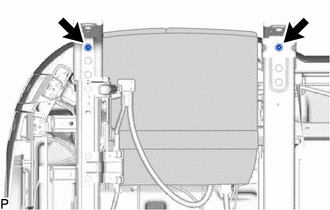
Install the 2 seat adjuster cover caps.
72806D
45.INSTALL REAR SEAT CENTER ARMREST CUP HOLDER SUB-ASSEMBLY
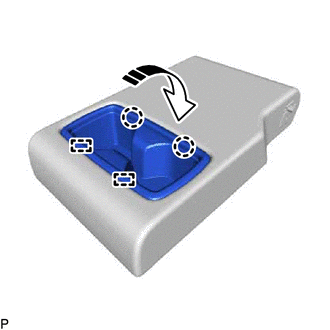
|
|
Install in this Direction |
Engage the 2 guides and 2 claws as shown in the illustration to install the rear seat center armrest cup holder sub-assembly.
72839
46.INSTALL REAR SEAT ARMREST HINGE SHIM
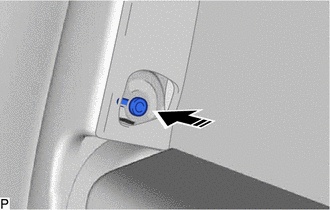
|
|
Install in this Direction |
Install the rear seat armrest hinge shim as shown in the illustration.
72830
47.INSTALL REAR SEAT CENTER ARMREST ASSEMBLY
Engage the guide as shown in the illustration.
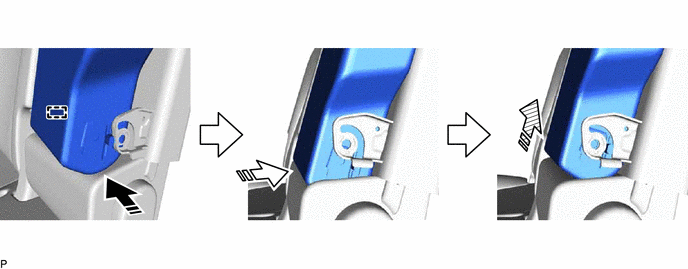
|
|
Install in this Direction (1) |
|
Install in this Direction (2) |

|
Install in this Direction (3) | - | - |
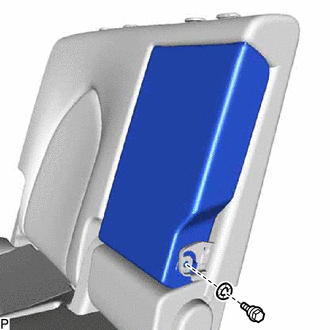
Install the rear seat center armrest assembly with the washer and bolt.
- Torque:
- 21 N*m (214 kgf*cm, 15 ft.*lbf)
72868B
48.INSTALL CENTER ARMREST HINGE COVER
|
|
Install in this Direction (1) |
|
|
Install in this Direction (2) |
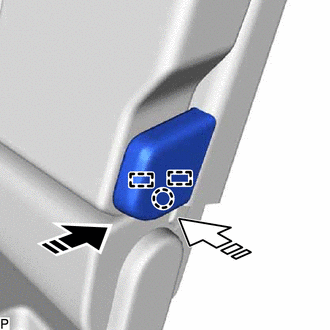
Engage the 2 guides and claw as shown in the illustration to install the center armrest hinge cover.