| B |  |
| GO TO DTC CHART (Click here) |
ECD SYSTEM (w/o EGR Cooler) > Lack of Power or Hesitation |
| Malfunction Condition | Main Trouble Area | Related Trouble Area |
| (a) Injector assembly malfunctions
|
|
| Faults and Symptoms of Common Rail Diesel Components |
Engine Control
| Main fault | Decrease in performance (foreign matter is stuck) |
| Symptoms | Lack of power, black smoke |
| Data List | MAF |
| |
| Symptom and Corresponding Main Fault |
|
| Data List |
|
| Main fault |
|
| Symptoms | Lack of power (when vehicle is starting, under heavy load) (Black smoke is not emitted when racing while vehicle is stopped) |
| Data List | MAP
|
| Main fault | Blockage |
| Symptoms | Lack of power (high engine speed, under heavy load) |
| Main fault | Open circuit, glow plug relay fault |
| Symptoms | Difficult to start, rough idle, knocking, white smoke (when cold) |
| Data List | Check the glow plug indicator light |
| Diagnostic Point | Measure the resistance of the glow plug |
| Main fault | Damaged, seized up |
| Symptoms | Cannot crank, crank speed is low, strange noise |
| Main fault | Loss of compression |
| Symptoms | Rough idle (lack of power always) |
| Data List | Engine Speed of Cyl#
|
Diesel Injection
| Main fault | - |
| Symptoms | Difficult to start, engine stalling, rough idle, lack of power |
| Data List | Fuel Press, Target Common Rail Pressure, Target Pump SCV Current
|
| Diagnostic Trouble Code | Even if Fuel Press is below Target Common Rail Pressure, a DTC will not be stored. |
| Main fault | Blockage |
| Symptoms | Difficult to start, engine stalling, rough idle, lack of power |
| Data List | Fuel Press, Target Common Rail Pressure
|
| Diagnostic Trouble Code | Even if Fuel Press is below Target Common Rail Pressure, a DTC will not be stored. |
| Main fault | Blockage |
| Symptoms | Rough idle, lack of power, black smoke, white smoke, knocking |
| Data List | Injection Feedback Val
|
| Main fault | Circuit fault: The injector assembly does not open. |
| Symptoms | Difficult to start, rough idle, lack of power, black smoke, white smoke, knocking |
| Data List | Same as injector assembly |
| Diagnostic Trouble Code | When the injector driver has a fault, some DTCs may be stored. |
| Main fault | Open circuit, decrease in performance (foreign matter is stuck) |
| Symptoms | Difficult to start, rough idle, engine stall, lack of power |
| Data List | Fuel Press, Target Common Rail Pressure
|
| Diagnostic Code | When the fuel pressure sensor has a fault, some DTCs may be stored. |
| Main fault | - |
| Symptoms | Difficult to start, rough idle (especially when cold) |
Diesel EGR
| Main fault |
|
| Symptoms |
|
| Data List | Actual EGR Valve Pos., Target EGR Position
|
Diesel Throttle
| Main fault | Stuck, does not move smoothly |
| Symptoms |
|
| Data List |
|
| Data List Related to Lack of Power |
| Explanation of Symptom |
| Lack of Power | The power of the diesel engine is determined by the quantity of injected fuel and the quantity of intake air. The quantity of injected fuel is determined by the fuel pressure and the amount of time the injector assembly is open. Basically, the fuel pressure is controlled so that it reaches the target fuel pressure. The throttle valve does not restrict air flow volume, so the manifold absolute pressure is almost the same as atmospheric pressure when idling. At more than approximately 1500 rpm, the turbo starts to operate causing the manifold absolute pressure to become higher than atmospheric pressure. |
| 1.READ OUTPUT DTC (RELATING TO ENGINE) |
Connect the intelligent tester to the DLC3.
Turn the ignition switch to ON and turn the tester on.
Enter the following menus: Powertrain / Engine and ECT / DTC.
Read pending DTCs.
| Result | Proceed to |
| No DTCs are output | A |
| Engine related DTCs are output | B |
|
| ||||
| A | |
 |
| 2.TAKE SNAPSHOT DURING IDLING AND 4000 RPM (PROCEDURE 2) |
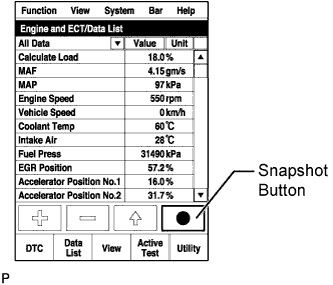 |
Connect the intelligent tester to the DLC3.
Start the engine and turn the tester on.
Enter the following menus: Powertrain / Engine and ECT / Data List / Lack of power.
With no load after the engine is warmed up, take a snapshot when idling and at 4000 rpm.
| NEXT | |
|
| 3.TAKE SNAPSHOT DURING LACK OF POWER (PROCEDURE 3) |
|
Connect the intelligent tester to the DLC3.
Start the engine and turn the tester on.
Enter the following menus: Powertrain / Engine and ECT / Data List / All Data.
Take a snapshot of the Data List items with the intelligent tester during lack of power.
Check for a lack of power during the driving test.
| Result | Proceed to |
| Apparent lack of power is present | A |
| Apparent lack of power is not present | B |
|
| ||||
| A | |
|
| 4.CHECK SNAPSHOT (MAP) |
Check MAP in the snapshot taken in procedure 2 when the engine was running at 4000 rpm with no load.
| Result | Proceed to |
| MAP is 117 kPa or higher*1 | A |
| MAP is below 90 kPa*2 | B |
| Except above*3 | C |
|
| ||||
|
| ||||
| A | |
|
| 5.CHECK SNAPSHOT (FUEL PRESS, TARGET COMMON RAIL PRESSURE AND MAP) |
Check Fuel Press, Target Common Rail Pressure and MAP in the snapshot taken in procedure 3 when the vehicle was accelerating with the accelerator pedal fully depressed in 2nd gear and the engine speed around 3000 rpm.
| Result | Proceed to |
| MAP is 175 kPa or higher at an engine speed of 3000 rpm | A |
| Difference between Fuel Press and Target Common Rail Pressure is 20000 kPa or more | B |
| Except above | C |
|
| ||||
|
| ||||
| A | |
|
| 6.CHECK HARNESS AND CONNECTOR (MANIFOLD ABSOLUTE PRESSURE SENSOR - ECM) |
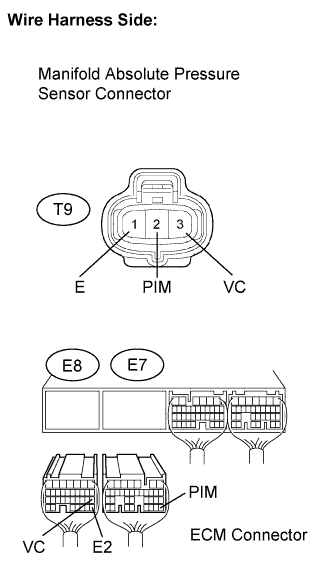 |
Disconnect the T9 manifold absolute pressure sensor connector.
Disconnect the E7 and E8 ECM connectors.
Measure the resistance of the wire harness side connectors.
| Tester Connection | Specified Condition |
| PIM (T9-2) - PIM (E7-28) | Below 1 Ω |
| VC (T9-3) - VC (E8-18) | Below 1 Ω |
| E (T9-1) - E2 (E8-28) | Below 1 Ω |
| Tester Connection | Specified Condition |
| PIM (T9-2) or PIM (E7-28) - Body ground | 10 kΩ or higher |
| VC (T9-3) or VC (E8-18) - Body ground | 10 kΩ or higher |
| E (T9-1) or E2 (E8-28) - Body ground | 10 kΩ or higher |
|
| ||||
| OK | |
|
| 7.CHECK OR REPLACE TURBOCHARGER SUB-ASSEMBLY |
Disconnect the actuator hose from the compressor housing.
Close the compressor housing side tube with a hose clip or equivalent.
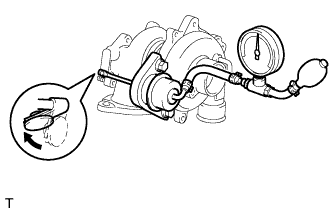 |
Using SST, apply pressure to the actuator to open the waste gate valve.
| Engine Type | Turbocharger Sub-assembly (Part No.) | Valve Opening Pressure (kPa: Gauge Pressure) | Maximum Pressure (kPa: Gauge Pressure) | Reference: Rod Stroke (mm) |
| 2KD-FTV | 17201-0L030 17201-30120 | 114 | 136 | 0.98 to 1.91 |
| 17201-0L050 | 123 | 147.8 | 0.89 to 1.74 |
Check that the actuator rod moves and that the waste gate valve opens.
| NEXT | |
|
| 8.CONFIRM WHETHER MALFUNCTION HAS BEEN SUCCESSFULLY REPAIRED |
| NEXT | ||
 | ||
| ||
| 9.READ VALUE USING INTELLIGENT TESTER (MAP AND ATMOSPHERIC PRESSURE) |
Connect the intelligent tester to the DLC3.
Turn the ignition switch to ON and turn the tester on.
Enter the following menus: Powertrain / Engine and ECT / Data List / MAP and Atmosphere Pressure.
Compare MAP to Atmosphere Pressure when the ignition switch is ON (do not start the engine).
| Result | Proceed to |
| MAP and Atmosphere Pressure have same value | A |
| MAP is different from actual atmospheric pressure | B |
| Atmosphere Pressure is different from actual atmospheric pressure | C |
|
| ||||
|
| ||||
| A | |
|
| 10.CHECK AIR INTAKE SYSTEM |
Check for air leaks and blockages between the air cleaner case and turbocharger, and between the turbocharger and intake manifold.
|
| ||||
| OK | |
|
| 11.CHECK TURBOCHARGER SUB-ASSEMBLY |
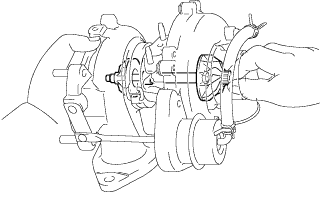 |
Inspect the turbine shaft.
Hold the nut of the turbine shaft with your fingers and check that the vertical, horizontal and axial play of the turbine shaft is not large.
Rotate the turbine shaft with your fingers and check that it rotates smoothly.
Inspect the turbocharger housing.
Visually check that there are no scratches or chipped areas inside the turbine housing or compressor housing.
Visually check that there are no scratches or chipped areas on the blades of the impeller or turbine wheel.
|
| ||||
| OK | |
|
| 12.CHECK FOR INTERMITTENT PROBLEMS |
Check for intermittent problems (Click here).
|
| ||||
| 13.REPLACE MANIFOLD ABSOLUTE PRESSURE SENSOR |
Replace the manifold absolute pressure sensor.
|
| ||||
| 14.REPLACE ECM |
Replace the ECM (Click here).
|
| ||||
| 15.REPAIR OR REPLACE AIR INTAKE SYSTEM |
Repair or replace the malfunctioning part in the air intake system.
|
| ||||
| 16.REPLACE TURBOCHARGER SUB-ASSEMBLY |
Replace the turbocharger sub-assembly (Click here).
|
| ||||
| 17.CONFIRM WHETHER MALFUNCTION HAS BEEN SUCCESSFULLY REPAIRED |
| NEXT | ||
| ||
| ||
| 18.CHECK IF FUEL IS BEING SUPPLIED TO FUEL SUPPLY PUMP |
Disconnect the inlet hose from the fuel supply pump.
Operate the priming pump and check that fuel is being supplied to the fuel supply pump.
Reconnect the inlet hose.
|
| ||||
| OK | |
|
| 19.REPLACE FUEL SUPPLY PUMP |
Replace the fuel supply pump (Click here).
|
| ||||
| 20.REPAIR OR REPLACE CLOGGED FUEL PIPE (INCLUDING FROZEN FUEL) (FUEL TANK - FUEL SUPPLY PUMP) |
Check and repair or replace the clogged fuel pipe.
| NEXT | |
|
| 21.BLEED AIR FROM FUEL SYSTEM |
Bleed the air from the fuel system .
| NEXT | |
|
| 22.PERFORM FUEL SUPPLY PUMP INITIALIZATION |
Perform fuel supply pump initialization (Click here).
| NEXT | |
|
| 23.CONFIRM WHETHER MALFUNCTION HAS BEEN SUCCESSFULLY REPAIRED |
Connect the intelligent tester to the DLC3.
Start the engine and turn the tester on.
Enter the following menus: Powertrain / Engine and ECT / Active Test / Test the Fuel Leak / Data List / Fuel Press, Target Common Rail Pressure.
|
Take a snapshot with the intelligent tester during the Active Test.
Measure the difference between the target fuel pressure (Target Common Rail Pressure) and the actual fuel pressure (Fuel Press) when the "Test the Fuel Leak" Active Test is performed.
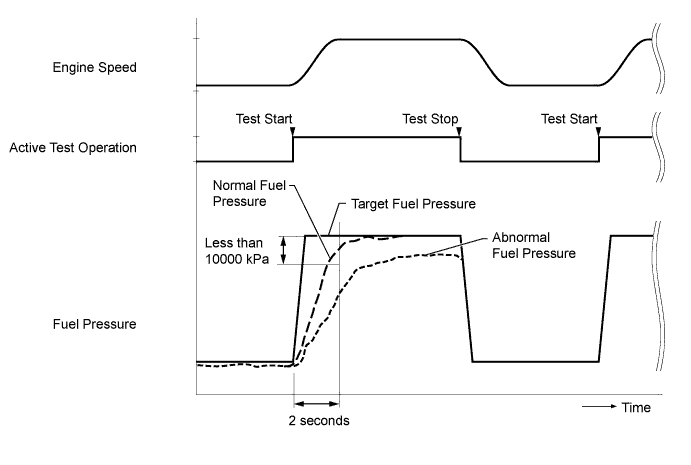
|
| ||||
| OK | ||
| ||
| ||
| 24.REPLACE COMMON RAIL ASSEMBLY |
Replace the common rail assembly (Click here).
| NEXT | |
|
| 25.BLEED AIR FROM FUEL SYSTEM |
Bleed the air from the fuel system .
| NEXT | |
|
| 26.CONFIRM WHETHER MALFUNCTION HAS BEEN SUCCESSFULLY REPAIRED |
Connect the intelligent tester to the DLC3.
Start the engine and turn the tester on.
Enter the following menus: Powertrain / Engine and ECT / Active Test / Test the Fuel Leak / Data List / Fuel Press, Target Common Rail Pressure.
|
Take a snapshot with the intelligent tester during the Active Test.
Measure the difference between the target fuel pressure (Target Common Rail Pressure) and the actual fuel pressure (Fuel Press) when the "Test the Fuel Leak" Active Test is performed.
| NEXT | ||
| ||
| ||
| 27.CHECK INTAKE SYSTEM |
Check for air leaks and blockages between the air cleaner case and turbocharger, and between the turbocharger and intake manifold.
|
| ||||
| OK | |
|
| 28.CHECK HARNESS AND CONNECTOR (MANIFOLD ABSOLUTE PRESSURE SENSOR - ECM) |
|
Disconnect the T9 manifold absolute pressure sensor connector.
Disconnect the E7 and E8 ECM connectors.
Measure the resistance of the wire harness side connectors.
| Tester Connection | Specified Condition |
| PIM (T9-2) - PIM (E7-28) | Below 1 Ω |
| VC (T9-3) - VC (E8-18) | Below 1 Ω |
| E (T9-1) - E2 (E8-28) | Below 1 Ω |
| Tester Connection | Specified Condition |
| PIM (T9-2) or PIM (E7-28) - Body ground | 10 kΩ or higher |
| VC (T9-3) or VC (E8-18) - Body ground | 10 kΩ or higher |
| E (T9-1) or E2 (E8-28) - Body ground | 10 kΩ or higher |
|
| ||||
| OK | |
|
| 29.PERFORM ACTIVE TEST USING INTELLIGENT TESTER (ACTIVATE THE EGR VALVE CLOSE) |
Connect the intelligent tester to the DLC3.
Start the engine and warm it up, and make sure the A/C switch and all accessory switches are off.
Turn the ignition switch off. Wait for 30 seconds, and then restart the engine.
Turn the tester on.
Enter the following menus: Powertrain / Engine and ECT / Data List / MAF.
Read the MAF value displayed on the tester while the engine is idling.
Enter the following menus: Powertrain / Engine and ECT / Activate the EGR Valve Close.
Read the MAF value when the EGR valve is closed using the Active Test function.
| Active Test | Result | Proceed to |
| Activate the EGR Valve Close: Off (Open) to On (Closed) | MAF value does not change | A |
| MAF value changes | B |
| EGR Valve Condition (Opening) | Measuring Condition | MAF (Reference) |
| Open (55%) |
| 3.0 to 9.0 gm/s |
| Closed (0%) | 13 to 20 gm/s |
|
| ||||
| A | |
|
| 30.READ VALUE USING INTELLIGENT TESTER (MAF) |
Connect the intelligent tester to the DLC3.
Turn the ignition switch to ON and turn the tester on.
Enter the following menus: Powertrain / Engine and ECT / Data List / MAF.
Read the value.
| Tester Display | Condition | Specified Condition |
| MAF | Engine not running | Less than 0.35 gm/s |
|
| ||||
| OK | |
|
| 31.REMOVE DEPOSIT (ELECTRIC EGR CONTROL VALVE ASSEMBLY) |
Remove the electric EGR control valve assembly.
Visually check the electric EGR control valve assembly for deposits.
If there are deposits, clean the electric EGR control valve assembly.
Reinstall the electric EGR control valve assembly.
| NEXT | |
|
| 32.INSPECT ELECTRIC EGR CONTROL VALVE ASSEMBLY |
Inspect the electric EGR control valve assembly (Click here).
|
| ||||
|
| ||||
| 33.REPAIR OR REPLACE AIR INTAKE SYSTEM |
Repair or replace the malfunctioning part in the air intake system.
|
| ||||
| 34.REPLACE MASS AIR FLOW METER |
Replace the mass air flow meter (Click here).
|
| ||||
| 35.REPLACE ELECTRIC EGR CONTROL VALVE ASSEMBLY |
Replace the electric EGR control valve assembly (Click here).
| NEXT | |
|
| 36.CONFIRM WHETHER MALFUNCTION HAS BEEN SUCCESSFULLY REPAIRED |
|
| ||||
| OK | ||
| ||
| ||
| 37.CHECK FRONT EXHAUST PIPE ASSEMBLY (CATALYTIC CONVERTER) |
Remove the front exhaust pipe assembly.
Visually check for catalyst clogging or carbon deposits adhering to the inner wall of the exhaust pipe upstream of the catalyst.
Reinstall the front exhaust pipe assembly.
|
| ||||
| OK | |
|
| 38.INSPECT TURBOCHARGER SUB-ASSEMBLY |
Disconnect the actuator hose from the compressor housing.
Close the compressor housing side tube with a hose clip or equivalent.
|
Using SST, apply pressure to the actuator to open the waste gate valve.
| Engine Type | Turbocharger Sub-assembly (Part No.) | Valve Opening Pressure (kPa: Gauge Pressure) | Maximum Pressure (kPa: Gauge Pressure) | Reference: Rod Stroke (mm) |
| 2KD-FTV | 17201-0L030 17201-30120 | 114 | 136 | 0.98 to 1.91 |
| 17201-0L050 | 123 | 147.8 | 0.89 to 1.74 |
Check that the actuator rod moves and that the waste gate valve opens.
|
Inspect the turbine shaft.
Hold the nut of the turbine shaft with your fingers and check that the vertical, horizontal and axial play of the turbine shaft is not large.
Rotate the turbine shaft with your fingers and check that it rotates smoothly.
Inspect the turbocharger housing.
Visually check that there are no scratches or chipped areas inside the turbine housing or compressor housing.
Visually check that there are no scratches or chipped areas on the blades of the impeller or turbine wheel.
|
| ||||
|
| ||||
| 39.REPLACE FRONT EXHAUST PIPE ASSEMBLY (CATALYTIC CONVERTER) |
Replace the front exhaust pipe assembly.
|
| ||||
| 40.REPLACE TURBOCHARGER SUB-ASSEMBLY |
Replace the turbocharger sub-assembly (Click here).
|
| ||||
| 41.CHECK FOR INTERMITTENT PROBLEMS |
Check for intermittent problems (Click here).
| NEXT | |
|
| 42.CONFIRM WHETHER MALFUNCTION HAS BEEN SUCCESSFULLY REPAIRED |
| NEXT | ||
| ||
| ||
| 43.CLEAN FUEL FILTER CASE AND REPLACE FUEL FILTER |
Clean the fuel filter case and replace the fuel filter.
| NEXT | |
|
| 44.REPLACE INJECTOR ASSEMBLIES OF ALL CYLINDERS |
Replace the injector assemblies (Click here).
| NEXT | |
|
| 45.BLEED AIR FROM FUEL SYSTEM |
Bleed the air from the fuel system .
| NEXT | |
|
| 46.REGISTER INJECTOR COMPENSATION CODE AND PERFORM PILOT QUANTITY LEARNING |
Register the injector compensation codes .
Perform the injector pilot quantity learning .
| NEXT | |
|
| 47.CONFIRM WHETHER MALFUNCTION HAS BEEN SUCCESSFULLY REPAIRED |
| NEXT | ||
| ||
| ||
| 48.COMPARE WITH SIMILAR VEHICLE WITH SAME ENGINE |
Confirm the situation in which the lack of power was experienced by the customer again, and compare the driving feeling under the same conditions using a similar vehicle with the same engine while collecting data with the intelligent tester.
| Result | Proceed to |
| Significant difference is found | A |
| Significant difference is not found | B |
|
| ||||
| B | |
|
| 49.EXPLAIN THE INVESTIGATION RESULT TO CUSTOMER |
Vehicle performance is normal.
There is no problem at this point in time. However, if the problem recurs, ask the customer to explain in detail the situation in which the problem occurred.
The best course may be to have the customer ride in another vehicle with the same specifications to understand that there is no problem with the customer's vehicle.
| NEXT | ||
| ||
| ||
