Home › SUSPENSION & AXLE › AXLE › REAR AXLE SHAFT

REAR AXLE SHAFT > INSTALLATION

for Preparation Click here


HINT:
  1. Use the same procedures for the RH side and LH side.
  2. The procedures listed below are for the LH side.
  3. A bolt without a torque specification is shown in the standard bolt chart (Click here).


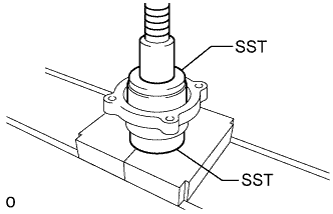
1. INSTALL REAR AXLE SHAFT BEARING LH


C190693E01
  1. Using SST and a press, press in a new bearing.

    SST
    09515-21010  
    09950-60020   (09951-00810)


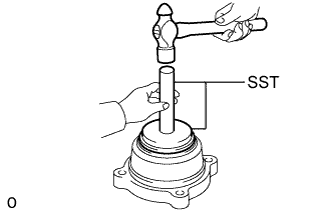
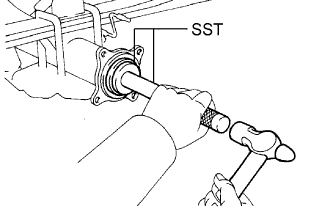
2. INSTALL REAR AXLE SHAFT OUTER OIL SEAL


C190694E01
  1. Using SST and a hammer, tap in a new oil seal.

    SST
    09950-00020   (09951-00680)
    09950-70010   (09951-07150)


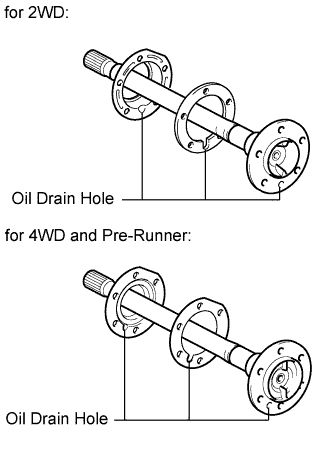
3. INSTALL REAR AXLE HUB BOLT LH


C191260E01
  1. Install a new gasket and the deflector to the axle shaft.

    HINT:
    Align the 3 oil drain holes.

  1. for 2WD:
    Pass 5 new hub bolts through the axle hub.

  1. for 4WD and Pre-Runner:
    Pass 6 new hub bolts through the axle hub.
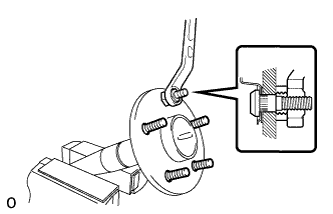


    C191019
  1. Secure the axle shaft between aluminum plates in a vise.

  1. for 2WD:
    Temporarily install a washer and nut to each of the 5 hub bolts as shown in the illustration.
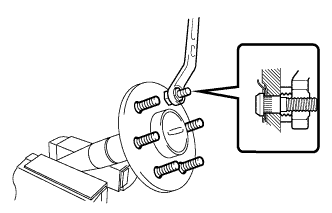


    C191194
  1. for 4WD and Pre-Runner:
    Temporarily install a washer and nut to each of the 6 hub bolts as shown in the illustration.

  1. Install the hub bolts by tightening each nut.

  1. Remove the washer and nut from each hub bolt.


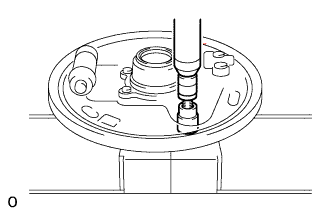
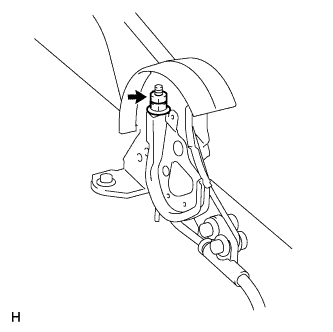
4. INSTALL BACKING PLATE TO REAR AXLE HOUSING SETTING BOLT


C190710
  1. Position the backing plate on the bearing case.

  1. Using 2 socket wrenches and a press, press in 4 new setting bolts.


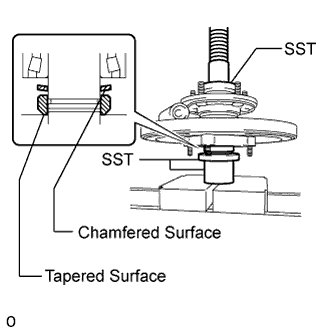
5. INSTALL REAR AXLE BEARING INNER RETAINER LH


C190695E02
  1. Heat a new retainer to approximately 70 to 130°C (158 to 266°F).

  1. Install a new shaft washer and the retainer to the axle shaft as shown in the illustration.

    NOTICE:
    1. Install the shaft washer with its tapered surface facing downward.
    2. Install the retainer with its chamfered surface facing downward.

  1. Using SST and a press, press in the axle shaft.

    SST
    09951-01100  
    09631-12090  
    09726-40010  

  1. Using a snap ring expander, install a new snap ring.


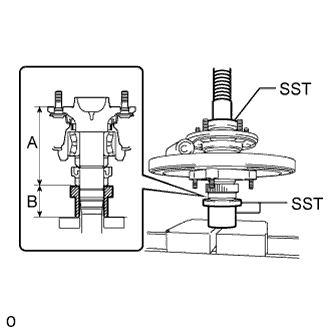
6. INSTALL REAR AXLE BEARING INNER RETAINER LH AND REAR SKID CONTROL ROTOR (w/ ABS, VSC)


C191007E01
  1. Using SST and a press, press in a new skid control rotor and retainer to the axle shaft until the lengths are within the standard range.

    SST
    09951-01100  
    09631-12090  
    09726-40010  

    Standard length:
    Length A
    Length B
    133.2 +/-0.6 mm (5.244 +/-0.0236 in.)
    56 mm (2.205 in.)

    NOTICE:
    If this installation measurement is not followed precisely, oil leaks and other mechanical failures will result. Follow the assembly instructions closely, and confirm that parts have been installed according to the standard length measurement.

    HINT:
    It may be easier to verify the installation by adding the length of the SST to the standard length, and then measuring the height from the surface of the press.


7. INSTALL REAR AXLE SHAFT OIL SEAL LH


F050775E02
  1. Using SST and a hammer, tap in a new oil seal.

    SST
    09950-60020   (09951-00770)
    09950-70010   (09951-07150)


8. INSTALL O-RING
  1. Install a new O-ring to the axle housing.


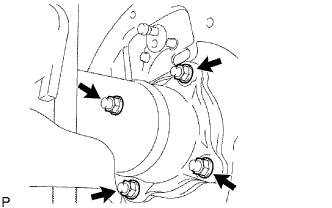
9. INSTALL REAR AXLE SHAFT WITH BACKING PLATE


C191121
  1. Install the axle shaft with backing plate with the 4 nuts.

    Torque:
    43 N*m{ 438 kgf*cm , 32 ft.*lbf }


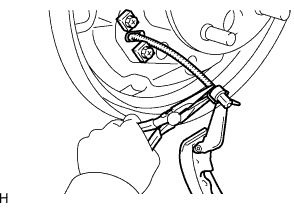
10. CONNECT PARKING BRAKE CABLE
  1. Connect the parking brake cable with the 2 bolts.

    Torque:
    9.0 N*m{ 92 kgf*cm , 80 in.*lbf }


11. INSTALL REAR BRAKE SHOE (for 2WD)


C111480
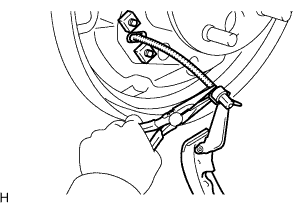
  1. Using needle-nose pliers, connect the No. 3 parking brake cable to the parking brake shoe lever.

  1. Using needle-nose pliers, install the adjust lever tension spring to the automatic adjust lever and rear brake shoe.
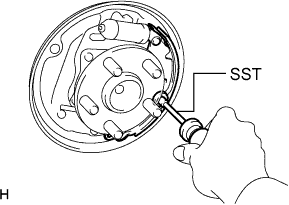


    C111398E01
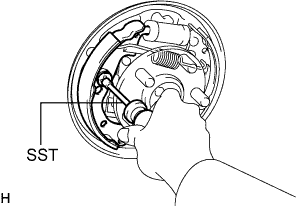
  1. Using SST, install the shoe, pin, shoe hold down spring and shoe hold down spring cup.

    SST
    09718-00010  


12. INSTALL FRONT BRAKE SHOE (for 2WD)


C111397E01
  1. Connect the shoe tension spring to the front brake shoe and rear brake shoe.

  1. Using SST, install the shoe, shoe hold down spring and shoe hold down spring cup.

    SST
    09718-00010  


13. INSTALL BRAKE SHOES (for 4WD and Pre-Runner)


C111502
  1. Using needle-nose pliers, connect the No. 3 parking brake cable to the parking brake shoe lever.

  1. Install the strut set and return spring to the shoe.
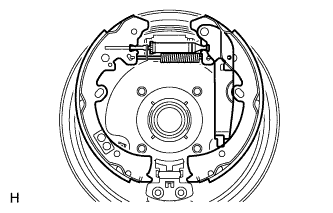


    C123250
  1. Attach the support clip to exposed threads of the strut set.

    NOTICE:
    The support clip shall not contact the adjuster nut.

  1. Using needle-nose pliers, hook the support clip around the spring.

    NOTICE:
    Be careful not to damage the spring.

  1. Install the front and rear brake shoes.
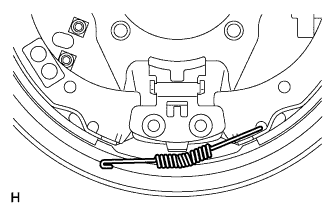


    C113224
  1. Move one of the shoes upward and install the shoe tension spring.
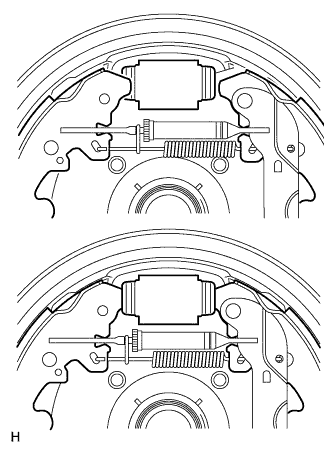


    C123244
  1. Install the shoe front or rear side to the cylinder. Then install the other side of the shoe to the other side of the cylinder.
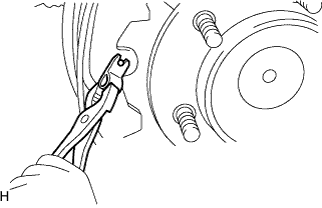
    HINT:
    After one side of the shoe is installed to the cylinder, hold that side of the shoe steady. Then widen the opening of the shoe by pulling the other side of the shoe outward and install it to the other side of the cylinder.

    NOTICE:
    Be careful not to damage the cylinder dust boot.


    C111498
  1. Using pliers, install the front brake shoe, rear brake shoe, pins and shoe hold down springs.


14. INSTALL REAR SPEED SENSOR LH (w/ ABS, VSC)


  1. Install the speed sensor RH with the bolt.
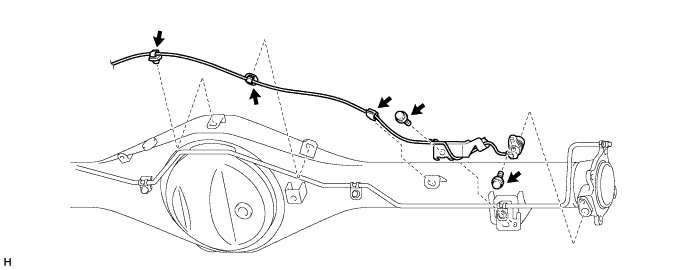

    C225641

    Torque:
    8.5 N*m{ 87 kgf*cm , 75 in.*lbf }

    NOTICE:
    1. Make sure there are no pieces of iron or other foreign matter attached to the sensor tip.
    2. While inserting the speed sensor into the axle housing hole, do not strike or damage the sensor tip.
    3. After installing the speed sensor, make sure there is no clearance or foreign matter between the sensor stay part and the axle housing.

  1. Install the harness clamp with the bolt.

    Torque:
    8.5 N*m{ 87 kgf*cm , 75 in.*lbf }

    NOTICE:
    1. When installing the clamp, do not twist the wire harness.
    2. Make sure the clamp rotation stopper touches the installation position.

  1. Attach the 3 clamps.

    NOTICE:
    When attaching the clamps, do not twist the wire harness.


  1. Install the speed sensor LH with the bolt.
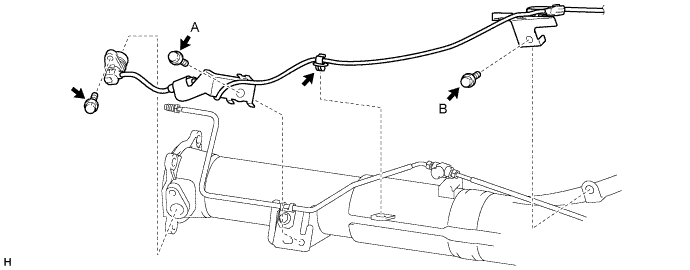

    C225640E01

    Torque:
    8.5 N*m{ 87 kgf*cm , 75 in.*lbf }

    NOTICE:
    1. Make sure there are no pieces of iron or other foreign matter attached to the sensor tip.
    2. While inserting the speed sensor into the axle housing hole, do not strike or damage the sensor tip.
    3. After installing the speed sensor, make sure there is no clearance or foreign matter between the sensor stay part and the axle housing.

  1. Install the 2 harness clamps with the 2 bolts.

    Torque:
    for bolt A:
    8.5 N*m{ 87 kgf*cm , 75 in.*lbf }
    for bolt B:
    32 N*m{ 326 kgf*cm , 24 ft.*lbf }

    NOTICE:
    1. When installing the clamps, do not twist the wire harness.
    2. Make sure the clamp rotation stopper touches the installation position.

  1. Attach the clamp.

    NOTICE:
    When attaching the clamp, do not twist the wire harness.

  1. Connect the sensor connector.

    NOTICE:
    1. Securely connect the connector.
    2. When connecting the connector, do not twist the wire harness.


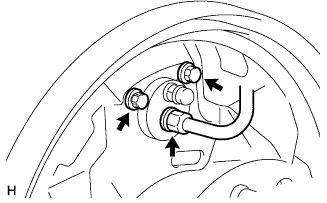
15. CONNECT BRAKE LINE (for 2WD)


C111485
  1. Install the cylinder with the 2 bolts.

    Torque:
    9.5 N*m{ 97 kgf*cm , 84 in.*lbf }

  1. Using SST, connect the brake line.

    SST
    09023-00101  

    Torque:
    15.2 N*m{ 155 kgf*cm , 11 ft.*lbf } without SST
    14 N*m{ 143 kgf*cm , 10 ft.*lbf } with SST

    HINT:
    Use a torque wrench with a fulcrum length of 30 cm (11.82 in.).


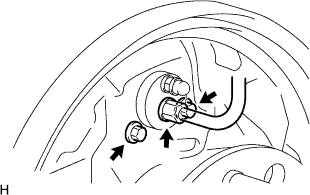
16. CONNECT BRAKE LINE (for 4WD and Pre-Runner)


C111505
  1. Install the cylinder with the 2 bolts.

    Torque:
    11.5 N*m{ 117 kgf*cm , 8 ft.*lbf }

  1. Using SST, connect the brake line.

    SST
    09023-00101  

    Torque:
    15.2 N*m{ 155 kgf*cm , 11 ft.*lbf } without SST
    14 N*m{ 143 kgf*cm , 10 ft.*lbf } with SST

    HINT:
    Use a torque wrench with a fulcrum length of 30 cm (11.81 in.).


17. INSTALL REAR BRAKE DRUM SUB-ASSEMBLY (for 2WD)


18. INSTALL REAR BRAKE DRUM SUB-ASSEMBLY (for 4WD and Pre-Runner)


19. FILL RESERVOIR WITH BRAKE FLUID

HINT:
Refer to "BRAKE-BRAKE FLUID-BLEEDING" and the fill reservoir with brake fluid.


20. BLEED AIR FROM BRAKE LINE

HINT:
Refer to "BRAKE-BRAKE FLUID-BLEEDING" and perform the air bleeding.


21. CHECK BRAKE FLUID LEVEL IN RESERVOIR

HINT:
Refer to "BRAKE-BRAKE FLUID-ON-VEHICLE INSPECTION" and the check brake fluid level in reservoir.


22. CHECK FOR BRAKE FLUID LEAKAGE (for 2WD)


23. CHECK FOR BRAKE FLUID LEAKAGE (for 4WD and Pre-Runner)


24. INSTALL REAR WHEEL

Torque:
for 2WD steel wheel:
152 N*m{ 1550 kgf*cm , 112 ft.*lbf }
for 2WD aluminum wheel:
121 N*m{ 1234 kgf*cm , 89 ft.*lbf }
for 4WD:
105 N*m{ 1071 kgf*cm , 77 ft.*lbf }


25. CHECK PARKING BRAKE LEVER TRAVEL
  1. Pull the lever upward with a force of approximately 200 N (20 kgf, 44 lbf) and count the number of clicks.

    OK:
    7 to 9 clicks


26. ADJUST PARKING BRAKE LEVER TRAVEL


C112487
  1. Remove the lock nut.

  1. Turn the No. 1 wire adjusting nut until the lever travel is correct.

  1. Tighten the lock nut.

    Torque:
    5.0 N*m{ 51 kgf*cm , 44 in.*lbf }

    HINT:
    If further adjustment is necessary, proceed to the next step.


27. CONNECT CABLE TO NEGATIVE BATTERY TERMINAL


28. PERFORM INITIALIZATION
  1. Perform initialization (Click here).

    NOTICE:
    Certain systems need to be initialized after disconnecting and reconnecting the cable to the negative (-) battery terminal.


29. CHECK SPEED SENSOR SIGNAL
  1. w/ Rear Differential Lock
    Check the speed sensor signal (Click here).

  1. w/o VSC:
    Check the speed sensor signal (Click here).

  1. w/ VSC:
    Check the speed sensor signal (Click here).