 |
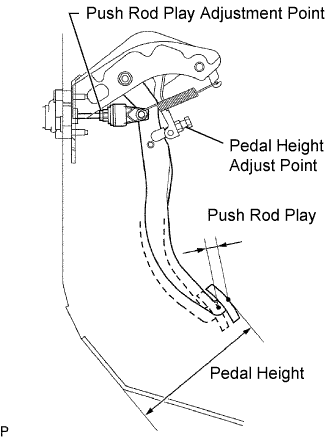
Check that the pedal height is correct.
- Pedal height from dash panel:
- 179.9 to 189.9 mm (7.08 to 7.48 in.) (for LHD)
- 179.6 to 189.6 mm (7.07 to 7.46 in.) (for RHD)
CLUTCH PEDAL > ADJUSTMENT |
| 1. INSPECT AND ADJUST CLUTCH PEDAL ASSEMBLY |
Lift up the floor carpet to expose the asphalt sheet under the pedal.
|
Check that the pedal height is correct.
w/o Clutch Switch:
Adjust the pedal height.
Loosen the lock nut and turn the stopper bolt until the pedal height is within the specified range.
Tighten the lock nut.
w/ Clutch Switch:
Adjust the pedal height.
Loosen the lock nut of stopper bolt and clutch switch. Then turn clutch switch backward.
Turn the stopper bolt until the pedal height is within the specified range.
Tighten the lock nut of stopper bolt.
Adjust the clutch switch assembly (Click here).
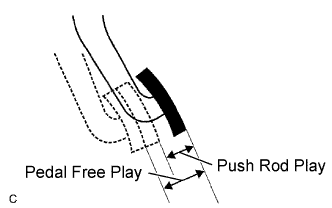 |
Check the pedal free play and push rod play.
Depress the clutch pedal until resistance is felt.
Measure the distance between the pedal's released position and the position in the previous step.
Release the pedal. Using your finger, gently press the pedal until resistance increases slightly.
Measure the distance between the pedal's released position and the position in the previous step.
Adjust the pedal free play and push rod play.
Loosen the lock nut and turn the push rod until the pedal free play and push rod play are within the specified ranges.
Tighten the lock nut.
After adjusting the pedal free play, check the pedal height.
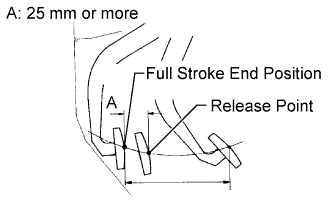 |
Check the clutch release point.
Pull the parking brake lever and use wheel chocks to stabilize the vehicle.
Start the engine and run it at idle.
Without depressing the clutch pedal, slowly move the shift lever to R until the gears contact.
Gently depress the clutch pedal and measure the stroke distance from the point that the gear noise stops (release point) up to the full stroke end position.
| 2. ADJUST CLUTCH SWITCH ASSEMBLY (w/ Clutch Switch) |
Loosen the adjusting nut.
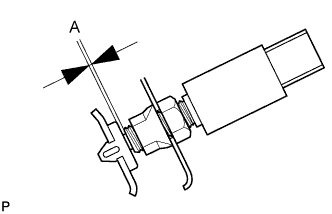 |
Adjust the switch position so that the clearance labeled A in the illustration, between the clutch switch and cushion, is within the specified range. Then, tighten the adjusting nut.