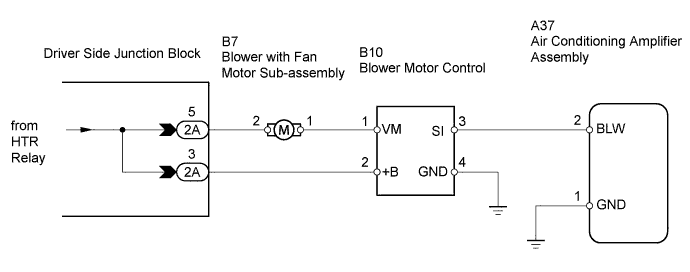
AIR CONDITIONING SYSTEM (for Automatic Air Conditioning System) > Blower Motor Circuit |
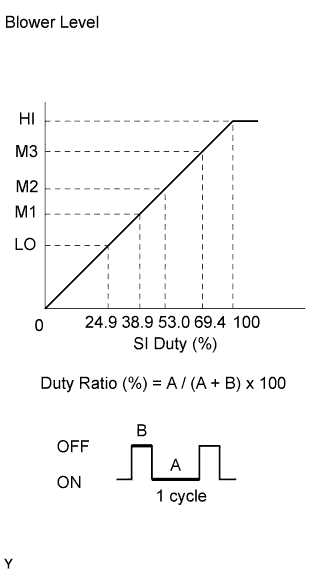
| 1.ACTUATOR CHECK |
Enter actuator check mode (Click here).
Press the front DEF switch to change to the step operation (Click here).
Check the air flow level by hand.
| Display Code | Blower Level |
| 0 | 0 |
| 1 | 1 |
| 2 | 16 |
| 3 | 16 |
| 4 | 16 |
| 5 | 16 |
| 6 | 16 |
| 7 | 16 |
| 8 | 16 |
| 9 | 31 |
|
| ||||
| OK | ||
 | ||
| ||
| 2.CHECK HARNESS AND CONNECTOR (BLOWER MOTOR CONTROL - AIR CONDITIONING AMPLIFIER) |
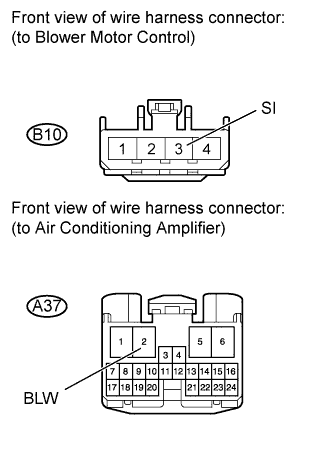 |
Disconnect the B10 control connector.
Disconnect the A37 amplifier connector.
Measure the resistance according to the value(s) in the table below.
| Tester Connection | Condition | Specified Condition |
| B10-3 (SI) - A37-2 (BLW) | Always | Below 1 Ω |
| B10-3 (SI) - Body ground | Always | 10 kΩ or higher |
|
| ||||
| OK | |
 |
| 3.CHECK HARNESS AND CONNECTOR (BLOWER MOTOR CONTROL - BODY GROUND) |
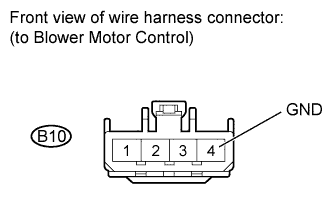 |
Disconnect the B10 control connector.
Measure the resistance according to the value(s) in the table below.
| Tester Connection | Condition | Specified Condition |
| B10-4 (GND) - Body ground | Always | Below 1 Ω |
|
| ||||
| OK | |
|
| 4.INSPECT BLOWER WITH FAN MOTOR SUB-ASSEMBLY |
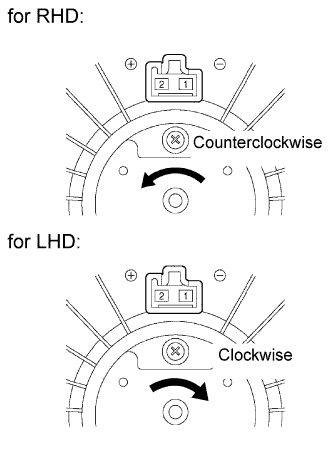 |
Remove the motor.
Apply battery voltage to the motor and check that the motor rotates smoothly.
| Measurement Condition | Specified Condition |
| Battery positive (+) → Terminal 2 Battery negative (-) → Terminal 1 | Motor rotates clockwise |
| Measurement Condition | Specified Condition |
| Battery positive (+) → Terminal 2 Battery negative (-) → Terminal 1 | Motor rotates counterclockwise |
|
| ||||
| OK | |
|
| 5.CHECK HARNESS AND CONNECTOR (BLOWER MOTOR CONTROL - BLOWER WITH FAN MOTOR AND DRIVER SIDE JUNCTION BLOCK) |
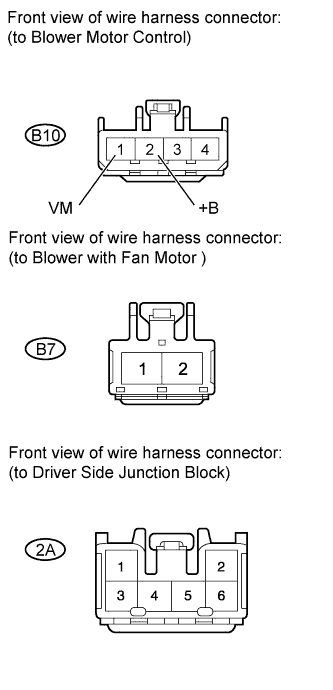 |
Disconnect the B10 control connector.
Disconnect the B7 motor connector.
Disconnect the 2A junction block connector.
Measure the resistance according to the value(s) in the table below.
| Tester Connection | Condition | Specified Condition |
| B10-1 (VM) - B7-1 | Always | Below 1 Ω |
| B10-2 (+B) - 2A-3 | ||
| B7-2 - 2A-5 | ||
| B10-2 (+B) - Body ground | Always | 10 kΩ or higher |
| B7-1 - Body ground | ||
| B7-2 - Body ground |
|
| ||||
| OK | |
|
| 6.CHECK AIR CONDITIONING AMPLIFIER ASSEMBLY |
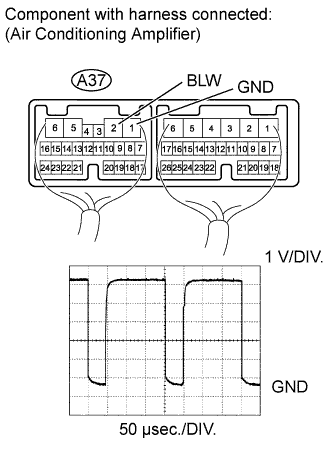 |
Remove the air conditioning amplifier with its connectors still connected.
Turn the ignition switch to ON.
Turn the blower switch ON (LO).
Using an oscilloscope, check the waveform of the amplifier.
| Item | Content |
| Tester Connection | A37-2 (BLW) - A37-1 (GND) |
| Tool Setting | 1 V/DIV., 50 μsec./DIV. |
| Condition | Blower switch ON (LO) |
|
| ||||
| OK | ||
| ||
| ||

