Home › ENGINE ยท 1KD-FTV › FUEL › COMMON RAIL (w/ EGR Cooler)

COMMON RAIL (w/ EGR Cooler) > INSTALLATION

for Preparation Click here


NOTICE:
  1. When replacing the injectors (including shuffling the injectors between the cylinders), common rail or cylinder head, it is necessary to replace the injection pipes with new ones.
  2. When replacing the fuel supply pump, common rail, cylinder block, cylinder head, cylinder head gasket or timing gear case, it is necessary to replace the fuel inlet pipe with a new one.


1. INSTALL COMMON RAIL ASSEMBLY

NOTICE:
When replacing the common rail, do not remove the foreign object mixing prevention caps of the common rail until just before the fuel inlet pipe and injection pipe are connected to the common rail.


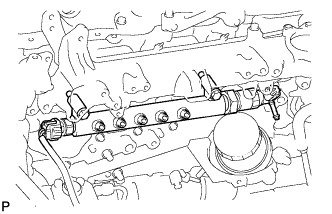
    A152283
  1. Install the common rail and insulator with the 2 bolts.

    Torque:
    38 N*m{ 387 kgf*cm , 28 ft.*lbf }

  1. Connect the 2 connectors.


2. INSTALL FUEL INLET PIPE SUB-ASSEMBLY


    A154319E01
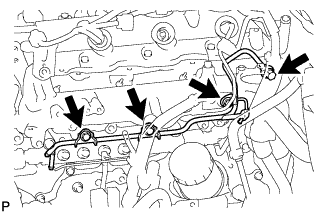
  1. Temporarily install the fuel inlet pipe with the union nuts.

    NOTICE:
    1. If the supply pump is replaced, the fuel inlet pipe must be replaced.
    2. Keep the fuel inlet pipe free of foreign matter.

  1. Install a new O-ring to the oil level gauge guide, and install the oil level gauge guide to the cylinder block.
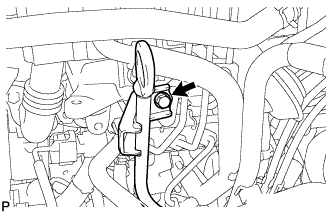
    NOTICE:
    Apply a coat of engine oil to the O-ring.


    A153562
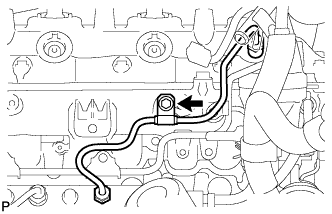
  1. Temporarily install the stay of the oil level gauge guide to the intake manifold with the bolt.
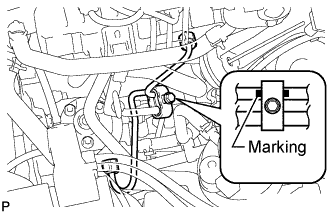


    A153410E01
  1. Install the clamp with the bolt.

    NOTICE:
    Install the clamp so that the fuel inlet pipe marking can be seen on both sides of the clamp.

    Torque:
    5.0 N*m{ 51 kgf*cm , 44 in.*lbf }

  1. Tighten the bolt of the oil level gauge guide stay.
    Torque:
    8.0 N*m{ 82 kgf*cm , 71 in.*lbf }


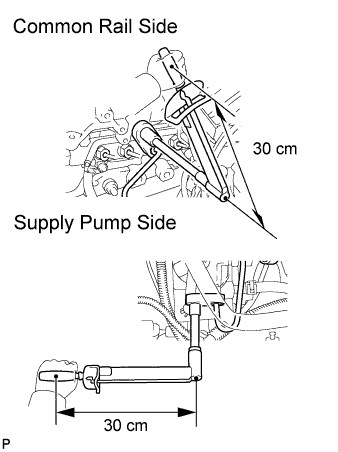
    A152337E02
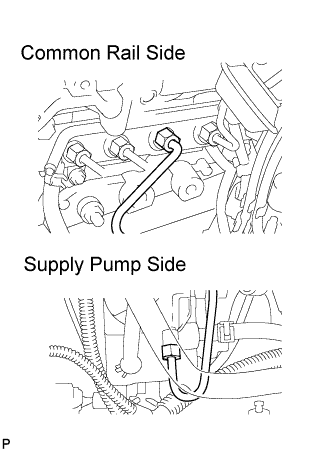
  1. Using a 17 mm union nut wrench, tighten the injection pipe union nut on the common rail side.

    Torque:
    without union nut wrench:
    35 N*m{ 357 kgf*cm , 26 ft.*lbf }
    with union nut wrench:
    32 N*m{ 326 kgf*cm , 24 ft.*lbf }

    HINT:
    1. Use a torque wrench with a fulcrum length of 30 cm (11.81 in.). If using a torque wrench with a length that is not 30 cm, calculate the torque specification for the torque wrench and union nut wrench based on the "without union nut wrench" torque specification (Click here).
    2. Make sure union nut wrench and wrench are connected in a straight line.

  1. Using a 17 mm union nut wrench, tighten the injection pipe union nut on the supply pump side.

    Torque:
    without union nut wrench:
    35 N*m{ 357 kgf*cm , 26 ft.*lbf }
    with union nut wrench:
    32 N*m{ 326 kgf*cm , 24 ft.*lbf }

    HINT:
    1. Use a torque wrench with a fulcrum length of 30 cm (11.81 in.). If using a torque wrench with a length that is not 30 cm, calculate the torque specification for the torque wrench and union nut wrench based on the "without union nut wrench" torque specification (Click here).
    2. Make sure union nut wrench and wrench are connected in a straight line.


3. INSTALL NO. 2 NOZZLE LEAKAGE PIPE ASSEMBLY


    A152338
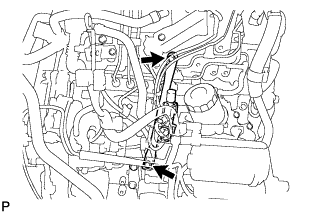
  1. Temporarily install the leakage pipe with the 3 bolts.

  1. Temporarily install a new gasket with the check valve.

  1. Tighten the 3 bolts and check valve.

    Torque:
    check valve:
    21 N*m{ 214 kgf*cm , 16 ft.*lbf }
    bolt:
    13 N*m{ 133 kgf*cm , 10 ft.*lbf }

  1. Connect the 3 fuel hoses.


4. INSTALL NO. 4 INJECTION PIPE

NOTICE:
  1. When replacing the injector, also replace the injection pipe.
  2. Keep the joints of the injection pipe clean.


    A152275
  1. Temporarily install the No. 4 injection pipe with the union nuts.

  1. Install new injection pipe clamp with the bolt.
    Torque:
    5.0 N*m{ 51 kgf*cm , 44 in.*lbf }

    NOTICE:
    1. Make sure that the inner-rubbers of the injection pipe fit inside the clamp.
    2. When installing the pipe, check that the inner rubbers and the clamp are in their proper positions.


    A152280E01
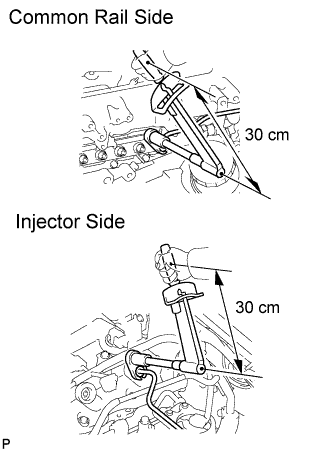
  1. Using a 17 mm union nut wrench, tighten the injection pipe union nuts on the common rail side.

    Torque:
    without union nut wrench:
    35 N*m{ 357 kgf*cm , 26 ft.*lbf }
    with union nut wrench:
    32 N*m{ 326 kgf*cm , 24 ft.*lbf }

    HINT:
    1. Use a torque wrench with a fulcrum length of 30 cm (11.81 in.). If using a torque wrench with a length that is not 30 cm, calculate the torque specification for the torque wrench and union nut wrench based on the "without SST" torque specification (Click here).
    2. Make sure union nut wrench and wrench are connected in a straight line.

  1. Using a union nut wrench, tighten the injection pipe union nuts on the injector side.

    Torque:
    without union nut wrench:
    35 N*m{ 357 kgf*cm , 26 ft.*lbf }
    with union nut wrench:
    32 N*m{ 326 kgf*cm , 24 ft.*lbf }

    HINT:
    1. Use a torque wrench with a fulcrum length of 30 cm (11.81 in.). If using a torque wrench with a length that is not 30 cm, calculate the torque specification for the torque wrench and union nut wrench based on the "without union nut wrench" torque specification (Click here).
    2. Make sure union nut wrench and wrench are connected in a straight line.


5. INSTALL EGR COOLER ASSEMBLY
  1. Install the EGR cooler assembly (Click here).


6. INSTALL NO. 1, NO. 2 AND NO. 3 INJECTION PIPE

NOTICE:
  1. When replacing the injector, also replace the injection pipe.
  2. Keep the joints of the injection pipe clean.

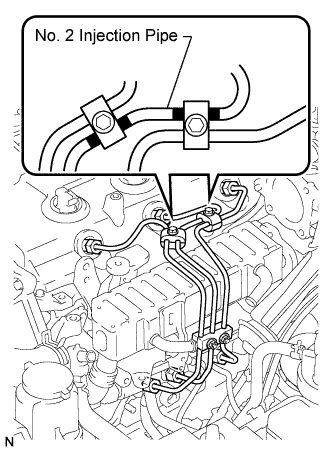
  1. Temporarily install the No. 1, No. 2 and No. 3 injection pipes with the union nuts.


    A153423E01
  1. Install the No. 2 and No. 3 injection pipe clamps with the 2 bolts and 2 nuts, as shown in the illustration.
    Torque:
    5.0 N*m{ 51 kgf*cm , 44 in.*lbf }

    HINT:
    If the painted mark on the No. 1 injection pipe has disappeared, use the illustration as a reference to install the clamps.


    A152279E01
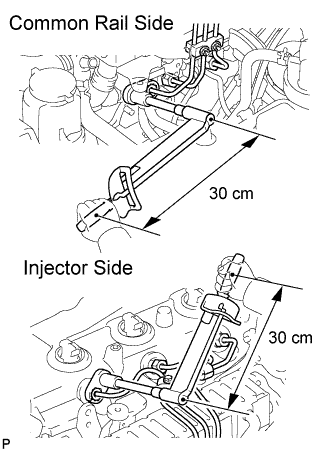
  1. Using a 17 mm union nut wrench, tighten the injection pipe union nuts on the common rail side.

    Torque:
    without union nut wrench:
    35 N*m{ 357 kgf*cm , 26 ft.*lbf }
    with union nut wrench:
    32 N*m{ 326 kgf*cm , 24 ft.*lbf }

    HINT:
    1. Use a torque wrench with a fulcrum length of 30 cm (11.81 in.). If using a torque wrench with a length that is not 30 cm, calculate the torque specification for the torque wrench and union nut wrench based on the "without union nut wrench" torque specification (Click here).
    2. Make sure union nut wrench and wrench are connected in a straight line.

  1. Using a 17 mm union nut wrench, tighten the injection pipe union nuts on the injector side.

    Torque:
    without union nut wrench:
    35 N*m{ 357 kgf*cm , 26 ft.*lbf }
    with union nut wrench:
    32 N*m{ 326 kgf*cm , 24 ft.*lbf }

    HINT:
    1. Use a torque wrench with a fulcrum length of 30 cm (11.81 in.). If using a torque wrench with a length that is not 30 cm, calculate the torque specification for the torque wrench and union nut wrench based on the "without SST" torque specification (Click here).
    2. Make sure union nut wrench and wrench are connected in a straight line.


7. INSTALL OIL FILTER SUB-ASSEMBLY
  1. Check and clean the oil filter installation surface.

  1. Apply clean engine oil to the gasket of a new oil filter.

  1. Lightly screw the oil filter into place by hand. Tighten it until the gasket contacts the seat.


    A060101E02
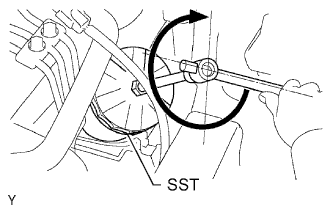
  1. Using SST, tighten the oil filter. Depending on the work space available, choose from the following.

    SST
    09228-07501  

    1. If enough space is available, use a torque wrench to tighten the oil filter.

      Torque:
      12 N*m{ 122 kgf*cm , 9 ft.*lbf }

    2. If enough space is not available to use a torque wrench, tighten the oil filter 3/4 turn by hand or with a common wrench.


8. INSTALL MANIFOLD STAY


    A148131
  1. Install the stay with the 2 bolts.

    Torque:
    19 N*m{ 194 kgf*cm , 14 ft.*lbf }

  1. Connect the 3 vacuum hoses to the 2 VSV.


9. INSTALL INTERCOOLER ASSEMBLY
  1. Install the intercooler assembly (Click here).


10. ADD FUEL


11. TIGHTEN FUEL TANK CAP ASSEMBLY


12. ADD ENGINE OIL


13. BLEED AIR FROM FUEL SYSTEM


14. CONNECT CABLE TO NEGATIVE BATTERY TERMINAL


15. PERFORM INITIALIZATION
  1. Perform initialization (Click here).

    NOTICE:
    Certain systems need to be initialized after disconnecting and reconnecting the cable from the negative (-) battery terminal.


16. CHECK ENGINE OIL LEAKS


17. CHECK FUEL LEAKS


18. INSTALL NO. 2 ENGINE UNDER COVER
  1. Install the under cover with the 4 bolts.

    Torque:
    28 N*m{ 286 kgf*cm , 21 ft.*lbf }


19. INSTALL NO. 1 ENGINE UNDER COVER
  1. Install the under cover with the 4 bolts.

    Torque:
    28 N*m{ 286 kgf*cm , 21 ft.*lbf }