Home › ENGINE ยท 1KD-FTV › INTAKE › INTAKE MANIFOLD (w/ EGR Cooler)

INTAKE MANIFOLD (w/ EGR Cooler) > INSTALLATION

for Preparation Click here


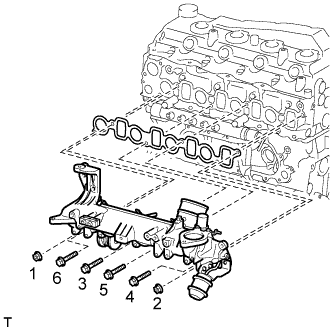
1. INSTALL INTAKE MANIFOLD


    A149797E01
  1. Temporarily install a new gasket and the manifold with the 2 nuts and 4 bolts.

  1. Tighten the 2 nuts and 4 bolts in the order shown in the illustration.
    Torque:
    29 N*m{ 296 kgf*cm , 21 ft.*lbf }

    NOTICE:

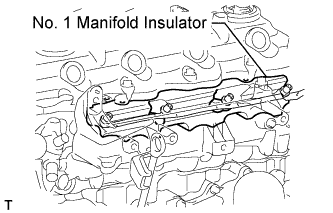
    1. A149937E01
    2. When installing the intake manifold, make sure that the No. 1 manifold insulator is not pinched.
    1. Make sure that the swirl control valve actuator is not damaged by surrounding parts.


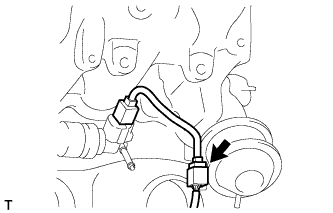
    A149936
  1. Install the common rail sub-harness connector to the intake manifold.


2. INSTALL INTAKE MANIFOLD INSULATOR


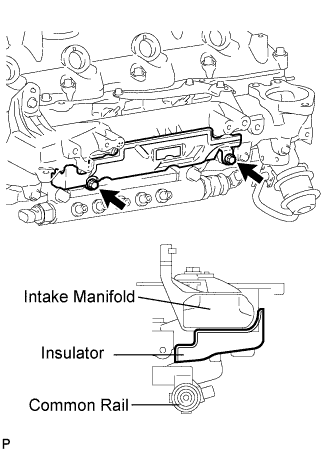
    A149966E01
  1. Install the insulator with the 2 bolts.

    Torque:
    8.0 N*m{ 82 kgf*cm , 71 in.*lbf }


3. INSTALL VACUUM CONTROL VALVE SET


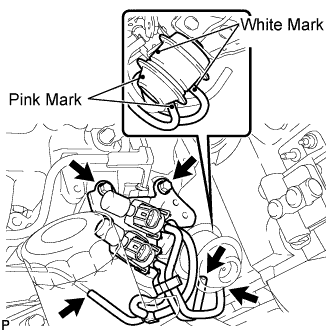
    A149961E01
  1. Install the vacuum valve control valve set with the 2 bolts.

    Torque:
    20 N*m{ 204 kgf*cm , 15 ft.*lbf }

  1. Connect the 3 vacuum hoses and 2 connectors.


4. INSTALL NO. 3 INTERCOOLER SUPPORT BRACKET


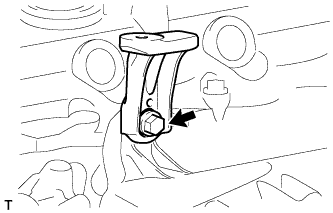
    A149935
  1. Install the support bracket with the bolt.

    Torque:
    23 N*m{ 235 kgf*cm , 17 ft.*lbf }


5. INSTALL NO. 2 NOZZLE LEAKAGE PIPE ASSEMBLY


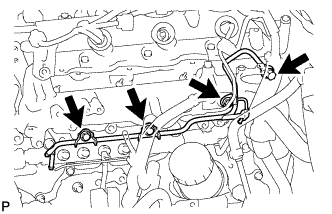
    A152338
  1. Temporarily install the leakage pipe with the 3 bolts.

  1. Temporarily install a new gasket with the check valve.

  1. Tighten the 3 bolts and check valve.

    Torque:
    check valve:
    21 N*m{ 214 kgf*cm , 16 ft.*lbf }
    bolt:
    13 N*m{ 133 kgf*cm , 10 ft.*lbf }

  1. Connect the 3 fuel hoses.


6. INSTALL NO. 4 INJECTION PIPE SUB-ASSEMBLY

NOTICE:
  1. When replacing the injector, also replace the injection pipe.
  2. Keep the joints of the injection pipe clean.


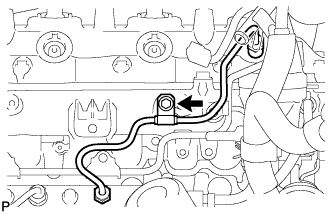
    A152275
  1. Temporarily install the No. 4 injection pipe with the union nuts.

  1. Install new injection pipe clamp with the bolt.
    Torque:
    5.0 N*m{ 51 kgf*cm , 44 in.*lbf }

    NOTICE:
    1. Make sure that the inner-rubbers of the injection pipe fit inside the clamp.
    2. When installing the pipe, check that the inner rubbers and the clamp are in their proper positions.


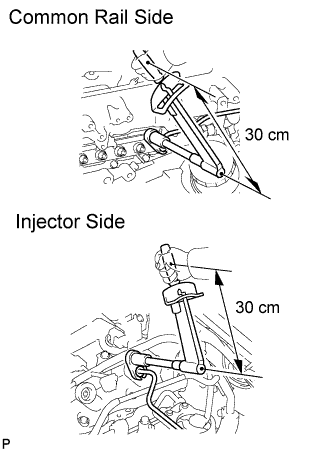
    A152280E01
  1. Using a 17 mm union nut wrench, tighten the injection pipe union nuts on the common rail side.

    Torque:
    without union nut wrench:
    35 N*m{ 357 kgf*cm , 26 ft.*lbf }
    with union nut wrench:
    32 N*m{ 326 kgf*cm , 24 ft.*lbf }

    HINT:
    1. Use a torque wrench with a fulcrum length of 30 cm (11.81 in.). If using a torque wrench with a length that is not 30 cm, calculate the torque specification for the torque wrench and union nut wrench based on the "without SST" torque specification (Click here).
    2. Make sure union nut wrench and wrench are connected in a straight line.

  1. Using a union nut wrench, tighten the injection pipe union nuts on the injector side.

    Torque:
    without union nut wrench:
    35 N*m{ 357 kgf*cm , 26 ft.*lbf }
    with union nut wrench:
    32 N*m{ 326 kgf*cm , 24 ft.*lbf }

    HINT:
    1. Use a torque wrench with a fulcrum length of 30 cm (11.81 in.). If using a torque wrench with a length that is not 30 cm, calculate the torque specification for the torque wrench and union nut wrench based on the "without union nut wrench" torque specification (Click here).
    2. Make sure union nut wrench and wrench are connected in a straight line.


7. INSTALL EGR COOLER
  1. Install the EGR (Click here).


8. INSTALL OIL DIPSTICK GUIDE


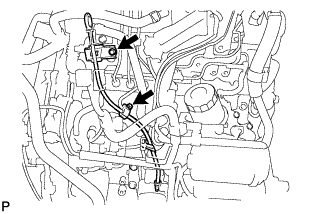
    A148132
  1. Install a new O-ring to the guide.

  1. Apply a small amount of clean engine oil to the O-ring.

  1. Install the guide with the bolt.

    Torque:
    8.0 N*m{ 82 kgf*cm , 71 in.*lbf }

  1. Install the injection pipe clamp with the bolt.

    Torque:
    5.0 N*m{ 51 kgf*cm , 44 in.*lbf }


9. INSTALL MANIFOLD STAY


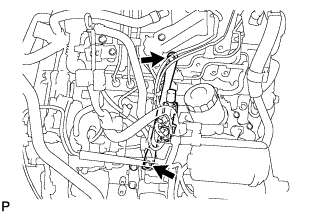
    A148131
  1. Install the stay with the 2 bolts.

    Torque:
    19 N*m{ 194 kgf*cm , 14 ft.*lbf }

  1. Connect the 3 vacuum hoses to the 2 VSV.


10. BLEED AIR FROM FUEL SYSTEM


11. CONNECT CABLE TO NEGATIVE BATTERY TERMINAL


12. CHECK FOR FUEL LEAKS

CAUTION:
  1. During Active Test mode, engine speed becomes high and combustion noise becomes loud, so pay attention.
  2. During Active Test mode, fuel becomes high-pressured. Be extremely careful not to expose your eyes, hands, or body to escaped fuel.

  1. Check that there are no leaks from any part of the fuel system when the engine is stopped. If there is fuel leakage, repair or replace parts as necessary.

  1. Start the engine and check that there are no leaks from any part of the fuel system. If there is fuel leakage, repair or replace parts as necessary.

  1. Disconnect the return hose from the common rail.

  1. Start the engine and check for fuel leaks from the return pipe.
    If there is fuel leakage, replace the common rail.

  1. Connect the intelligent tester to the DLC3.

  1. Start the engine and push the intelligent tester main switch on.

  1. Select the Fuel Leak test from the Active Test mode on the intelligent tester.

  1. If the intelligent tester is not available, fully depress the accelerator pedal quickly. Increase the engine speed to the maximum and maintain that speed for 2 seconds. Repeat this operation several times.

  1. Check that there are no leaks from any part of the fuel system.

    NOTICE:
    A return pipe leakage of less than 10 cc (0.6 cu in.) per minute is acceptable.

    If there is fuel leakage, repair or replace parts as necessary.

  1. Reconnect the return hose to the common rail.


13. PERFORM INITIALIZATION
  1. Perform initialization (Click here).

    NOTICE:
    Certain systems need to be initialized after disconnecting and reconnecting the cable from the negative (-) battery terminal.