 |
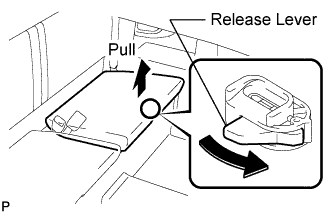
Pull the seat cushion lock hook's release lever in the direction indicated by the arrow in the illustration, and then disconnect the hook on the front of the seat cushion.
FUEL LID LOCK CONTROL > REMOVAL |
| 1. DISCONNECT CABLE FROM NEGATIVE BATTERY TERMINAL |
| 2. REMOVE FRONT SEAT ASSEMBLY LH |
w/ Front Seat Side Airbag:
Remove the front seat assembly (Click here).
for Separate Seat Type:
Remove the front seat assembly (Click here).
| 3. REMOVE FRONT SEAT ASSEMBLY RH |
w/ Front Seat Side Airbag:
for Separate Seat Type:
for Bench Seat Type:
Remove the front seat assembly (Click here).
for RHD, for Power Seat:
Remove the front seat assembly (Click here).
| 4. REMOVE REAR SEAT ASSEMBLY (for Double Cab) |
Remove the seat assembly (Click here).
| 5. REMOVE REAR SEAT CUSHION ASSEMBLY LH (for Extra Cab) |
|
Pull the seat cushion lock hook's release lever in the direction indicated by the arrow in the illustration, and then disconnect the hook on the front of the seat cushion.
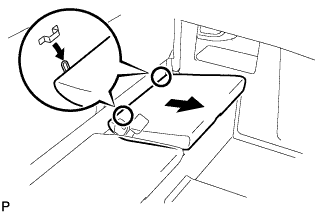 |
Detach the seat cushion's 2 rear hooks from the vehicle body.
Remove the seat cushion.
| 6. REMOVE REAR SEAT CUSHION ASSEMBLY RH (for Extra Cab) |
| 7. REMOVE BACK PANEL GARNISH UPPER |
for Single Cab:
Remove the back panel garnish upper .
for Extra Cab:
Remove the back panel garnish upper .
for Double Cab:
Remove the back panel garnish upper .
| 8. REMOVE BACK PANEL GARNISH LOWER (for Extra Cab) |
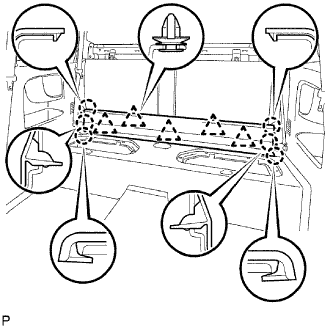 |
Using a screwdriver, detach the 6 claws.
Using a clip remover, detach the 5 clips and remove the garnish.
| 9. REMOVE REAR SEATBACK ASSEMBLY (for Extra Cab) |
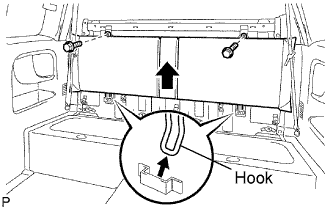 |
Remove the 2 bolts.
Lift up the seatback in the direction indicated by the arrow in the illustration to detach the 2 hooks from the vehicle body. Then remove the seatback.
| 10. REMOVE SHIFT LEVER KNOB SUB-ASSEMBLY |
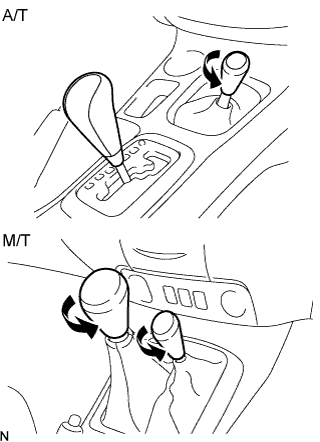 |
w/ M/T:
Twist the knob in the direction indicated by the arrow and remove it.
w/ 4WD:
Twist the transfer shift lever knob in the direction indicated by the arrow and remove it.
| 11. REMOVE PARKING BRAKE HOLE COVER SUB-ASSEMBLY |
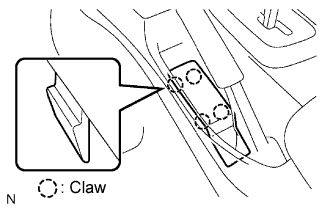 |
Detach the 4 claws and remove the hole cover.
| 12. REMOVE CONSOLE PANEL SUB-ASSEMBLY UPPER |
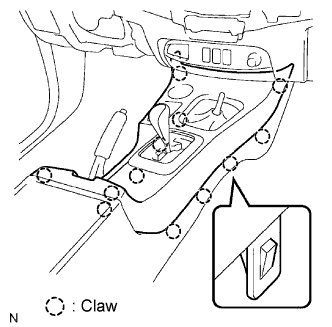 |
Detach the 12 claws and remove the console panel.
| 13. REMOVE CONSOLE BOX SUB-ASSEMBLY |
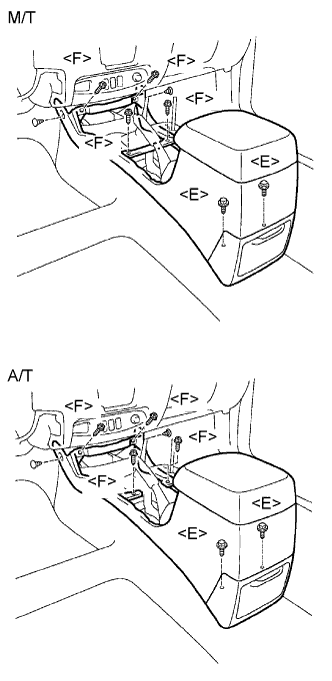 |
Remove the 4 screws <F> and 2 bolts <E>.
Using a clip remover, remove the 2 clips and console box.
| 14. REMOVE FRONT DOOR SCUFF PLATE LH |
for Single Cab:
Remove the front door scuff plate .
for Extra Cab:
Remove the front door scuff plate .
for Double Cab:
Remove the front door scuff plate .
| 15. REMOVE FRONT DOOR SCUFF PLATE RH (for RHD) |
for Single Cab:
Remove the front door scuff plate .
for Extra Cab:
Remove the front door scuff plate .
for Double Cab:
Remove the front door scuff plate .
| 16. REMOVE COWL SIDE TRIM BOARD LH (for LHD) |
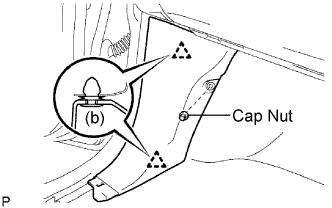 |
Remove the cap nut.
Using a clip remover, detach the 2 clips and remove the trim board.
| 17. REMOVE COWL SIDE TRIM BOARD RH (for RHD) |
| 18. REMOVE REAR DOOR SCUFF PLATE LH (for Double Cab) |
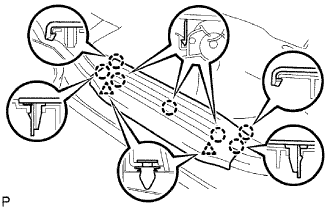 |
Using a screwdriver, detach the 7 claws.
Using a clip remover, detach the 2 clips and remove the scuff plate.
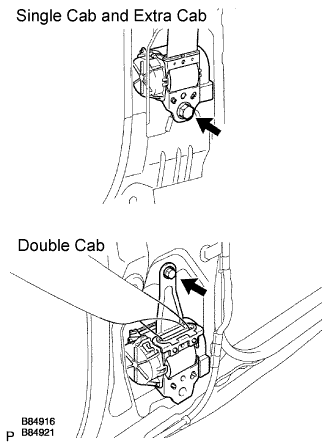
| 19. REMOVE FRONT SEAT OUTER BELT ASSEMBLY LH |
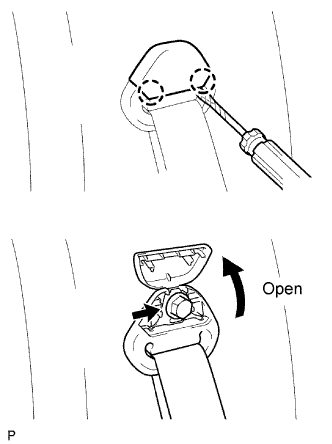 |
Single cab:
Remove the outer belt shoulder anchor.
Using a screwdriver, detach the 2 claws and open the seat belt anchor cover.
Remove the bolt and shoulder anchor.
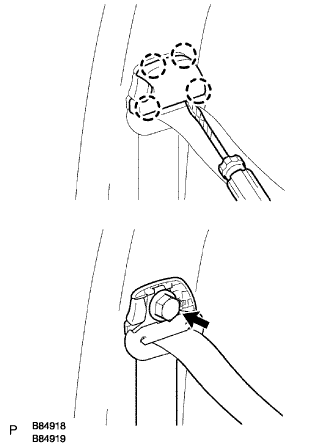 |
Double cab:
Remove the outer belt shoulder anchor.
Using a screwdriver, disengage the 4 claws and remove the seat belt anchor cover cap.
Remove the bolt and shoulder anchor.
 |
w/o Pretensioner:
Remove the bolt and seat belt.
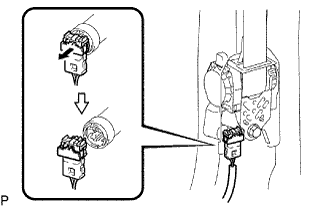 |
w/ Pretensioner:
Disconnect the pretensioner connector as shown in the illustration.
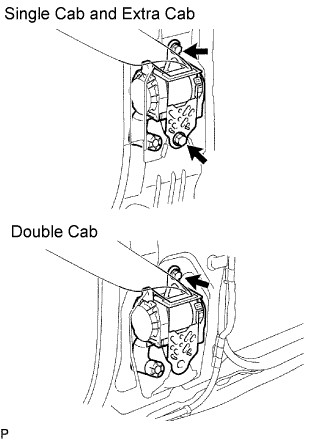 |
Remove the bolt and seat belt.
| 20. REMOVE REAR NO. 1 SEAT BELT ASSEMBLY OUTER LH (for RHD, for Extra Cab) |
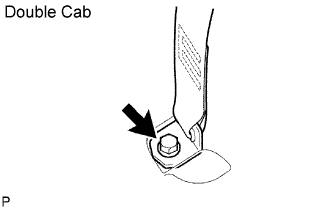 |
Remove the bolt and floor anchor.
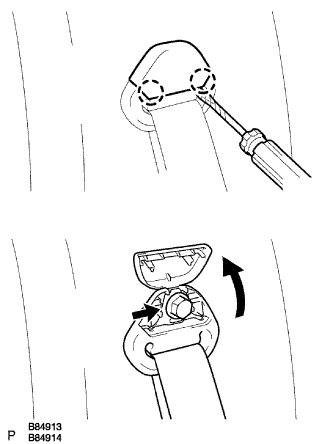 |
Using a screwdriver, detach the 2 claws and open the seat belt anchor cover.
Remove the bolt.
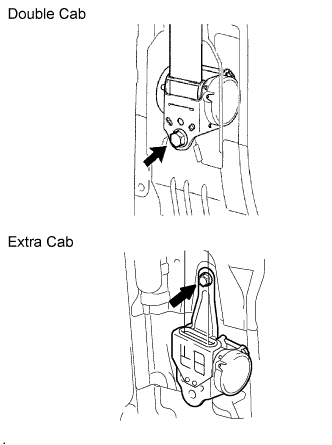 |
Remove the bolt and seat belt.
| 21. REMOVE CENTER PILLAR GARNISH LOWER LH (for Double Cab) |
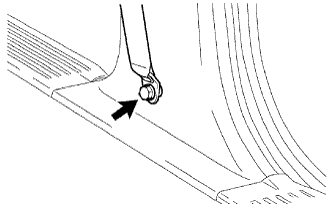 |
Remove the front seat outer belt anchor's built-in bolt and disconnect the belt's anchor.
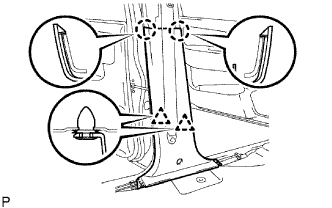 |
Using a screwdriver, detach the 2 claws.
Using a clip remover, detach the 2 clips and remove the garnish.
| 22. REMOVE BACK PANEL TRIM (w/ Back Panel Trim) |
for Single Cab:
Remove the back panel trim .
for Double Cab:
Remove the back panel trim .
| 23. REMOVE QUARTER TRIM PANEL LOWER LH |
for Single Cab:
Remove the quarter trim panel lower .
for Double Cab:
Remove the quarter trim panel lower .
| 24. REMOVE QUARTER INSIDE TRIM BOARD LH (for Extra Cab) |
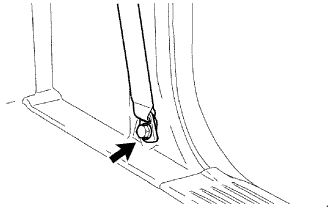 |
Remove the bolt and disconnect the front seat outer belt's anchor.
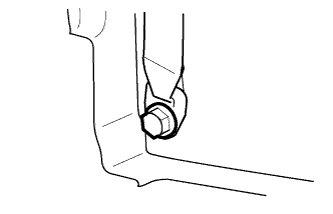 |
Remove the rear No. 1 seat belt anchor's built-in bolt and disconnect the belt's anchor.
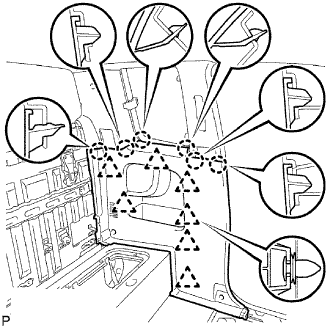 |
Using a clip remover, detach the 7 clips.
Using a screwdriver, detach the 6 claws and remove the trim board.
Detach the claws and remove the trim pocket from the trim board.
| 25. REMOVE FLOOR CARPET ASSEMBLY FRONT (for RHD) |
Partially remove the floor carpet.
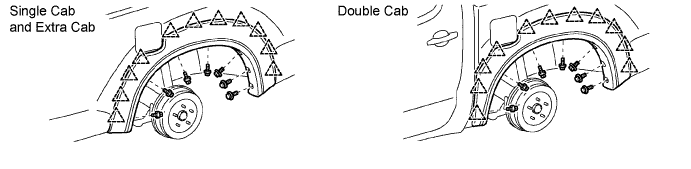
| 26. REMOVE REAR NO. 1 WHEEL OPENING EXTENSION LH (w/ Over Fender) |
Remove the 7 screws.
Detach the 11 clips and remove the extension.
| 27. REMOVE REAR WHEEL HOUSE LINER LH |
Partially remove the liner.
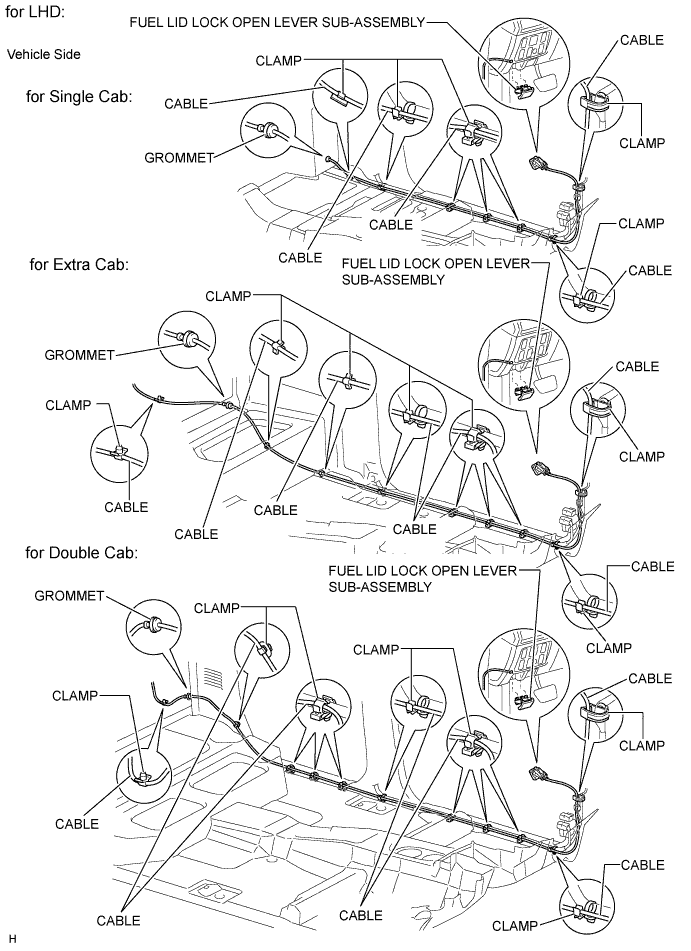
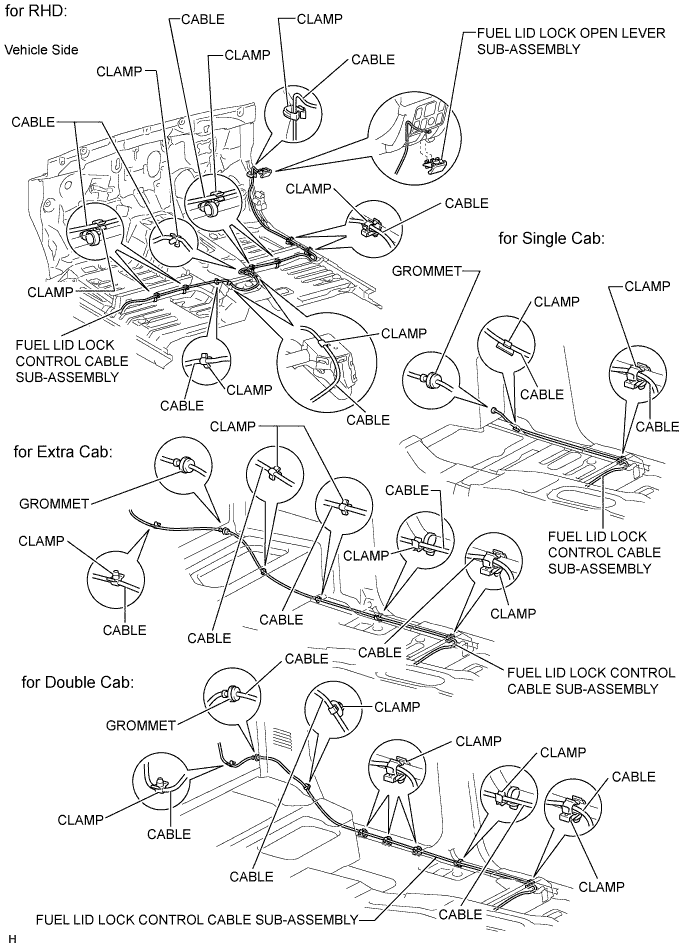
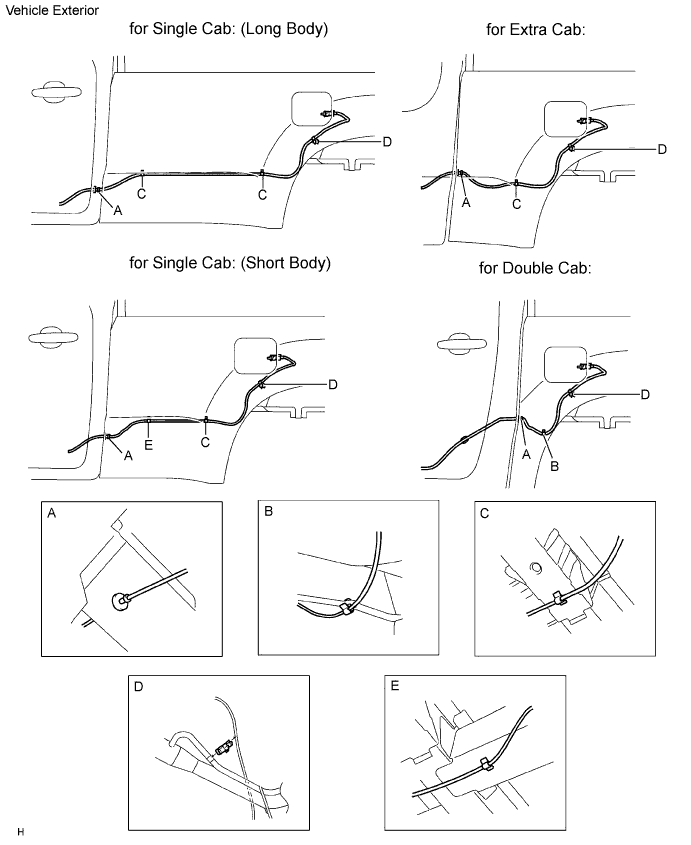
| 28. REMOVE FUEL LID LOCK CONTROL CABLE SUB-ASSEMBLY |
Remove the fuel lid lock open lever.
Remove the grommet from the vehicle body.
Detach the cable from the clamps shown in the illustration.
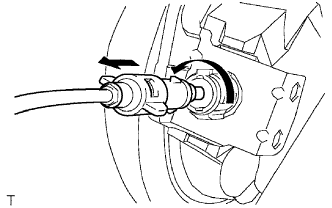 |
Turn the lock retainer counterclockwise and remove the cable from the retainer.
| 29. REMOVE FUEL FILLER OPENING LID LOCK RETAINER |
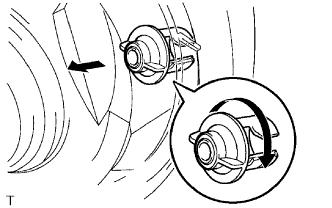 |
Turn the lock retainer clockwise and remove the lock retainer as shown in the illustration.