for LHD:
Attach the 5 guides and 8 claws to install the upper instrument panel.
Install the 2 bolts <A> and 2 screws <B>.
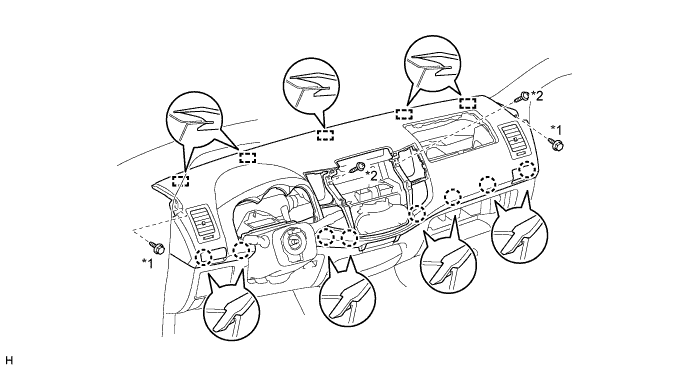
Text in Illustration *1 Bolt <A> *2 Screw <B>
UPPER INSTRUMENT PANEL > INSTALLATION |
| 1. INSTALL GLOVE COMPARTMENT DOOR LOCK ASSEMBLY |
Install the glove compartment door lock with the 2 screws.
| 2. INSTALL UPPER INSTRUMENT PANEL SUB-ASSEMBLY |
for LHD:
Attach the 5 guides and 8 claws to install the upper instrument panel.
Install the 2 bolts <A> and 2 screws <B>.
| *1 | Bolt <A> | *2 | Screw <B> |
for RHD:
Attach the 5 guides and 8 claws to install the upper instrument panel.
Install the 2 bolts <A> and 2 screws <B>.
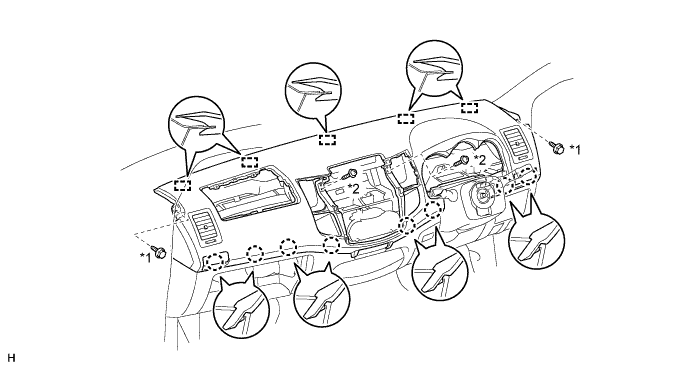
| *1 | Bolt <A> | *2 | Screw <B> |
| 3. INSTALL FRONT PILLAR GARNISH LH |
w/ Curtain Shield Airbag:
Remove the protective cover.
Attach the 2 guides and 2 clips to install the front pillar garnish.
Install the front door opening trim.
| 4. INSTALL FRONT PILLAR GARNISH RH |
| 5. INSTALL FRONT ASSIST GRIP SUB-ASSEMBLY |
Install the assist grip with the 2 screws.
| 6. INSTALL FRONT NO. 1 ASSIST GRIP PLUG LH |
Attach the 2 claws to install the front No. 1 assist grip plug.
| 7. INSTALL FRONT NO. 1 ASSIST GRIP PLUG RH |
| 8. INSTALL INSTRUMENT PANEL PASSENGER AIRBAG ASSEMBLY |
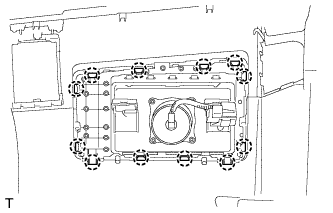 |
Attach the 12 claws to install the airbag.
Attach the clamp to the bracket.
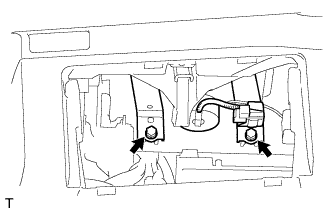 |
Install the 2 bolts.
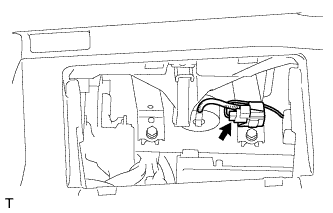 |
Connect the connector to the airbag.
| 9. INSTALL GLOVE COMPARTMENT DOOR ASSEMBLY |
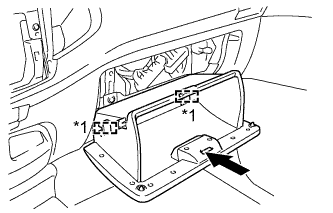 |
Attach the 2 hinges to install the glove compartment door.
| *1 | Hinge |
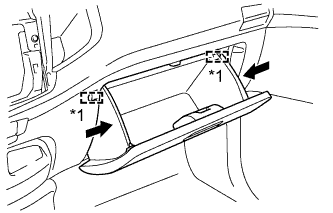 |
While pushing in the sides of the glove compartment door as indicated by the arrows in the illustration, close the door to engage it to the 2 stoppers.
| *1 | Stopper |
| 10. INSTALL RADIO TUNER OPENING COVER (w/o Audio) |
Install the radio tuner opening cover with the 4 screws.
| 11. INSTALL RADIO RECEIVER ASSEMBLY (w/ Audio) |
for Radio Receiver Type:
for Radio and Display Type:
| 12. INSTALL CENTER INSTRUMENT CLUSTER FINISH PANEL ASSEMBLY |
for Manual Air Conditioning System:
Connect the connectors.
Attach the 4 claws to connect the air conditioner control.
Attach the 10 claws and 4 clips to install the center instrument cluster finish panel.
for Automatic Air Conditioning System:
Connect the connectors.
Attach the 8 claws and 4 clips to install the center instrument cluster finish panel.
| 13. INSTALL COMBINATION METER ASSEMBLY |
Connect the connectors and attach the clamp.
Install the combination meter with the 3 screws.
| 14. INSTALL NO. 1 INSTRUMENT CLUSTER FINISH PANEL |
Attach the 2 claws and 3 guides to install the No. 1 instrument cluster finish panel.
Install the clip <C>.
| 15. INSTALL STEERING WHEEL ASSEMBLY |
| 16. CONNECT CABLE TO NEGATIVE BATTERY TERMINAL |
| 17. CHECK SRS WARNING LIGHT |