POWER WINDOW CONTROL SYSTEM > Auto Up / Down Function does not Operate |
| 1.CHECK MANUAL UP/DOWN FUNCTION (FOR DRIVER SIDE) |
Check that the manual up/down function operates normally.
|
| ||||
| OK | |
 |
| 2.PERFORM INITIALIZATION |
Initialize the front door window regulator sub-assembly (for driver side) (Click here).
Check that the driver side door power window moves when the auto up and down functions of the power window regulator master switch assembly are operated.
|
| ||||
| OK | ||
 | ||
| ||
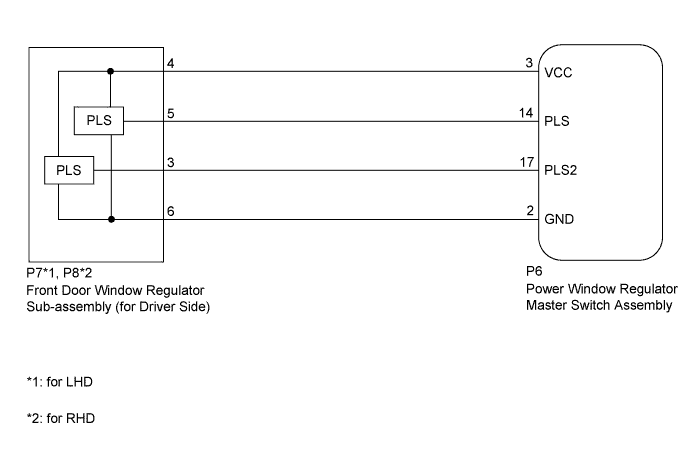
| 3.CHECK HARNESS AND CONNECTOR (POWER WINDOW REGULATOR MASTER SWITCH ASSEMBLY - FRONT DOOR WINDOW REGULATOR SUB-ASSEMBLY [FOR DRIVER SIDE]) |
Disconnect the P6 power window regulator master switch assembly connector.
Disconnect the P7*1 or P8*2 front door window regulator sub-assembly (for driver side) connector.
Measure the resistance according to the value(s) in the table below.
| Tester Connection | Condition | Specified Condition |
| P6-3 (VCC) - P7-4 | Always | Below 1 Ω |
| P6-14 (PLS) - P7-5 | Always | Below 1 Ω |
| P6-17 (PLS2) - P7-3 | Always | Below 1 Ω |
| P6-2 (GND) - P7-6 | Always | Below 1 Ω |
| P6-3 (VCC) or P7-4 - Body ground | Always | 10 kΩ or higher |
| P6-14 (PLS) or P7-5 - Body ground | Always | 10 kΩ or higher |
| P6-17 (PLS2) or P7-3 - Body ground | Always | 10 kΩ or higher |
| Tester Connection | Condition | Specified Condition |
| P6-3 (VCC) - P8-4 | Always | Below 1 Ω |
| P6-14 (PLS) - P8-5 | Always | Below 1 Ω |
| P6-17 (PLS2) - P8-3 | Always | Below 1 Ω |
| P6-2 (GND) - P8-6 | Always | Below 1 Ω |
| P6-3 (VCC) or P8-4 - Body ground | Always | 10 kΩ or higher |
| P6-14 (PLS) or P8-5 - Body ground | Always | 10 kΩ or higher |
| P6-17 (PLS2) or P8-3 - Body ground | Always | 10 kΩ or higher |
|
| ||||
| OK | |
|
| 4.CHECK POWER WINDOW REGULATOR MASTER SWITCH ASSEMBLY (PLS, PLS2 SIGNAL) |
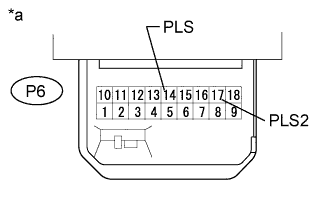 |
Remove the power window regulator master switch assembly with its connectors still connected (Click here).
Using an oscilloscope, check the waveform.
| Tester Connection | Condition | Specified Condition |
| P6-14 (PLS) - Body ground | Ignition switch ON, driver side power window switch off → up or down | Pulse waveform is output |
| P6-17 (PLS2) - Body ground |
| *a | Component with harness connected (Power Window Regulator Master Switch Assembly) |
|
| ||||
| OK | ||
| ||
| ||

