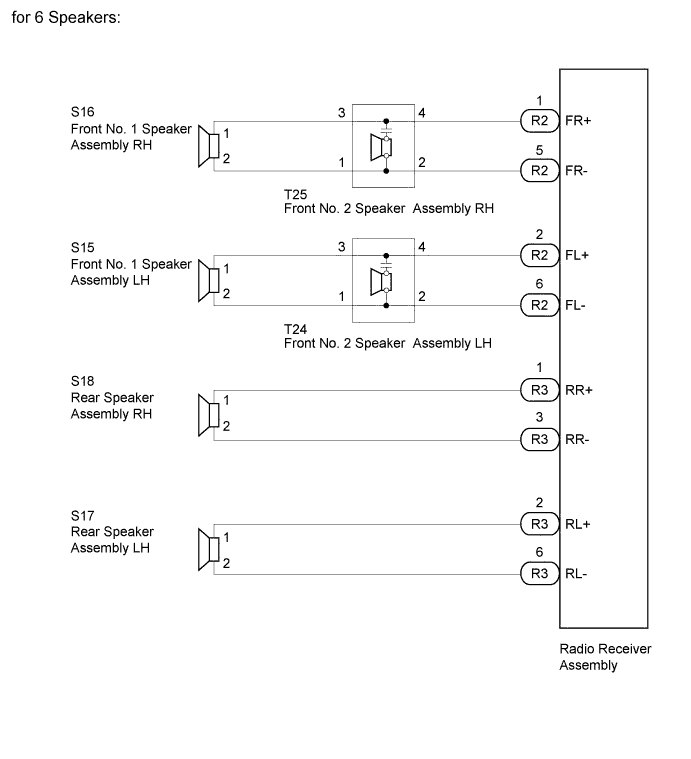
AUDIO AND VISUAL SYSTEM (for Radio Receiver Type) > Speaker Circuit |
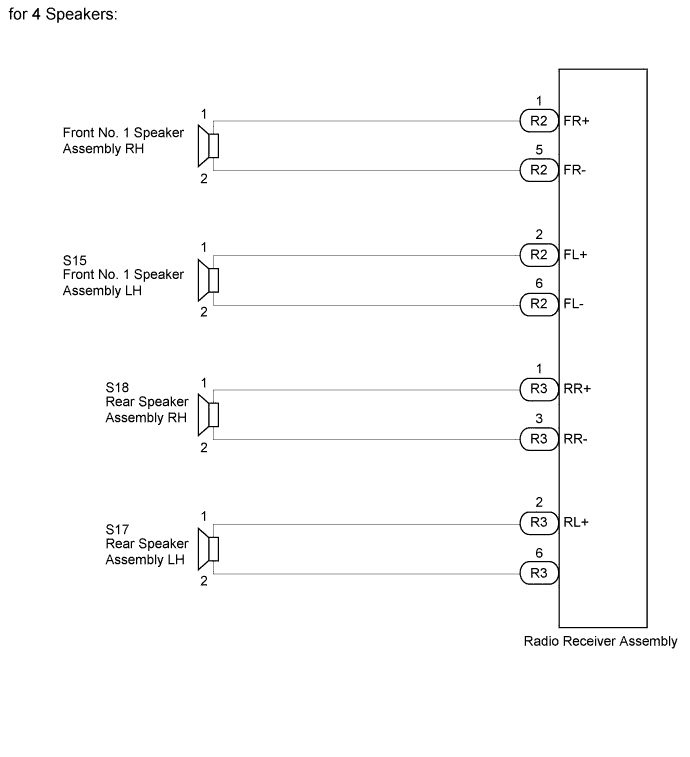
| 1.CHECK HARNESS AND CONNECTOR (RADIO RECEIVER - FRONT NO. 2 SPEAKER) |
Disconnect the R2 and R3 radio receiver assembly connectors.
Disconnect the S16*1 and/or S15*2 front No. 1 speaker assembly connector.
Disconnect the T25*1 and/or T24*2 front No. 2 speaker assembly connector*3.
Disconnect the S18*1 and/or S17*2 rear speaker assembly connector.
Measure the resistance according to the value(s) in the table below.
| Tester Connection | Condition | Specified Condition |
| R2-1 (FR+) - T25-4*3 | Always | Below 1 Ω |
| R2-5 (FR-) - T25-2*3 | Always | Below 1 Ω |
| T25-3 - S16-1*3 | Always | Below 1 Ω |
| T25-1 - S16-2*3 | Always | Below 1 Ω |
| R2-1 (FR+) - S16-1*4 | Always | Below 1 Ω |
| R2-5 (FR-) - S16-2*4 | Always | Below 1 Ω |
| R3-1 (RR+) - S18-1 | Always | Below 1 Ω |
| R3-3 (RR-) - S18-2 | Always | Below 1 Ω |
| R2-1 (FR+) - Body ground | Always | 10 kΩ or higher |
| R2-5 (FR-) - Body ground | Always | 10 kΩ or higher |
| T25-3 - Body ground*1 | Always | 10 kΩ or higher |
| T25-1 - Body ground*1 | Always | 10 kΩ or higher |
| R3-1 (RR+) - Body ground | Always | 10 kΩ or higher |
| R3-3 (RR-) - Body ground | Always | 10 kΩ or higher |
| Tester Connection | Condition | Specified Condition |
| R2-2 (FL+) - T24-4*3 | Always | Below 1 Ω |
| R2-6 (FL-) - T24-2*3 | Always | Below 1 Ω |
| T24-3 - S15-1*3 | Always | Below 1 Ω |
| T24-1 - S15-2*3 | Always | Below 1 Ω |
| R2-2 (FL+) - S15-1*4 | Always | Below 1 Ω |
| R2-6 (FL-) - S15-2*4 | Always | Below 1 Ω |
| R3-2 (RL+) - S17-1 | Always | Below 1 Ω |
| R3-6 (RL-) - S17-2 | Always | Below 1 Ω |
| R2-2 (FL+) - Body ground | Always | 10 kΩ or higher |
| R2-6 (FL-) - Body ground | Always | 10 kΩ or higher |
| T24-3 - Body ground*3 | Always | 10 kΩ or higher |
| T24-1 - Body ground*3 | Always | 10 kΩ or higher |
| R3-2 (RL+) - Body ground | Always | 10 kΩ or higher |
| R3-6 (RL-) - Body ground | Always | 10 kΩ or higher |
|
| ||||
| OK | |
 |
| 2.INSPECT FRONT NO. 1 SPEAKER ASSEMBLY |
Remove the front No. 1 speaker assembly (Click here).
Inspect the front No. 1 speaker assembly (Click here).
| Result | Proceed to |
| OK (for 6 Speakers) | A |
| OK (for 4 Speakers) | B |
| NG | C |
|
| ||||
|
| ||||
| A | |
|
| 3.CHECK FRONT NO. 2 SPEAKER ASSEMBLY |
Temporarily replace the front No. 2 speaker with a new or normally functioning one (Click here).
Check that the malfunction disappears.
|
| ||||
| OK | ||
 | ||
| ||
| 4.INSPECT REAR SPEAKER ASSEMBLY |
Remove the rear speaker assembly (Click here).
Inspect the rear speaker assembly (Click here).
|
| ||||
| OK | ||
| ||
| ||

