| NG |  |
| CONNECT CONNECTOR TO ECU CORRECTLY |
VEHICLE STABILITY CONTROL SYSTEM > Slip Indicator Light does not Come ON |
| 1.CHECK IF SKID CONTROL ECU CONNECTOR IS SECURELY CONNECTED |
Check if the skid control ECU connector is securely connected.
|
| ||||
| OK | |
 |
| 2.CHECK TERMINAL VOLTAGE (IG1 TERMINAL) |
Turn the ignition switch off.
Disconnect the skid control ECU (brake actuator assembly) connector.
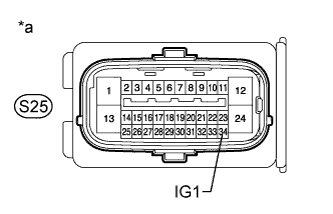 |
Measure the voltage according to the value(s) in the table below.
| Tester Connection | Switch Condition | Specified Condition |
| S25-34 (IG1) - Body ground | Ignition switch ON | 11 to 14 V |
| *a | Front view of wire harness connector (to Skid Control ECU [Brake Actuator Assembly]) |
|
| ||||
| OK | |
|
| 3.CHECK HARNESS AND CONNECTOR (GND1 TERMINAL) |
Turn the ignition switch off.
Disconnect the skid control ECU (brake actuator assembly) connector.
Measure the resistance according to the value(s) in the table below.
| Tester Connection | Condition | Specified Condition |
| S25-1 (GND1) - Body ground | Always | Below 1 Ω |
|
| ||||
| OK | |
|
| 4.CHECK HARNESS AND CONNECTOR (SKID CONTROL ECU - COMBINATION METER) |
Turn the ignition switch off.
Disconnect the skid control ECU (brake actuator assembly) connector.
Disconnect the C28 combination meter connector.
Measure the resistance according to the value(s) in the table below.
| Tester Connection | Condition | Specified Condition |
| S25-3 (IND) - C28-17 | Always | Below 1 Ω |
| S25-3 (IND) - Body ground | Always | 10 kΩ or higher |
|
| ||||
| OK | |
|
| 5.PERFORM ACTIVE TEST USING INTELLIGENT TESTER (SLIP INDICATOR LIGHT) |
Turn the ignition switch off.
Connect the intelligent tester to the DLC3.
Turn the ignition switch to ON.
Turn the intelligent tester on.
Enter the following menus: Chassis / ABS/VSC/TRC / Active Test.
| Tester Display | Test Part | Control Range | Diagnostic Note |
| Slip Indicator Light | Slip indicator light | Indicator light ON / OFF | Observe the combination meter. |
When performing the Slip Indicator Light Active Test, check Slip Indicator Light in the Data List.
| Tester Display | Measurement Item / Range | Normal Condition | Diagnostic Note |
| Slip Indicator Light | Slip indicator light / ON or OFF | ON: Slip indicator light on OFF: Slip indicator light off | - |
| Result | Proceed to | |
| Data List Display | Data List Display When Performing Active Test ON/OFF Operation | |
| ON | Does not change between ON and OFF | A |
| Changes between ON and OFF | B | |
| OFF | Does not change between ON and OFF | A |
| Changes between ON and OFF | B | |
|
| ||||
| A | ||
 | ||
| ||