Home › ENGINE › 5L-E ENGINE CONTROL SYSTEM › ECD SYSTEMPre-heating Control Circuit
Circuit diagnosis · Vehicles built Nov 2011 – Jul 2013
Versions by build date: Jun 2011 – Oct 2011 Nov 2011 – Jul 2013 Aug 2013 – Jul 2014 from Aug 2014
DESCRIPTION
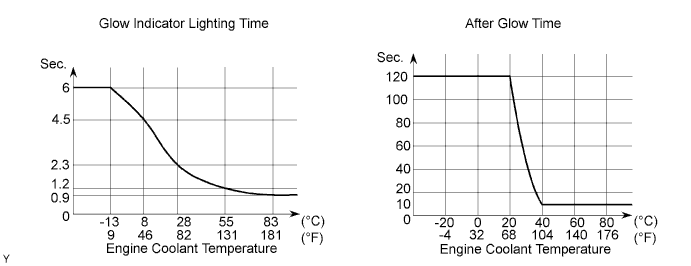
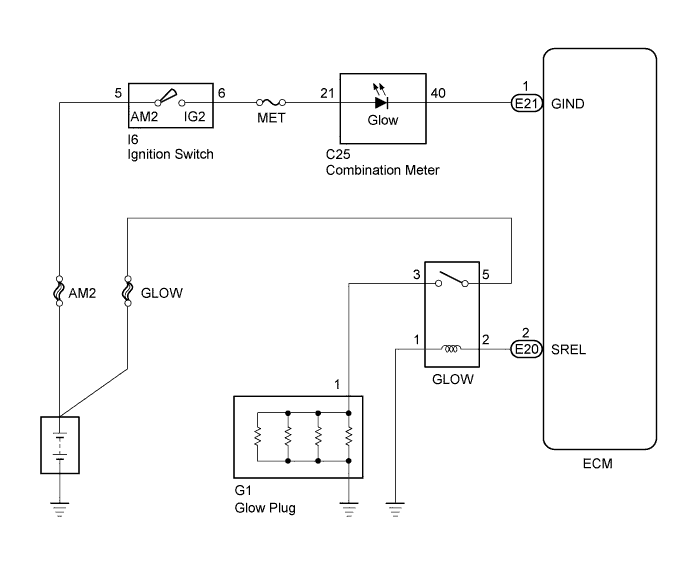
When the ignition switch turns ON, the ECM calculates the glow indicator lighting time/heating corresponding to the coolant temperature at that time and turns on the glow indicator light/glow plug relay. As ceramic is used for glow plug material, the current control is not performed. WIRING DIAGRAM
INSPECTION PROCEDURE
1. CHECK GLOW INDICATOR LIGHT
Turn the ignition switch ON.
Check that the glow indicator light comes on.
OK:
The glow indicator light remains on for 0.5 seconds or more and then goes off.
NG
OK
2. CHECK GLOW PLUG (INSTALLATION)
Check that the glow plug and glow plug wire are securely installed.
OK:
The glow plug and glow plug wire are securely installed.
NG
OK
3. INSPECT GLOW PLUG
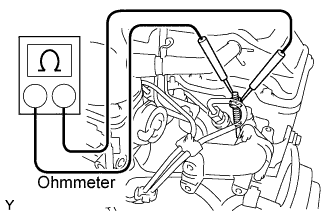
Measure the resistance of the glow plug.
Standard resistance:
0.72 Ω at 20°C (68°F)
HINT:
The higher the temperature, the smaller the resistance becomes and vice versa.
NG
OK
4. CHECK FOR INDICATOR LIGHTING TIME AND AFTER GLOW TIME
NG
OK
5. READ OUTPUT DTC
Read the DTC (Click here ).
Result:
Result
Proceed to
DTC is not output
A
DTC is output
B
B
A
6. INSPECT GLOW RELAY (Marking: GLOW)
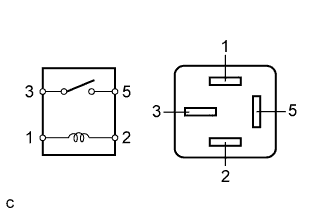
Measure the resistance of the glow relay.
Standard resistance:
Tester Connection
Specified Condition
3 - 5
10 kΩ or higher
3 - 5
Below 1 Ω
NG
OK
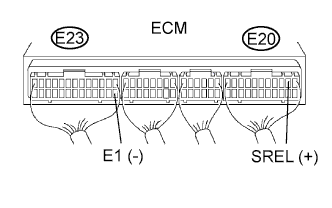
7. CHECK ECM (SREL VOLTAGE)
Turn the ignition switch to the START position. Measure the voltage of the ECM connector.
Standard voltage:
Tester Connection
Condition
Specified Condition
E20-2 (SREL) - E23-14 (E1)
Cranking
9 to 14 V
NG
OK
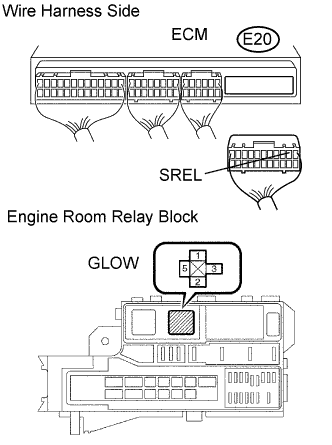
8. CHECK WIRE HARNESS (GLOW RELAY [Marking: GLOW] - ECM AND BODY GROUND)
Disconnect the E20 ECM connector. Disconnect the glow relay from the engine room relay block.
Measure the resistance of the wire harness side connectors.
Standard resistance:
Tester Connection
Specified Condition
Relay block glow relay terminal 2 - E20-2 (SREL)
Below 1 Ω
Relay block glow relay terminal 1 - Body ground
Below 1 Ω
E20-2 (SREL) - Body ground
10 kΩ or higher
NG
REPAIR OR REPLACE HARNESS AND CONNECTOR
OK
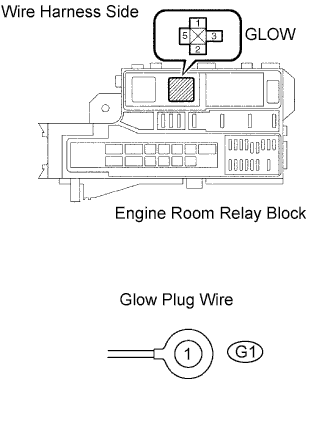
9. CHECK WIRE HARNESS (GLOW RELAY [Marking: GLOW] - GLOW PLUG AND BATTERY)
Disconnect the battery negative (-) cable. Disconnect the battery positive (+) cable.
Remove the glow relay from the engine room relay block.
Disconnect the glow plug wire.
Measure the resistance of the wire harness side connectors.
Standard resistance:
Tester Connection
Specified Condition
Relay block glow relay terminal 3 - Glow plug wire
Below 1 Ω
Relay block glow relay terminal 5 - Positive terminal of the battery
Below 1 Ω
NOTICE:
After reconnecting the battery cable, the radio and clock should be adjusted as they were previously.
NG
REPAIR OR REPLACE HARNESS AND CONNECTOR
OK
PROCEED TO NEXT CIRCUIT INSPECTION SHOWN IN PROBLEM SYMPTOMS TABLE
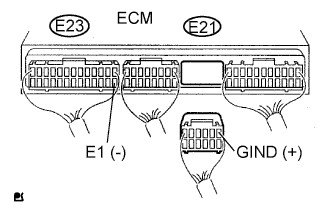
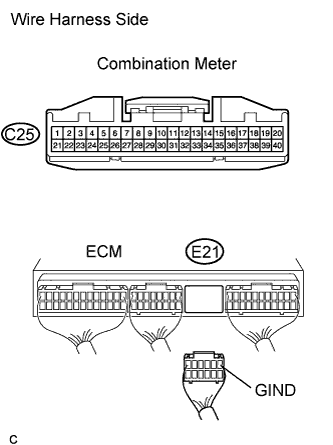
10. CHECK ECM (GIND VOLTAGE)
Disconnect the E21 ECM connector. Turn the ignition switch ON.
Measure the voltage of the wire harness side connectors.
Standard voltage:
Tester Connection
Specified Condition
E21-1 (GIND) - E23-14 (E1)
9 to 14 V
OK
NG
11. CHECK WIRE HARNESS (ECM - COMBINATION METER)
Disconnect the C25 combination meter connector. Disconnect the E21 ECM connector.
Measure the resistance of the wire harness side connectors.
Standard resistance:
Tester Connection
Specified Condition
C25-40 - E21-1 (GIND)
Below 1 Ω
NG
REPAIR OR REPLACE HARNESS AND CONNECTOR
OK
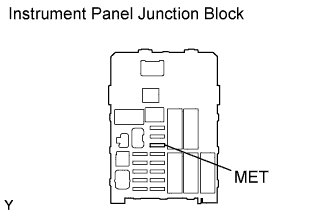
12. CHECK FUSE (MET FUSE)
Remove the MET fuse from the instrument panel junction block. Measure the resistance of the fuse.
Standard resistance:
Tester Connection
Specified Condition
MET fuse
Below 1 Ω
NG
CHECK FOR SHORT IN ALL HARNESSES AND COMPONENTS CONNECTED TO FUSE, AND REPLACE FUSE
OK
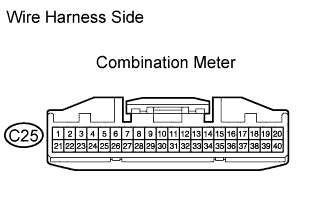
13. CHECK WIRE HARNESS (COMBINATION METER - BATTERY)
Disconnect the C25 combination meter connector. Turn the ignition switch ON.
Measure the voltage of the wire harness side connector.
Standard voltage:
Tester Connection
Specified Condition
C25-21 - Body ground
9 to 14 V
OK
REPLACE COMBINATION METER
NG
REPAIR OR REPLACE HARNESS AND CONNECTOR