Do not disconnect any part of the fuel system until you have discharged the fuel system pressure.
Even after discharging the fuel pressure, place a cloth or equivalent over fittings as you separate them to reduce risk of fuel spray on yourself or in the engine compartment.
Disconnect the cable from the negative (-) battery terminal.
CAUTION:
Wait at least 90 seconds after disconnecting the cable from the negative (-) battery terminal to prevent airbag and seat belt pretensioner activation.
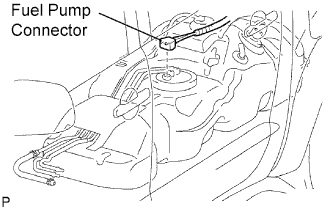
Disconnect the fuel pump connector.
Connect the cable to the negative (-) battery terminal.
Start the engine. After the engine has stopped on its own, turn the ignition switch OFF.
HINT:
DTC P0171/25 (system too lean) may be set.
Crank the engine again, then check that the engine does not start.
Loosen the fuel tank cap, then discharge the pressure in the fuel tank completely.
Connect the fuel pump connector.
2.
DISCONNECT CABLE FROM NEGATIVE BATTERY TERMINAL
CAUTION:
Wait at least 90 seconds after disconnecting the cable from the negative (-) battery terminal to prevent airbag and seat belt pretensioner activation.
NOTICE:
When disconnecting the cable, systems need to be initialized after the cable is reconnected (Click here).
3.
DRAIN ENGINE COOLANT
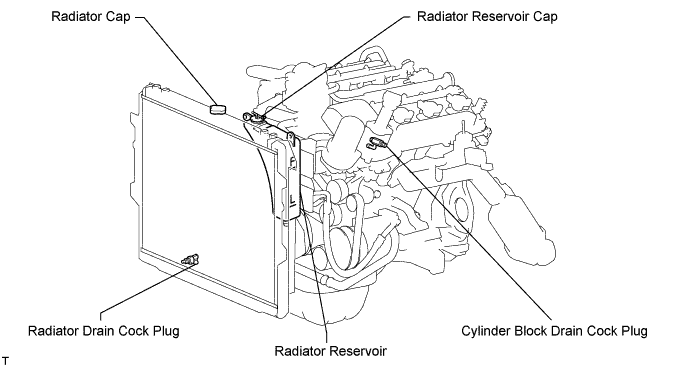
Remove the radiator cap.
Loosen the cylinder block drain cock plug and radiator drain plug, and then the coolant.
HINT:
Collect the coolant in a container and dispose of it according to the regulations in your area.
4.
DRAIN ENGINE OIL
Remove the engine under cover.
Remove the oil pan drain plug and drain the engine oil into a container.
5.
REMOVE BATTERY
6.
REMOVE HOOD
Disconnect the washer nozzle hose.
Remove the 4 bolts and hood.
7.
REMOVE V-BANK COVER
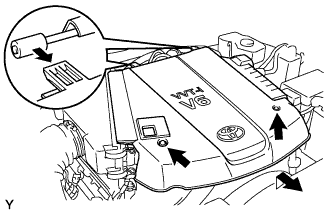
Remove the 2 nuts and the V-bank cover.
8.
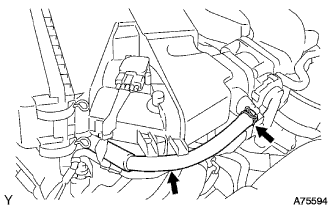
DISCONNECT NO. 2 VENTILATION HOSE
9.
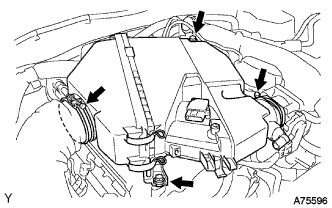
REMOVE AIR CLEANER
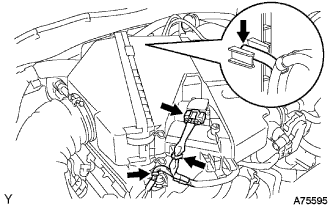
Disconnect the vacuum hose.
Disconnect the MAF meter connector.
Remove the 2 wire harness clamps.
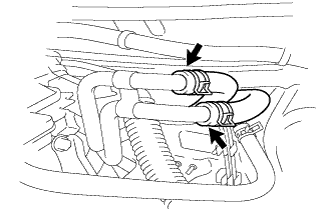
Loosen the 2 hose clamps.
Remove the 2 bolts and air cleaner.
10.
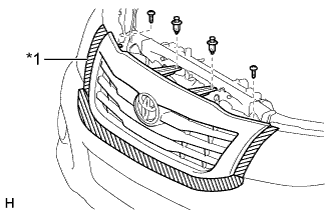
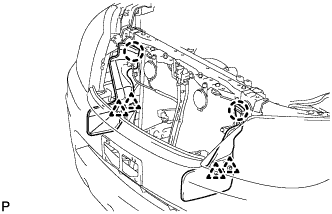
REMOVE RADIATOR GRILLE
Put protective tape around the radiator grille.
Text in Illustration
*1
Protective Tape
Remove the 2 clips and 2 screws.
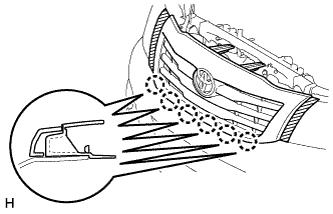
Detach the 6 claws and remove the radiator grille.
11.
REMOVE RADIATOR SIDE DEFLECTOR RH
Using a clip remover, remove the 2 clips.
Detach the claw and remove the deflector.
12.
REMOVE RADIATOR SIDE DEFLECTOR LH
Using a clip remover, remove the 2 clips.
Detach the claw and remove the deflector.
13.
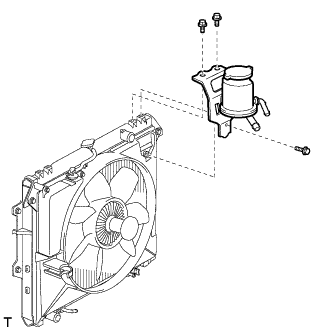
REMOVE FAN SHROUD
Remove the 3 bolts and oil reservoir.
Disconnect the reservoir hose from the radiator tank upper.
Remove the 4 nuts of the fluid coupling fan, and then remove the shroud together with the fluid coupling fan.
NOTICE:
Be careful not to damage the radiator core.
Remove the fan pulley from the water pump.
14.
LOOSEN FAN WITH FLUID COUPLING
15.
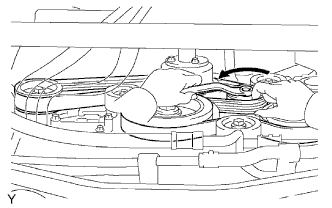
REMOVE DRIVE BELT
While releasing the belt tension by turning the belt tensioner counterclockwise, remove the V-ribbed belt from the belt tensioner.
16.
REMOVE FAN WITH FLUID COUPLING
Remove the 4 nuts and fan with fluid coupling.
17.
REMOVE FAN PULLEY
18.
REMOVE RADIATOR
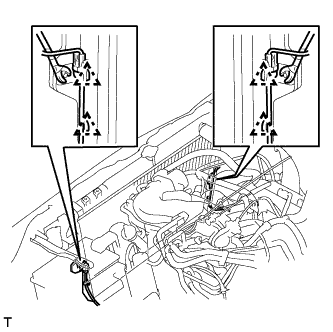
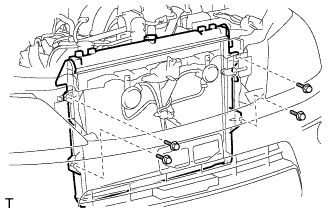
Disconnect the 2 front airbag sensor connectors.
Using a clip remover, detach the 4 clamps from the radiator side as shown in the illustration.
HINT:
Tape the clip remover tip before use.
Remove the 4 bolts and radiator.
19.
DISCONNECT VANE PUMP
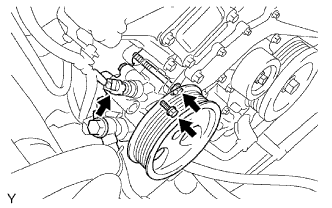
Disconnect the oil pressure switch connector.
Remove the 2 bolts, and disconnect the vane pump.
NOTICE:
Do not hit other parts with the pulley when disconnecting the vane pump.
HINT:
Make sure to suspend the vane pump securely.
20.
REMOVE GENERATOR
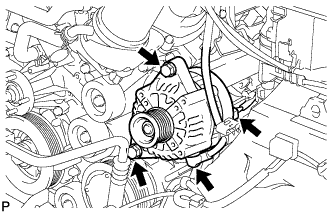
Remove the nut and generator wire.
Disconnect the generator connector.
Remove the 2 bolts and generator.
21.
DISCONNECT COOLER COMPRESSOR
22.
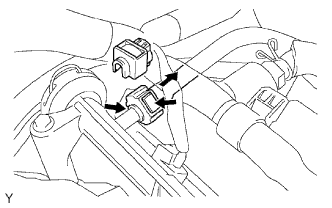
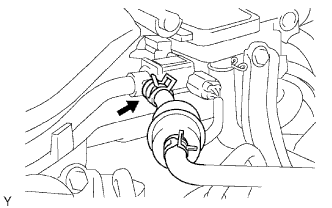
DISCONNECT NO. 1 FUEL PIPE
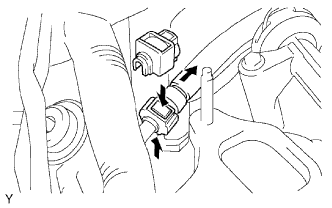
Remove the fuel pipe clamp.
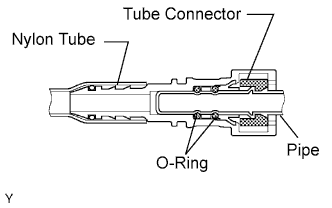
Pinch the tube connector and then pull out the fuel pipe.
NOTICE:
Check if there is any dirt or mud around the connector before this procedure, Clean if necessary. Foreign matter can affect the quick connector O-ring's seal between the fuel pipe and fuel delivery pipe.
Do not use any tool in this procedure.
Do not bend or twist the nylon tube.
Keep the plug free from foreign objects.
To protect the fuel pipe, cover it with a plastic bag after checking.
When the fuel pipe and fuel delivery pipe are stuck, pinch the nylon tube with your fingers, and turn it carefully to free and then disconnect the fuel pipe.
23.
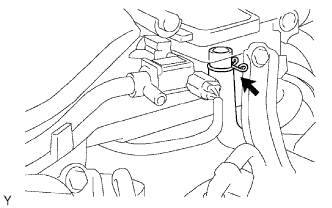
DISCONNECT NO. 2 FUEL PIPE
Remove the fuel pipe clamp.
Pinch the tube connector and then pull out the fuel pipe.
NOTICE:
Check if there is any dirt or mud around the connector before this procedure, Clean if necessary. Foreign matter can affect the quick connector O-ring's seal between the fuel pipe and fuel delivery pipe.
Do not use any tool in this procedure.
Do not bend or twist the nylon tube.
Keep the plug free from foreign objects.
To protect the fuel pipe, cover it with a plastic bag after checking.
When the fuel pipe and fuel pressure regulator are stuck, pinch the nylon tube with fingers, and turn it carefully to free and then disconnect the fuel pipe.
24.
DISCONNECT HEATER HOSE
Disconnect the hater water inlet hoses.
Disconnect the heater water outlet hose.
25.
REMOVE INTAKE AIR SURGE TANK
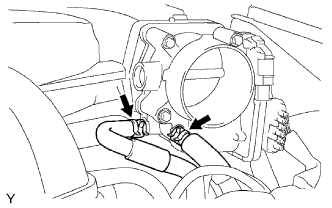
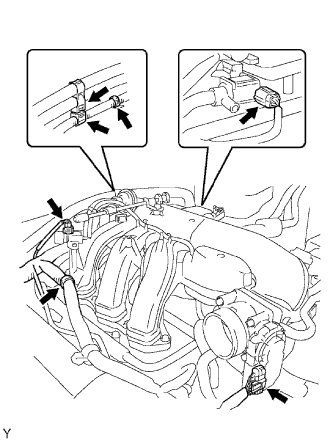
Disconnect the 2 water by-pass hoses.
Disconnect the purge line hose.
Disconnect the ventilation hose.
Disconnect the 2 VSV connectors.
Disconnect the throttle body with motor connector.
Separate the 3 wire harness clamps and hose clamp.
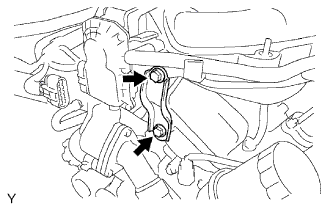
Remove the 2 bolts and throttle body bracket.
Remove the bolt and oil baffle plate.
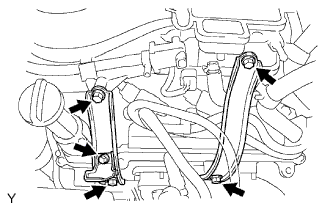
Remove the 4 bolts and 2 surge tank stays.
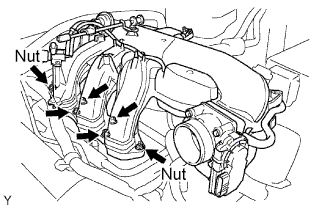
Remove the 2 nuts.
Using an 8 mm hexagon socket wrench, remove the 4 bolts, intake air surge tank and gasket.
26.
DISCONNECT ENGINE WIRE
Disconnect the ECM connectors from the cabin:
Remove the glove compartment door.
Disconnect the 5 ECM connectors.
Disconnect the 4WD control ECU connector.
Remove the nut, and disconnect the ground wire.
Remove the bolt and disconnect the ground wire from the frame.
Pull the end of the engine wire into the engine compartment.
Remove the upper relay block cover.
Remove the side relay block cover.
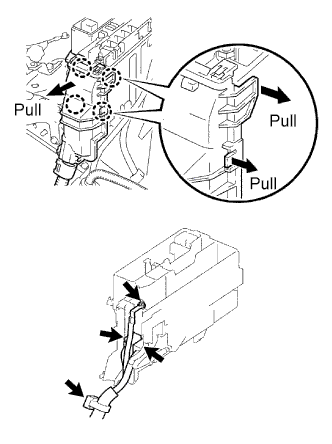
Using a screwdriver, detach the 4 claws and remove the relay block cover.
HINT:
Tape the screwdriver tip before use.
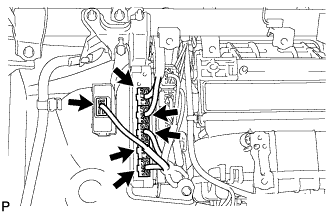
Remove the nut and disconnect the cable from the engine room junction block.
Disconnect the 2 engine room junction block connectors and detach the wire clamp.
Remove the bolt and disconnect the wire clamp from the engine mounting bracket front LH.
Disconnect the 2 A/F sensor connectors.
Disconnect the A.D.D. connector.
27.
DISCONNECT NO. 2 ENGINE WIRE
Disconnect the No. 2 engine wire from the cylinder block.
28.
REMOVE FRONT EXHAUST PIPE
Remove the 2 nuts, pipe support and exhaust pipe.
29.
REMOVE FRONT FENDER SEAL
Remove the front tires.
Remove the 10 clips and RH and LH fender seals.
30.
REMOVE FRONT FENDER APRON SEAL UPPER
Remove the 10 clips and RH and LH fender apron seals.
31.
REMOVE EXHAUST MANIFOLD RH
Remove the 6 nuts, exhaust manifold and gasket.
32.
REMOVE EXHAUST MANIFOLD LH
Remove the 6 nuts, exhaust manifold and gasket.
33.
REMOVE STARTER
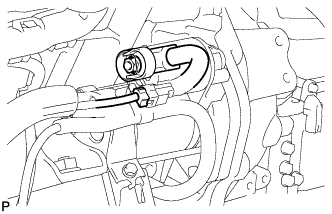
Disconnect the starter connector.
Remove the nut and disconnect the starter wire.
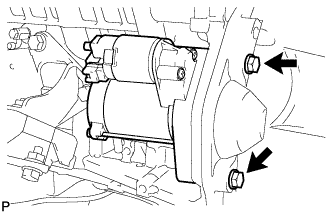
Remove the 2 bolts and starter.
34.
REMOVE AUTOMATIC TRANSMISSION
4WD: Remove the automatic transmission from the vehicle (Click here).
2WD: Remove the automatic transmission from the vehicle (Click here ).
35.
REMOVE MANUAL TRANSMISSION
4WD: Remove the manual transmission from the vehicle (Click here).
2WD: Remove the manual transmission from the vehicle (Click here).
36.
REMOVE CLUTCH COVER (for Manual Transmission)
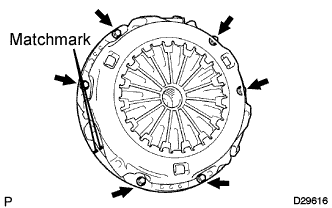
Place matchmarks on the clutch cover and flywheel.
Loosen each set bolt one turn at a time until spring tension is released.
Remove the 6 set bolts and pull off the clutch cover.
NOTICE:
Do not drop the clutch disc.
37.
REMOVE CLUTCH DISC (for Manual Transmission)
NOTICE:
Keep the lining part of the clutch disc, pressure plate and surface of the flywheel away from oil and foreign matter.
38.
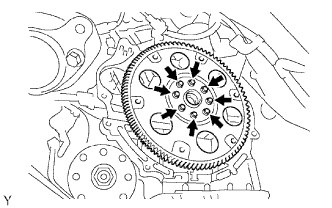
REMOVE DRIVE PLATE AND RING GEAR (for Automatic Transmission)
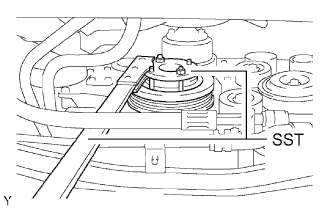
Using SST, hold the crankshaft.
SST
09213-54015
(91651-60855)
09330-00021
Remove the 8 bolts, rear spacer, drive plate and front spacer.
NOTICE:
Do not reuse the bolts.
39.
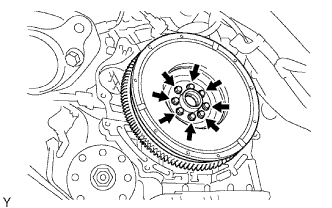
REMOVE FLYWHEEL (for Manual Transmission)
Using SST, hold the crankshaft.
SST
09213-54015
(91651-60855)
09330-00021
Remove the 8 bolts and flywheel.
NOTICE:
Do not reuse the bolts.
40.
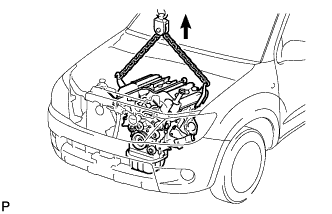
REMOVE ENGINE ASSEMBLY
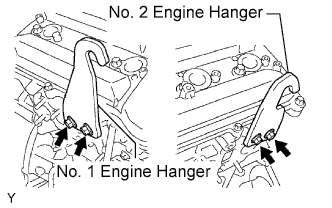
Install the 2 engine hangers with 4 bolts as shown in the illustration.
Engine hanger part No. :
Item
Part No
No. 1 engine hanger
12281-31060
No. 2 engine hanger
12282-31040
Bolt
90119-08A87
Torque:
33 N*m{
336 kgf*cm
, 24 ft.*lbf
}
Attach the engine sling device and chain block to the engine hangers.
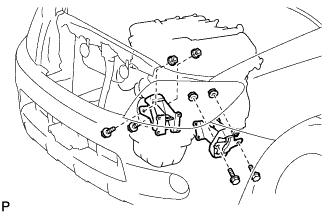
Remove the 4 bolts and 4 nuts holding the engine mounting brackets to the frame.
Lift the engine out of the vehicle carefully.
NOTICE:
Make sure all the wires, hoses and cables are disconnected from the engine. Keep the disconnected wires, hoses and cables off of the engine.
41.
INSTALL ENGINE TO ENGINE STAND
Install the engine assembly to a stand.
42.
REMOVE ENGINE WIRE FROM ENGINE ASSEMBLY
43.
REMOVE NO. 1 RADIATOR HOSE
44.
REMOVE NO. 2 RADIATOR HOSE
45.
REMOVE HEATER WATER HOSE FROM ENGINE ASSEMBLY
46.
REMOVE VENTILATION HOSE
47.
REMOVE NO. 2 VENTILATION HOSE
48.
REMOVE NO. 1 ENGINE MOUNTING BRACKET FRONT RH
Remove the 4 bolts and engine mounting bracket.
49.
REMOVE NO. 1 ENGINE MOUNTING BRACKET FRONT LH
Remove the 3 bolts and engine mounting bracket.
50.
REMOVE IDLER PULLEY (w/o Air Conditioning System)
Remove the 3 bolts and idler pulley.
51.
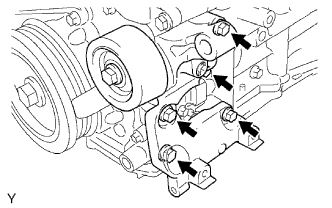
REMOVE V-RIBBED BELT TENSIONER
Remove the 5 bolts and V-ribbed belt tensioner.
52.
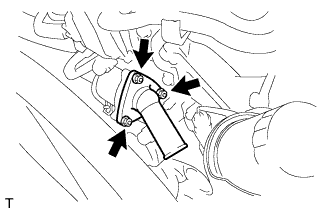
REMOVE WATER INLET
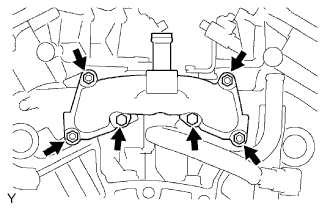
Remove the 3 nuts, water inlet with thermostat and gasket.
53.
REMOVE OIL FILTER BRACKET
Remove the 3 bolts, 2 nuts, oil filter bracket and gasket.
54.
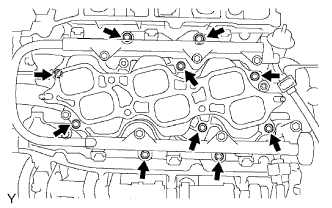
REMOVE INTAKE MANIFOLD
Disconnect the 6 fuel injector connectors.
Remove the 10 bolts, intake manifold and 2 gaskets.
55.
REMOVE CAMSHAFT TIMING OIL CONTROL VALVE
Remove the 2 bolts and 2 camshaft timing oil control valves.
56.
REMOVE WATER BY-PASS JOINT REAR
Disconnect the engine coolant temperature sensor connector.
Remove the 2 bolts, 4 nuts, water by-pass joint and 2 gaskets.
Remove the O-ring from the water outlet pipe.
57.
REMOVE OIL FILLER CAP
58.
REMOVE OIL FILLER CAP HOUSING
Remove the 2 nuts, oil filler cap housing and gasket.
59.
REMOVE IGNITION COIL
Remove the 6 bolts and 6 ignition coils.
60.
REMOVE SPARK PLUG
61.
REMOVE OIL DIPSTICK GUIDE
Remove the oil dipstick gauge.
Remove the bolt and pull out the oil dipstick gauge guide.
Remove the O-ring from the oil dipstick gauge guide.
62.
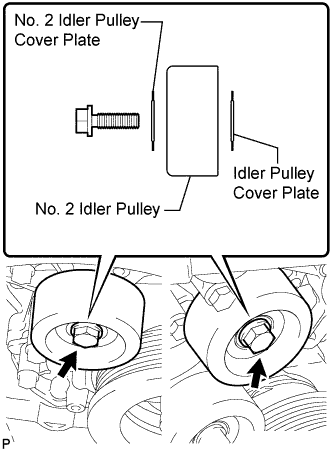
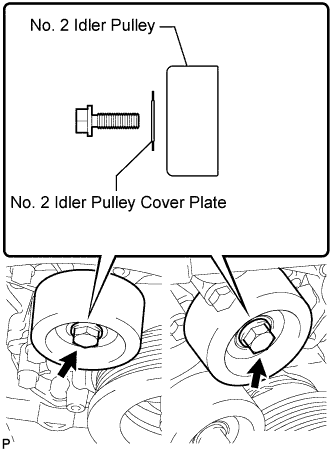
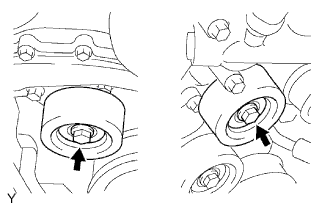
REMOVE NO. 2 IDLER PULLEY
NOTICE:
Use the same procedure for both No. 2 idler pulleys.
w/ Idler Pulley Cover Plate:
Remove the bolt, No. 2 idler pulley cover plate, idler pulley and idler pulley cover plate.
w/o Idler Pulley Cover Plate:
Remove the bolt, No. 2 idler pulley cover plate and idler pulley.
for Integrated Type: Remove the 2 bolts and 2 No. 2 idler pulleys.