ABS Warning Light Remains ON
Circuit diagnosis · Vehicles built from Aug 2013
Versions by build date: Jun 2011 – Jul 2013 from Aug 2013
DESCRIPTION
When checking for a 2 digit DTC, the ABS warning light may remain on.WIRING DIAGRAM
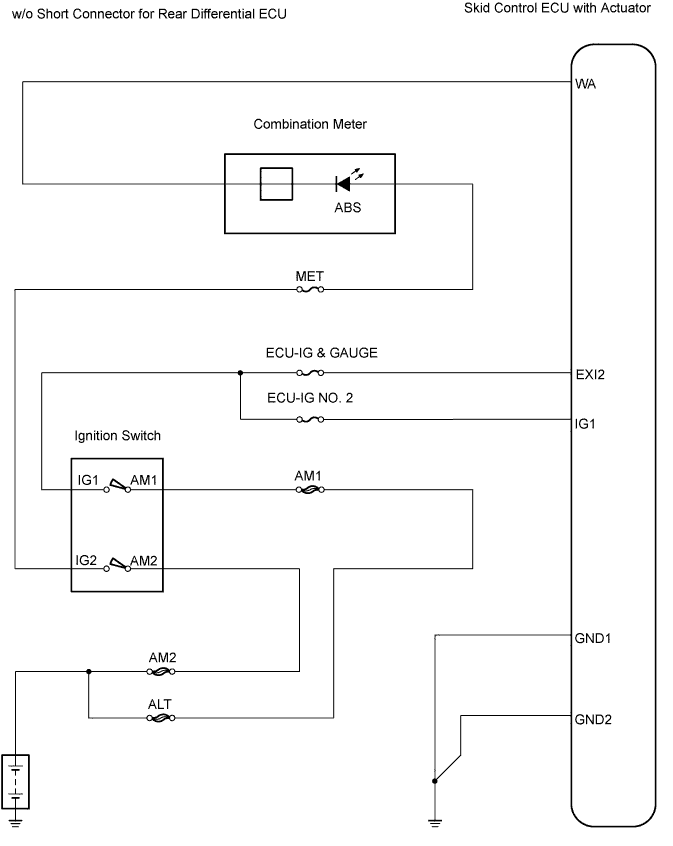

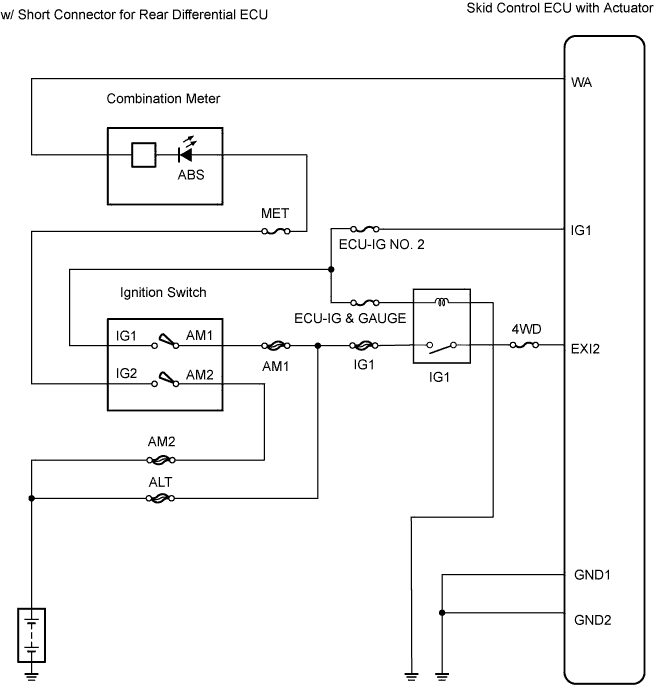
INSPECTION PROCEDURE
| 1. CHECK FOR DTC |

Turn the ignition switch ON.
Check that the ABS warning light illuminates.
Check if the same DTCs are recorded.
Result Result
Proceed to
DTC is not output (when using intelligent tester)
A
DTC is not output (when not using intelligent tester)
B
DTC is output
C
|
|
||||
|
|
||||


| A | |
 |
| 2. INSPECT SKID CONTROL ECU CONNECTOR |
Check that each ECU connector is properly installed.
- OK:
- Each ECU connector is properly installed.
|
|
||||
| OK | |
|
| 3. READ VALUE USING INTELLIGENT TESTER (ECU IG POWER VOLTAGE) |
Using the Data List, check for proper functioning of the ECU IG power voltage.
Skid control ECU Item
Measurement Item / Range (Display)
Normal Condition
Diagnostic Note
ECU IG Power Voltage
ECU power supply voltage / TOO LOW / NORMAL / TOO HIGH
TOO HIGH: more than 14.0 V
NORMAL: 10 to 14 V
TOO LOW: Below 10 V
-
Result Result
Proceed to
Display is NORMAL
A
Display is not NORMAL
B
|
|
||||
| A | |
|
| 4. CHECK WIRE HARNESS (SKID CONTROL ECU - BATTERY) |
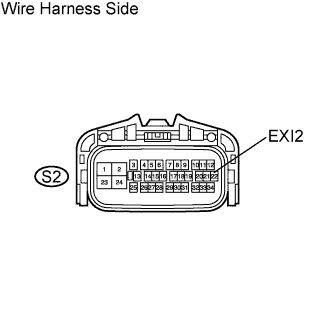 |
Disconnect the S2 ECU connector.
Measure the voltage of the wire harness side connector.
- Standard voltage:
Tester Connection
Condition
Specified Condition
S2-22 (EXI2) - Body ground
Ignition switch ON
10 to 14 V
Result: Result
Proceed to
OK
A
NG (w/o short connector)
B
NG (w/ short connector)
C
|
|
||||
|
|
||||
| A | |
|
| 5. CHECK ABS WARNING LIGHT |
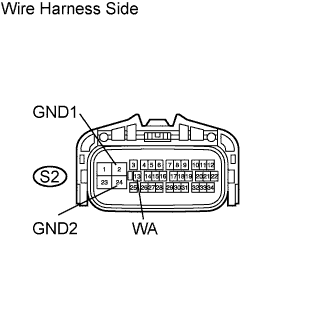 |
Disconnect the S2 ECU connector.
Turn the ignition switch ON.
Using a service wire, connect terminal WA to GND1 or GND2 of the S2 ECU connector. Check the ABS warning light.
- OK:
- ABS warning light turns off.
Turn the ignition switch OFF.
Remove the service wire.
Turn the ignition switch ON. Check the ABS warning light.
- OK:
- ABS warning light illuminates.
|
|
||||
| NG | |
|
| 6. CHECK WIRE HARNESS (SKID CONTROL ECU - COMBINATION METER AND BODY GROUND) |
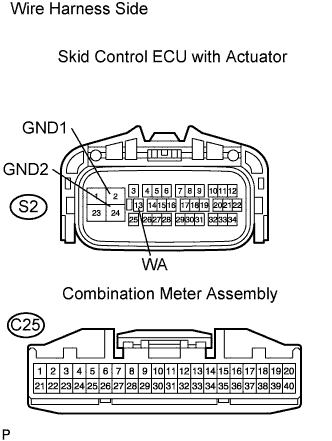 |
Disconnect the S2 ECU connector.
Disconnect the C25 meter connector.
Measure the resistance of the wire harness side connectors.
- Standard resistance:
Tester Connection
Specified Condition
S2-13 (WA) - C25-38
Below 1 Ω
S2-13 (WA) - Body ground
10 kΩ or higher
S2-2 (GND1) - Body ground
Below 1 Ω
S2-24 (GND2) - Body ground
Below 1 Ω
|
|
||||
| OK | ||
 |
||
| ||
| 7. INSPECT SKID CONTROL ECU CONNECTOR |
Check that each ECU connector is properly installed.
- OK:
- Each ECU connector is properly installed.
|
|
||||
| OK | |
|
| 8. CHECK WIRE HARNESS (SKID CONTROL ECU - BATTERY) |
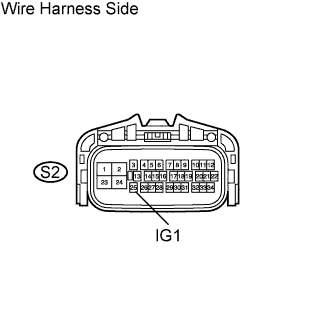 |
Disconnect the S2 ECU connector.
Measure the voltage of the wire harness side connector.
- Standard voltage:
Tester Connection
Condition
Specified Condition
S2-25 (IG1) - Body ground
Ignition switch ON
10 to 14 V
|
|
||||
| OK | |
|
| 9. CHECK ABS WARNING LIGHT |
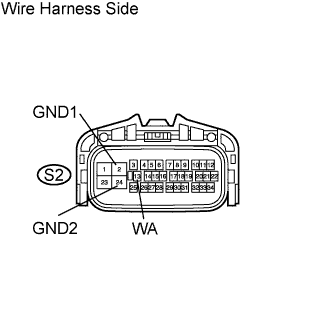 |
Disconnect the S2 ECU connector.
Turn the ignition switch ON.
Using a service wire, connect terminal WA to GND1 or GND2 of the S2 ECU connector. Check the ABS warning light.
- OK:
- ABS warning light turns off.
Turn the ignition switch OFF.
Remove the service wire.
Turn the ignition switch ON. Check the ABS warning light.
- OK:
- ABS warning light illuminates.
|
|
||||
| OK | |
|
| 10. CHECK WIRE HARNESS (SKID CONTROL ECU - COMBINATION METER AND BODY GROUND) |
|
|
Disconnect the S2 ECU connector.
Disconnect the C25 meter connector.
Measure the resistance of the wire harness side connectors.
- Standard resistance:
Tester Connection
Specified Condition
S2-13 (WA) - C25-38
Below 1 Ω
S2-13 (WA) - Body ground
10 kΩ or higher
S2-2 (GND1) - Body ground
Below 1 Ω
S2-24 (GND2) - Body ground
Below 1 Ω
|
|
||||
| OK | ||
|
||
| ||
| 11. CHECK WIRE HARNESS (SKID CONTROL ECU - BATTERY) |
|
|
Disconnect the S2 ECU connector.
Measure the voltage of the wire harness side connector.
- Standard voltage:
Tester Connection
Condition
Specified Condition
S2-25 (IG1) - Body ground
Ignition switch ON
10 to 14 V
|
|
||||
| OK | ||
|
||
| ||
| 12. INSPECT RELAY (Marking: IG1) |
Remove the relay.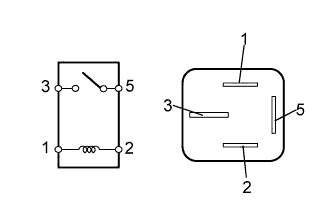
Measure the resistance of the relay.
- Standard resistance:
Tester Connection
Specified Condition
3 - 5
10 kΩ or higher
3 - 5
Below 1 Ω
(when battery voltage is applied to terminals 1 and 2)
|
|
||||
| OK | ||
|
||
| ||