INSTALLATION
Removal / installation · Vehicles built Jun 2011 – Jul 2012
Versions by build date: Jun 2011 – Jul 2012 Aug 2012 – Jul 2013 from Aug 2013
- CAUTION:
- Be sure to read the precautionary notices concerning the SRS airbag system before servicing (Click here).
| 1. INSTALL CENTER AIRBAG SENSOR ASSEMBLY |

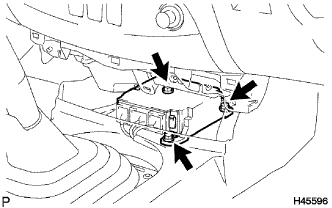  |
Temporarily install the sensor with the 3 bolts.
- CAUTION:
- If the airbag sensor has been dropped, or there are any cracks, dents or other defects in the case, bracket or connector, replace it with a new one.
- When installing the airbag sensor, make sure that the SRS wiring does not interfere with other parts and is not pinched between other parts.
- If the airbag sensor has been dropped, or there are any cracks, dents or other defects in the case, bracket or connector, replace it with a new one.
Tighten the 3 bolts.
- Torque:
- 17.5 N*m{ 179 kgf*cm , 13 ft.*lbf }
Check that there is no free play in the installation parts of the sensor.
Connect the sensor connector.
Check that the waterproof sheet is properly set.
| 2. INSTALL CONSOLE BOX ASSEMBLY |
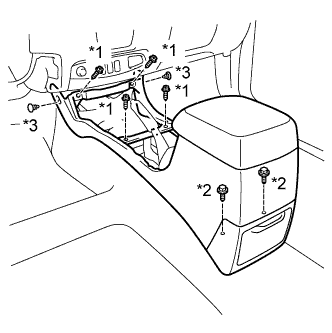 |
Install the console box with the 4 screws and 2 bolts.
Install the 2 clips.
Text in Illustration *1
Screw
*2
Bolt
*3
Clip
| 3. INSTALL CONSOLE PANEL SUB-ASSEMBLY UPPER |
Attach the 12 claws to install the upper console panel.
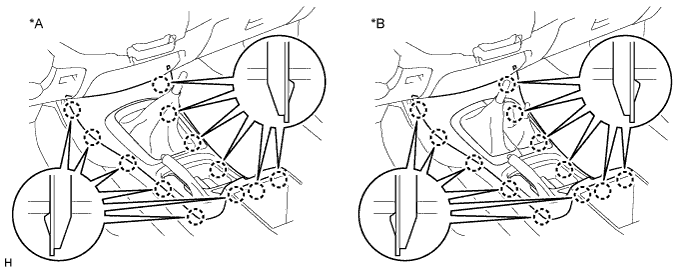
Text in Illustration *A
for 2WD
*B
for 4WD
| 4. INSTALL TRANSFER SHIFT KNOB SUB-ASSEMBLY (4WD) |
| 5. INSTALL SHIFT LEVER KNOB SUB-ASSEMBLY (M/T) |
| 6. CONNECT CABLE TO NEGATIVE BATTERY TERMINAL |
| 7. PERFORM INITIALIZATION |
Perform initialization (Click here).
- NOTICE:
- Certain systems need to be initialized after disconnecting and reconnecting the cable from the negative (-) battery terminal.
| 8. INSPECT SRS WARNING LIGHT |
Check the SRS warning light (Click here).