ON-VEHICLE INSPECTION
Inspection · Vehicles built from Jun 2011
| CHECK LOAD SENSING PROPORTIONING VALVE ASSEMBLY |

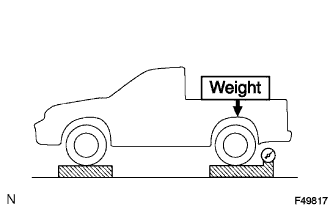  |
Set the vehicle to its curb weight.
Place weights (as necessary) on the rear deck until the rear axle load is as shown below.
- Standard rear axle load:
Vehicle Type
Specified Condition
2WD Single Cab
7845 N (800 kgf, 1764 lbf)
2WD Extra Cab
8336 N (850 kgf, 1874 lbf)
2WD Double Cab
8826 N (900 kgf, 1984 lbf)
4WD and Pre-Runner
9807 N (1000 kgf, 2205 lbf)
- NOTICE:
- Be sure that the vehicle is on a level surface before starting the procedure.
- When placing the weights on the vehicle, first place the weights so that the total is approximately 60 kg (132 lb) more than the specification. Then remove weights as necessary to adjust the load.
- Be sure that the vehicle is on a level surface before starting the procedure.
Install SST and bleed air from the brake system.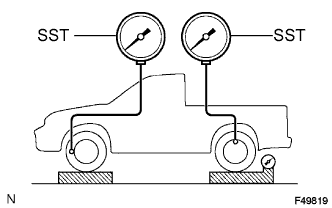
- SST
- 09709-29018
Raise the front brake fluid pressure to 10000 kPa (107.6 kgf/cm2, 1450 psi) by depressing the brake pedal, and measure the rear brake fluid pressure.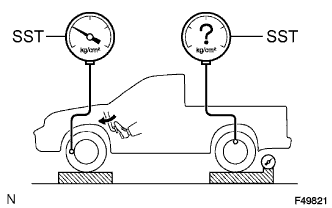
- Standard rear brake fluid pressure:
Vehicle Type
Specified Condition
2WD
5260 +/-490 kPa (53.6 +/-5.0 kgf/cm2, 762 +/-71 psi)
4WD and Pre-Runner
4450 +/-490 kPa (45.4 +/-5.0 kgf/cm2, 645 +/-71 psi)
- HINT:
- The pedal should not be depressed twice or released while raising the front brake fluid pressure.
- Read the value of the rear brake fluid pressure after raising and holding the front fluid pressure for 2 seconds.
- The pedal should not be depressed twice or released while raising the front brake fluid pressure.
- If necessary, adjust the load sensing proportioning valve.
| ADJUST LOAD SENSING PROPORTIONING VALVE ASSEMBLY |
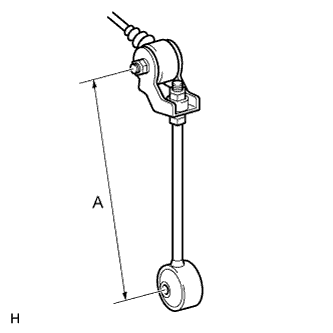 |
Adjust the length of the No. 2 load sensing spring shackle.
When the rear brake fluid pressure is below the standard pressure, lengthen length A.
When the rear brake fluid pressure is higher than the standard pressure, shorten length A.- Standard Initial Length (A):
Vehicle Type
Specified Condition
2WD
120 mm (4.764 in.)
4WD and Pre-Runner
190 mm (7.543 in.)
- Standard Length (A) after Adjustment:
Vehicle Type
Specified Condition
2WD
114 to 126 mm (4.526 to 5.002 in.)
4WD and Pre-Runner
184 to 196 mm (7.305 to 7.781 in.)
- HINT:
- The rear brake fluid pressure changes according to the table below by adjusting length A.
- Standard Pressure Change:
Vehicle Type
Specified Condition
2WD
Changes by 140 kPa (1.4 kgf/cm2, 20.5 psi) for every 1 mm (0.0394 in.) change in length A
4WD and Pre-Runner
Changes by 120 kPa (1.2 kgf/cm2, 17.6 psi) for every 1 mm (0.0394 in.) change in length A
If the pressure cannot be adjusted by the No. 2 load sensing spring shackle, loosen the nuts and raise or lower the valve body.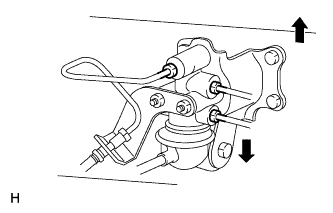
When the pressure is below the standard pressure, lower the load sensing valve assembly.
When the pressure is higher than the standard pressure, raise the load sensing valve assembly.
Tighten the nuts.
- Torque:
- 13 N*m{ 127 kgf*cm , 9 ft.*lbf }
Adjust the length of the No. 2 load sensing spring shackle again.
- HINT:
- If the length cannot be adjusted, check the load sensing valve assembly.
| CHECK VALVE BODY |
Check that the master cylinder rear brake fluid pressure changes according to the rear wheel cylinder pressure.
- Standard pressure:
Vehicle Type
Master Cylinder Pressure
Wheel Cylinder Pressure
2WD
2450 kPa (25 kgf/cm2, 356 psi)
1350 +/-200 kPa (14 +/-2 kgf/cm2, 196 +/-29 psi)
2WD
5880 kPa (59 kgf/cm2, 855 psi)
2210 +/-340 kPa (22 +/-3 kgf/cm2, 321 +/-49 psi)
4WD and Pre-runner
2940 kPa (29 kgf/cm2, 428 psi)
1270 +/-200 kPa (13 +/-2 kgf/cm2, 185 +/-29 psi)
4WD and Pre-runner
5880 kPa (59 kgf/cm2, 855 psi)
1720 +/-340 kPa (17 +/-3 kgf/cm2, 250 +/-49 psi)