DISASSEMBLY
Removal / installation · Vehicles built from Jun 2011
| 1. SECURE REAR DIFFERENTIAL CARRIER ASSEMBLY |

Secure the differential carrier.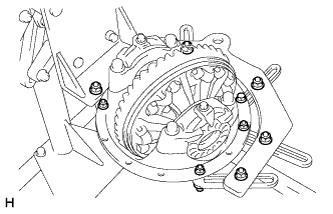

| 2. INSPECT REAR DRIVE PINION COMPANION FLANGE SUB-ASSEMBLY |
Using a dial indicator, measure the runout of the companion flange vertically and laterally.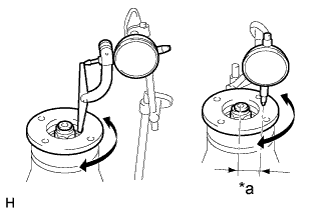
Text in Illustration *a
30 mm (1.18 in.)
- Maximum Runout:
Runout
Maximum
Vertical runout
0.10 mm (0.00394 in.)
Lateral runout
0.10 mm (0.00394 in.)
- If the runout is more than the maximum, replace the companion flange.
| 3. INSPECT RUNOUT OF DIFFERENTIAL RING GEAR |
Using a dial indicator, check the runout of the ring gear.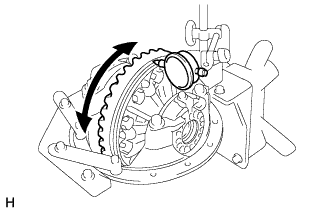
- Maximum runout:
- 0.07 mm (0.00276 in.)
- If the runout is more than the maximum, replace the ring gear with a new one.
| 4. INSPECT DIFFERENTIAL RING GEAR BACKLASH |
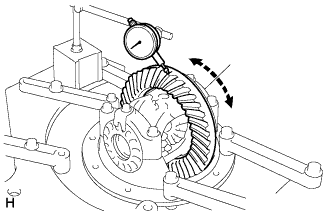 |
Using a dial indicator, check the backlash of the ring gear.
- Backlash:
- 0.13 to 0.18 mm (0.00512 to 0.00708 in.)
- If the backlash is not within the specification, adjust the side bearing preload or perform repairs as necessary.
- HINT:
- Perform the measurement at 3 or more positions around the circumference of the ring gear.
| 5. INSPECT DIFFERENTIAL DRIVE PINION PRELOAD |
Using a torque wrench, measure the preload.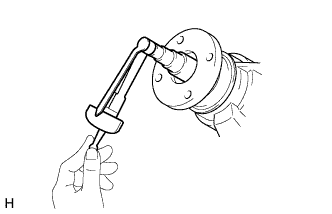
- Standard Preload (Starting Torque):
Item
Specified Condition
New bearing
1.1 to 1.6 N*m (12 to 16 kgf*cm, 10 to 14 in.*lbf)
Reused bearing
0.6 to 0.8 N*m (7 to 8 kgf*cm, 6 to 7 in.*lbf)
- If the result is not as specified, adjust the preload.
| 6. INSPECT TOTAL PRELOAD |
Using a torque wrench, measure the preload with the teeth of the drive pinion and ring gear in contact.
- Standard Total Preload:
Bearing
Specified Condition
New bearing
0.4 to 0.5 N*m (4 to 6 kgf*cm, 4 to 5 in.*lbf) + drive pinion preload
Reused bearing
0.4 to 0.5 N*m (4 to 6 kgf*cm, 4 to 5 in.*lbf) + drive pinion preload
| 7. REMOVE REAR DRIVE PINION NUT |
Using SST and a hammer, loosen the staked part of the nut.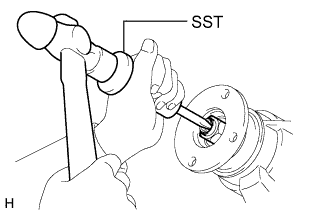
- SST
- 09930-00010
(09931-00010, 09931-00020)
Using SST to hold the companion flange in place, remove the nut.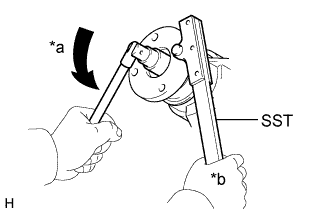
- SST
- 09330-00021
(09330-00030)
Text in Illustration *a
Turn
*b
Hold
| 8. REMOVE REAR DRIVE PINION COMPANION FLANGE SUB-ASSEMBLY WITH DUST DEFLECTOR |
Using SST, remove the companion flange with dust deflector.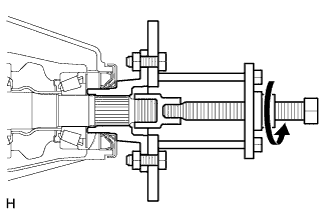
- SST
- 09950-30012
(09951-03010, 09953-03010, 09954-03010, 09955-03030, 09956-03040)
- NOTICE:
- Before using SST (center bolt), apply hypoid gear oil to its threads and tip.
| 9. REMOVE REAR DIFFERENTIAL CARRIER OIL SEAL |
Using SST, remove the oil seal.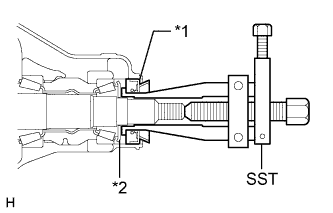
- SST
- 09308-10010
Text in Illustration *1
Oil Seal
*2
Oil Slinger
| 10. REMOVE REAR DIFFERENTIAL DRIVE PINION OIL SLINGER |
Remove the oil slinger from the drive pinion.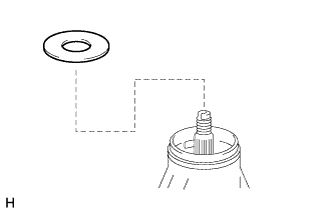
| 11. REMOVE REAR DRIVE PINION FRONT TAPERED ROLLER BEARING |
Using SST, remove the roller bearing (inner) from the drive pinion.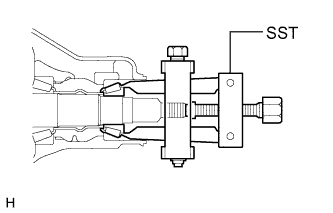
- SST
- 09556-22010
| 12. REMOVE REAR DIFFERENTIAL BEARING ADJUSTING NUT LOCK |
Remove the 2 bolts and 2 adjusting nut locks.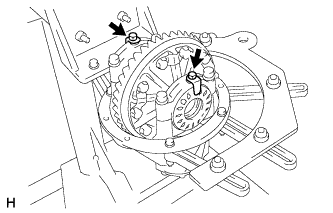
| 13. REMOVE DIFFERENTIAL CASE ASSEMBLY |
Place matchmarks on the bearing cap and differential carrier.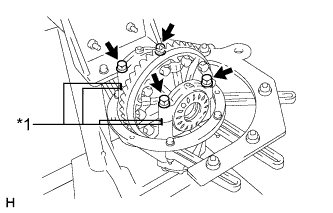
Text in Illustration *1
Matchmark
Remove the 4 bolts and 2 differential bearing caps.
Remove the 2 adjusting nuts.
Remove the rear differential case assembly from the differential carrier.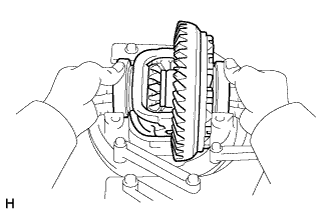
- HINT:
- Tag the 2 rear differential case bearings (outer) so that they can be reinstalled in the correct locations.
| 14. REMOVE DIFFERENTIAL DRIVE PINION |
Remove the drive pinion and bearing spacer from the differential carrier.
| 15. REMOVE REAR DRIVE PINION REAR TAPERED ROLLER BEARING |
Using SST and a press, press out the roller bearing (inner) and drive pinion plate washer from the drive pinion.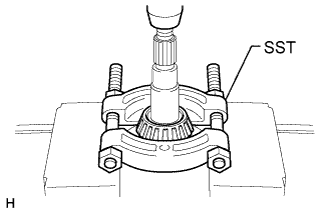
- SST
- 09950-00020
- NOTICE:
- Do not drop the drive pinion.
- HINT:
- If the drive pinion or ring gear is damaged, replace them as a set.
| 16. REMOVE REAR DRIVE PINION FRONT TAPERED ROLLER BEARING |
Using SST, remove the roller bearing (outer) from the carrier.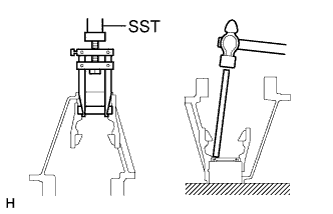
- SST
- 09308-00010
Using a brass bar and hammer, tap out the oil storage ring from the carrier.
- HINT:
- If the bearing is damaged during removal, replace it.
| 17. REMOVE REAR DRIVE PINION REAR TAPERED ROLLER BEARING |
Using a brass bar and hammer, tap out the rear tapered roller bearing (outer) from the carrier.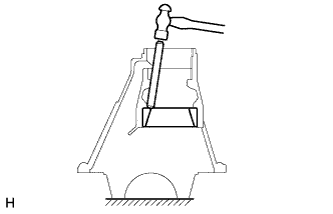
- HINT:
- If the bearing is damaged during removal, replace it.
| 18. REMOVE DIFFERENTIAL RING GEAR |
Place matchmarks on the ring gear and differential case.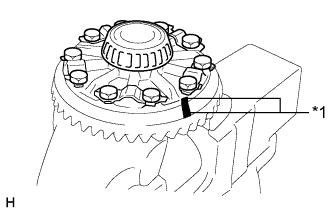
Text in Illustration *1
Matchmark
Using a screwdriver and hammer, pry out the lock plates.
Remove the 10 ring gear set bolts and 5 lock plates.
Using a plastic-faced hammer, tap on the ring gear to separate it from the differential case.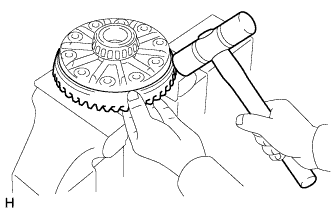
| 19. INSPECT DIFFERENTIAL CASE ASSEMBLY RUNOUT |
Install the rear differential case bearings (outer) to the differential case.
Install the differential case to the differential carrier.
Install the 2 adjusting nuts.
Install the 2 bearing caps to the differential carrier with the 4 bolts.
- Torque:
- 85 N*m{ 870 kgf*cm , 63 ft.*lbf }
Using a dial indicator, measure the differential case runout.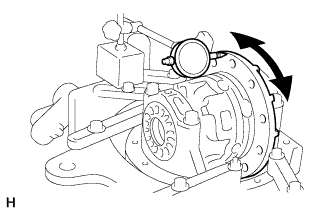
- Maximum runout:
- 0.07 mm (0.00276 in.)
Remove the 4 bolts and 2 bearing caps.
Remove the 2 adjusting nuts.
Remove the differential case.
Remove the rear differential case bearings (outer).
| 20. REMOVE REAR DIFFERENTIAL CASE BEARING |
Using SST, remove the 2 bearings from the differential case.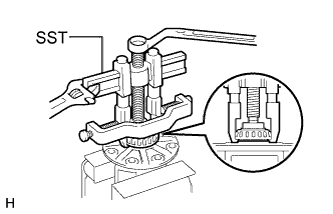
- SST
- 09950-40011
(09951-04020, 09952-04010, 09953-04030, 09954-04010, 09955-04061, 09957-04010, 09958-04011)
09950-60010 (09951-00360)
- HINT:
- Do not remove the case bearings when not replacing the differential case.
| 21. DISASSEMBLE DIFFERENTIAL CASE (for 2 Pinion Gear Type) |
Using a chisel and hammer, unstake the differential case.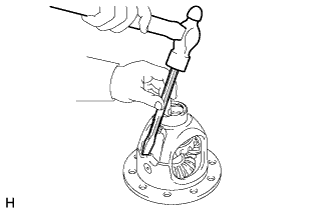
Using a pin punch and hammer, tap out the straight pin.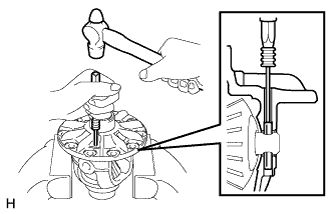
Remove the following parts from the differential case.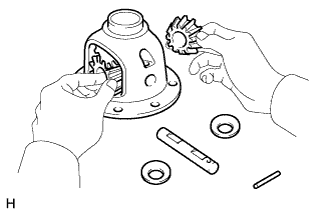
-
(1) Side gear (2 pieces)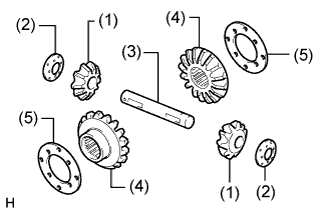
- (2) Side gear thrust washer (2 pieces)
- (3) Pinion shaft
- (4) Pinion gear (2 pieces)
- (5) Pinion gear thrust washer (2 pieces)
-
Using a chisel and hammer, unstake the differential case.
| 22. DISASSEMBLE DIFFERENTIAL CASE (for LSD) |
Place matchmarks on the LH and RH cases.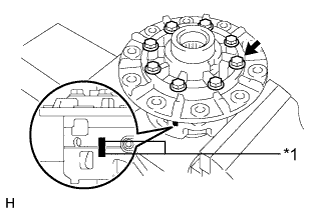
Text in Illustration *1
Matchmark
Remove the 8 bolts.
- NOTICE:
- Diametrically loosen and remove the bolts in several passes.
Remove the following parts from the differential cases.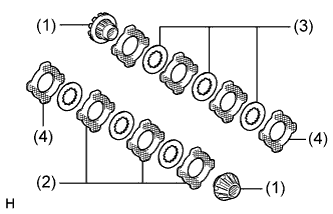
- (1) Side gear (2 pieces)
- (2) No. 1 Side gear thrust washer (6 pieces)
- (3) Clutch plate (6 pieces)
- (4) Side gear thrust washer (2 pieces)
-
(5) Spring retainer RH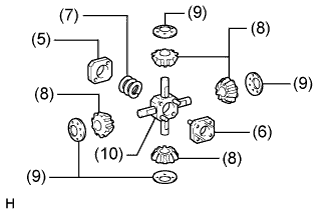
- (6) Spring retainer LH
- (7) Compression spring
- (8) Pinion gear (4 pieces)
- (9) Pinion gear thrust washer (4 pieces)
- (10) Spider
- (1) Side gear (2 pieces)
| 23. INSPECT REAR NO. 1 DIFFERENTIAL SIDE GEAR THRUST WASHER (for LSD) |
Using a micrometer, measure the thickness of the thrust washer. Also, check that there is no bare metal.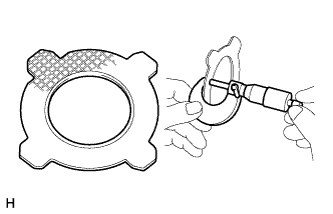
- Standard thickness:
- 1.77 to 1.86 mm (0.0697 to 0.0732 in.)
- If necessary, replace the thrust washers.
- HINT:
- If replacing the thrust washer, also replace the clutch plate that it contacts.
| 24. INSPECT CLUTCH PLATE (for LSD) |
Using a micrometer, measure the thickness of the clutch plate. Also, check that there is no abnormal wear.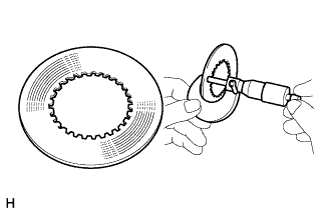
- Standard thickness:
- 1.57 to 1.63 mm (0.0619 to 0.0641 in.)
- If necessary, replace the clutch plate.
| 25. INSPECT COMPRESSION SPRING (for LSD) |
Using a vernier caliper, measure the free length of the spring.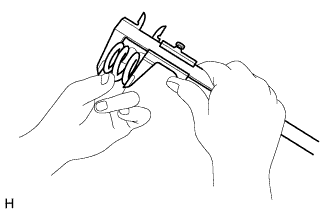
- Minimum free length:
- 27.02 mm (1.063 in.)
- If the length is less than the minimum, replace the spring.
| 26. INSPECT DIFFERENTIAL GEAR KIT |
Check that the differential pinion and differential gear are not damaged.
- If the differential pinion or differential side gear is damaged, replace the differential gear kit.
- If the differential pinion or differential side gear is damaged, replace the differential gear kit.
| 27. INSPECT DIFFERENTIAL CASE |
Check that the differential case is not damaged.
- If the differential case is damaged, replace it.
- If the differential case is damaged, replace it.