INSTALLATION
Removal / installation · Vehicles built Jun 2011 – Jul 2012
Versions by build date: Jun 2011 – Jul 2012 Aug 2012 – Jul 2013 from Aug 2013
| 1. INSTALL FLOOR SHIFT ASSEMBLY |

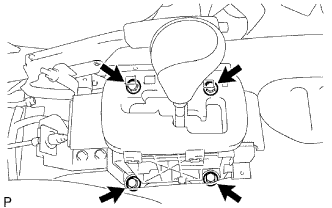  |
Install the floor shift with the 4 bolts.
- Torque:
- 14 N*m{ 143 kgf*cm , 10 ft.*lbf }
Connect the clamp and 2 connectors.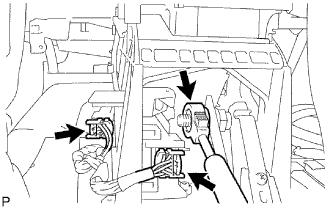
Move the shift lever to L.
Connect the transmission control cable.
| 2. CONNECT CABLE TO NEGATIVE BATTERY TERMINAL |
| 3. PERFORM INITIALIZATION |
Perform initialization (Click here).
- NOTICE:
- Certain systems need to be initialized after disconnecting and reconnecting the cable from the negative (-) battery terminal.
| 4. ADJUST SHIFT LEVER POSITION |
Adjust the shift lever position (Click here).
| 5. INSPECT SHIFT LEVER POSITION |
Inspect the shift lever position (Click here).
| 6. INSTALL CONSOLE BOX ASSEMBLY |
Install the console box assembly (Click here).
| 7. INSTALL UPPER CONSOLE PANEL SUB-ASSEMBLY |
Install the upper console panel sub-assembly (Click here).
| 8. INSTALL PARKING BRAKE HOLE COVER SUB-ASSEMBLY |
Install the parking brake hole cover sub-assembly (Click here).
| 9. INSTALL TRANSFER SHIFT LEVER KNOB SUB-ASSEMBLY |