INSTALLATION
Removal / installation · Vehicles built from Aug 2013
Versions by build date: Jun 2011 – Jul 2012 Aug 2012 – Jul 2013 from Aug 2013
- HINT:
- Use the same procedure for RHD and LHD vehicles.
- The procedure listed below is for LHD vehicles.
- Use the same procedure for the RH and LH sides.
- The procedure listed below is for the LH side.
- A bolt without a torque specification is shown in the standard bolt chart (Click here).
- Use the same procedure for RHD and LHD vehicles.
| 1. INSTALL FRONT SEAT INNER BELT ASSEMBLY LH |

Install the front seat cushion cover LH.
Install the front seat anchor plate.
w/ Seat Belt Warning System:
Install the front seat inner belt assembly LH with the nut.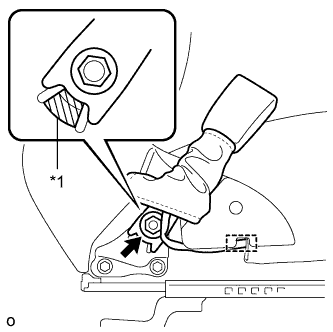

- Torque:
- 42 N*m{ 428 kgf*cm }
- NOTICE:
- Do not overlap the anchor part of the front seat inner belt assembly LH and protruding part of the seat adjuster.
Text in Illustration *1
Protruding Part
Attach the wire harness to the clamp.
w/o Seat Belt Warning System:
Install the front seat inner belt assembly LH with the nut.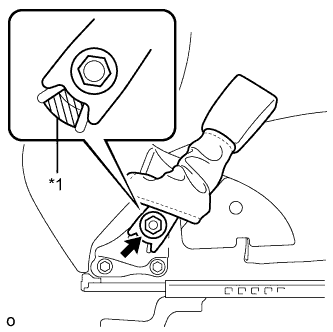
- Torque:
- 42 N*m{ 428 kgf*cm }
- NOTICE:
- Do not overlap the anchor part of the front seat inner belt assembly LH and protruding part of the seat adjuster.
Text in Illustration *1
Protruding Part
| 2. INSTALL FRONT SEAT INNER BELT ASSEMBLY RH (for Separate Seat Type) |
Install the front seat cushion cover RH.
Install the front seat anchor plate.
w/ Front Passenger Seat Belt Warning System:
Install the front seat inner belt assembly RH with the nut.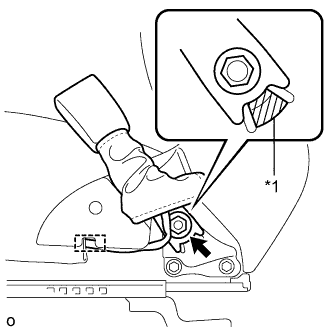
- Torque:
- 42 N*m{ 428 kgf*cm }
- NOTICE:
- Do not overlap the anchor part of the front seat inner belt assembly RH and protruding part of the seat adjuster.
Text in Illustration *1
Protruding Part
Attach the wire harness to the clamp.
Connect the connector and attach the 2 clamps.
w/o Front Passenger Seat Belt Warning System:
Install the front seat inner belt assembly RH with the nut.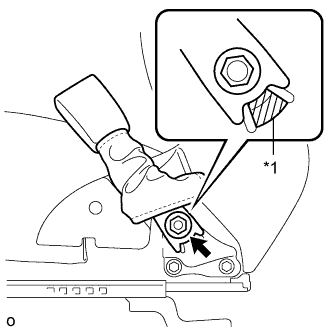
- Torque:
- 42 N*m{ 428 kgf*cm }
- NOTICE:
- Do not overlap the anchor part of the front seat inner belt assembly RH and protruding part of the seat adjuster.
Text in Illustration *1
Protruding Part
| 3. INSTALL FRONT SEAT INNER BELT ASSEMBLY RH (for Bench Seat Type) |
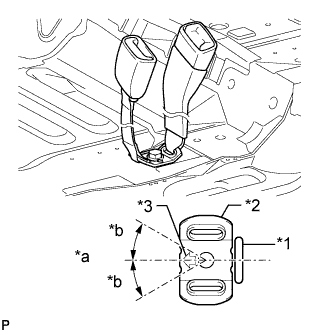 |
Align the direction of the anchor plate with the protruding part of the vehicle body as shown in the illustration.
Install the front seat inner belt assembly RH with the bolt.
- Torque:
- 42 N*m{ 428 kgf*cm , 31 ft.*lbf }
- NOTICE:
- Do not overlap the anchor part of the front seat inner belt assembly RH and protruding parts of the vehicle body.
- Make sure that the arrow on the front seat inner belt assembly RH floor anchor is facing towards the front of the vehicle.
- Install the front seat inner belt assembly RH so that the angle of the floor anchor is with in the standard range.
- Standard:
- 0°to 5°
- Do not overlap the anchor part of the front seat inner belt assembly RH and protruding parts of the vehicle body.
Text in Illustration *1
Protruding Part
*2
Floor Anchor
*3
Arrow
*a
Vehicle Front (0°)
*b
5°
| 4. INSTALL FRONT SEAT LAP TYPE CENTER BELT ASSEMBLY (for Bench Seat Type) |
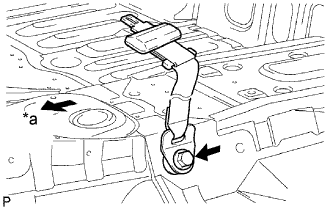 |
Install the front seat lap type center belt assembly with its built-in bolt.
- Torque:
- 42 N*m{ 428 kgf*cm , 31 ft.*lbf }
Text in Illustration *a
Front
| 5. INSTALL FRONT SEAT ASSEMBLY (for Separate Seat Type) |
Place the front seat assembly in the cabin.
- NOTICE:
- Be careful not to damage the vehicle body.
Connect the connector and attach the wire harness clamp under the seat.
Temporarily install the front seat assembly with the 4 bolts.
Lift up the seat track handle sub-assembly LH and move the seat to the rearmost position.
Tighten the bolts in the order shown in the illustration.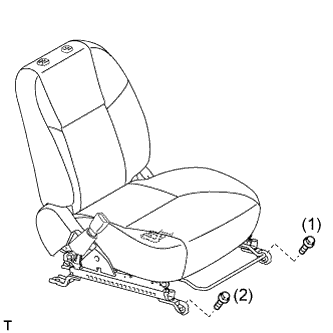
- Torque:
- 37 N*m{ 377 kgf*cm , 27 ft.*lbf }
Lift up the seat track handle sub-assembly LH and move the seat to the foremost position.
Tighten the bolts in the order shown in the illustration.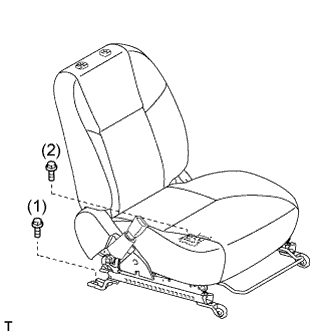
- Torque:
- 37 N*m{ 377 kgf*cm , 27 ft.*lbf }
| 6. INSTALL FRONT SEAT ASSEMBLY (for Bench Seat Type) |
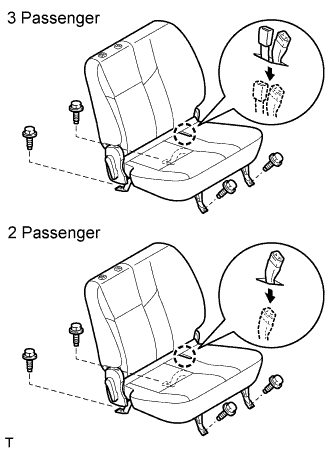 |
Place the seat in the cabin.
- NOTICE:
- Be careful not to damage the vehicle body.
w/ Occupant detection sensor:
Connect the connector under the seat.
Install the seat with the 4 bolts.
- Torque:
- 37 N*m{ 377 kgf*cm , 27 ft.*lbf }
- HINT:
- Tighten the bolts in the order indicated in the illustration.
Pass the inner belts through the hole of the seat cushion.
| 7. CONNECT CABLE TO NEGATIVE BATTERY TERMINAL |
- NOTICE:
- When disconnecting the cable, some systems need to be initialized after the cable is reconnected (Click here).