INSTALLATION
Removal / installation · Vehicles built Aug 2012 – Jul 2013
Versions by build date: Jun 2011 – Jul 2012 Aug 2012 – Jul 2013 from Aug 2013
| 1.
INSTALL TRANSMISSION VALVE BODY ASSEMBLY |
 |
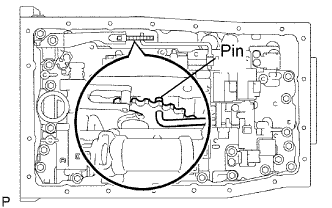
Insert the pin of the lever into the hole of the manual valve.
Install 3 new drum seal gaskets onto the transmission case.
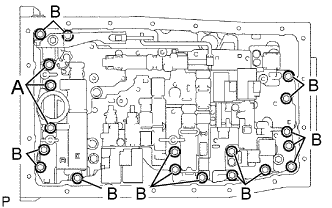
- Install the 19 bolts.
-
Torque:
- 11 N*m{
110 kgf*cm
, 8 ft.*lbf
}
- HINT:
- Bolt length:
36 mm (1.42 in.) for bolt A
25 mm (0.98 in.) for bolt B
| 2.
CONNECT TRANSMISSION WIRE |
|
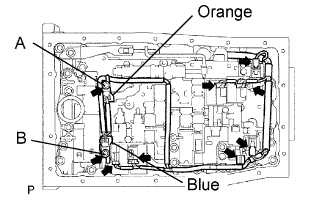
Connect the 7 connectors to the solenoid valves.
Install the clamp with the 2 bolts.
-
Torque:
- 10 N*m{
100 kgf*cm
, 7 in.*lbf
}
for bolt A
- 11 N*m{
110 kgf*cm
, 8 ft.*lbf
}
for bolt B
- Bolt length:
- 36 mm (1.42 in.) for bolt A
- 12 mm (0.47 in.) for bolt B
Connect the ATF temperature sensor.
| 3.
INSTALL VALVE BODY OIL STRAINER ASSEMBLY |
|
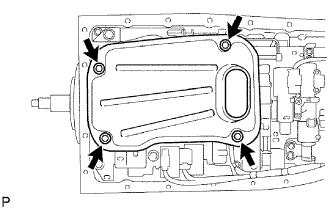
Install a new O-ring and the oil strainer with the 4 bolts.
-
Torque:
- 10 N*m{
100 kgf*cm
, 7 ft.*lbf
}
| 4.
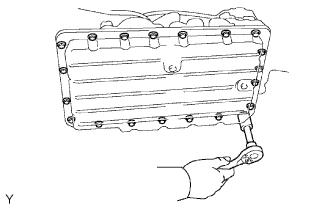
INSTALL AUTOMATIC TRANSMISSION OIL PAN SUB-ASSEMBLY |
|
- HINT:
- Remove the gasket and be careful not to spill oil on the contacting surfaces of the transmission case and oil pan.
Install the new gasket and the oil pan with the 20 bolts.
-
Torque:
- 4.4 N*m{
45 kgf*cm
, 39 in.*lbf
}
| 5.
CONNECT CABLE TO NEGATIVE BATTERY TERMINAL |
|
| 6.
PERFORM INITIALIZATION |
|
Perform initialization (Click here).
- NOTICE:
- Certain systems need to be initialized after disconnecting and reconnecting the cable from the negative (-) battery terminal.
| 7.
ADD AUTOMATIC TRANSMISSION FLUID |
|
Add automatic transmission fluid (Click here).
| 8.
INSPECT AUTOMATIC TRANSMISSION FLUID |
|
Inspect the automatic transmission fluid (Click here).