Microphone Circuit between Microphone and Radio Receiver
Circuit diagnosis · Vehicles built from Aug 2013
DESCRIPTION
Using this circuit, the radio receiver assembly sends power to the telephone microphone assembly, and the telephone microphone assembly sends microphone signals to the radio receiver assembly.WIRING DIAGRAM
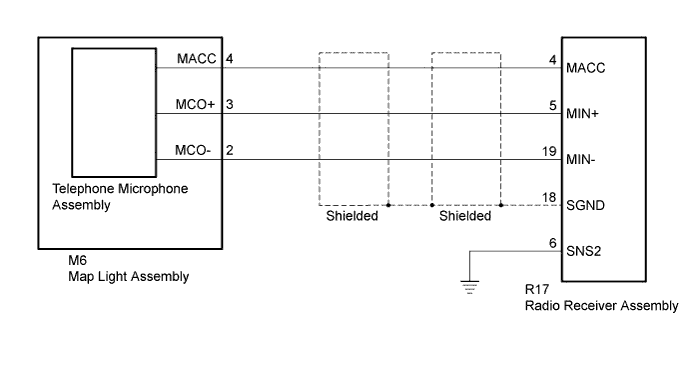

INSPECTION PROCEDURE
| 1. CHECK HARNESS AND CONNECTOR (RADIO RECEIVER ASSEMBLY - MAP LIGHT ASSEMBLY) |

Disconnect the R17 radio receiver assembly connector.
Disconnect the M6 map light assembly connector.
Measure the resistance according to the value(s) in the table below.
- Standard Resistance:
Tester Connection
Condition
Specified Condition
R17-6 (SNS2) - Body ground
Always
Below 1 Ω
R17-4 (MACC) - M6-4 (MACC)
Always
Below 1 Ω
R17-5 (MIN+) - M6-3 (MCO+)
Always
Below 1 Ω
R17-19 (MIN-) - M6-2 (MCO-)
Always
Below 1 Ω
R17-4 (MACC) - Body ground
Always
10 kΩ or higher
R17-5 (MIN+) - Body ground
Always
10 kΩ or higher
R17-19 (MIN-) - Body ground
Always
10 kΩ or higher
R17-18 (SGND) - Body ground
Always
10 kΩ or higher
|
|
||||

| OK | |
 |
| 2. CHECK RADIO RECEIVER ASSEMBLY |
Measure the voltage according to the value(s) in the table below.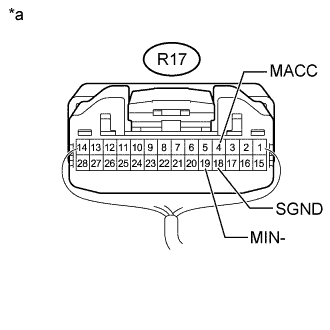
- Standard Voltage:
Tester Connection
Switch Condition
Specified Condition
R17-4 (MACC) - Body ground
Ignition switch ACC
4 to 6 V
Measure the resistance according to the value(s) in the table below.
- Standard Resistance:
Tester Connection
Condition
Specified Condition
R17-18 (SGND) - Body ground
Always
Below 1 Ω
R17-19 (MIN-) - Body ground
Always
Below 1 Ω
| *a |
Component with harness connected (Radio Receiver Assembly) |
|
|
||||
| OK | |
|
| 3. CHECK TELEPHONE MICROPHONE ASSEMBLY |
Replace the telephone microphone assembly with a known good one (Click here).
Check that the malfunction disappears.
- OK:
- Malfunction disappears.
|
|
||||
| OK | ||
 |
||
| ||