REMOVAL
Removal / installation · Vehicles built from Jun 2011
- HINT:
- Use the same procedures for the LH side and RH side.
- The procedures listed below are for the LH side.
- Use the same procedures for the LH side and RH side.
| 1. REMOVE FRONT WHEEL |
| 2. DRAIN BRAKE FLUID |

- NOTICE:
- Wash off brake fluid immediately if it comes in contact with any painted surface.
| 3. REMOVE FRONT DISC BRAKE ANTI-RATTLE SPRING (for 16 inch Front Disc Brake) |
Remove the 2 pin hold clips and 2 disc brake pad guide pins.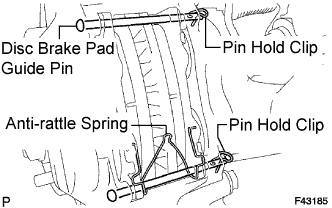

Remove the anti-rattle spring.
- NOTICE:
- The anti-rattle spring can be reused if it has sufficient rebound; no deformation, cracks or wear; and has all rust, dirt and foreign matter cleaned off.
| 4. REMOVE FRONT DISC BRAKE ANTI-RATTLE SPRING (for 15 inch Front Disc Brake) |
for Type A:
Remove the pin hold clip.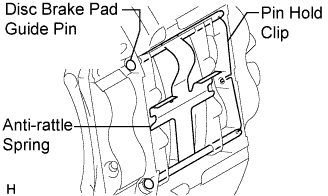
Hold down the anti-rattle spring and remove the 2 disc brake pad guide pins.
Remove the anti-rattle spring.
- CAUTION:
- Do not remove the 2 disc brake pad guide pins without holding down the anti-rattle spring. The anti-rattle spring will eject with a force capable of causing injury.
for Type B:
Remove the pin hold clip and 2 disc brake pad guide pins.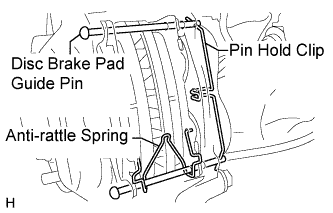
Remove the anti-rattle spring.
- NOTICE:
- The anti-rattle spring can be reused if it has sufficient rebound; no deformation, cracks or wear; and has all rust, dirt and foreign matter cleaned off.
| 5. REMOVE FRONT DISC BRAKE PAD |
Remove the 2 disc brake pads.
| 6. REMOVE FRONT ANTI SQUEAL SHIM KIT |
Remove the No. 1 and No. 2 shims from each pad.
| 7. REMOVE FRONT NO. 1 WHEEL CYLINDER TUBE LH |
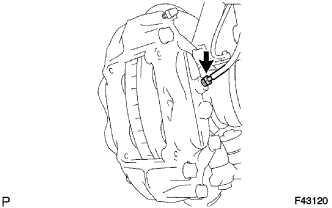 |
Using a union nut wrench, disconnect the tube from the cylinder.
| 8. REMOVE DISC BRAKE CYLINDER ASSEMBLY LH |
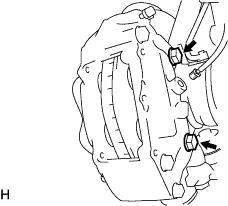 |
Remove the 2 bolts and cylinder.