REASSEMBLY
Removal / installation · Vehicles built from Aug 2013
Versions by build date: Jun 2011 – Jul 2013 from Aug 2013
- HINT:
- Use the same procedure for RHD and LHD vehicles.
- The procedure listed below is for LHD vehicles.
- Use the same procedure for RHD and LHD vehicles.
| 1. INSTALL NO. 1 ROOF WIRE |

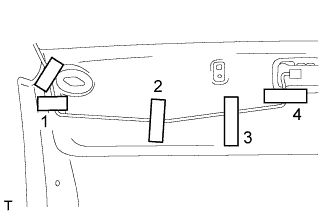  |
w/o Microphone:
Position the positioning tape as shown in the illustration and install the No. 1 roof wire.
Apply tape in the order shown in the illustration to fix the No. 1 roof wire in place.
w/ Microphone: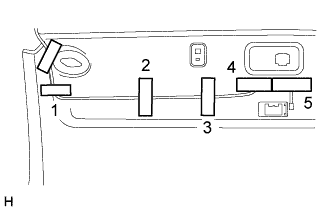
Position the positioning tape as shown in the illustration and install the No. 1 roof wire.
Apply tape in the order shown in the illustration to fix the No. 1 roof wire in place.
| 2. INSTALL ROOF HEADLINING HOLDER COVER (w/ Microphone) |
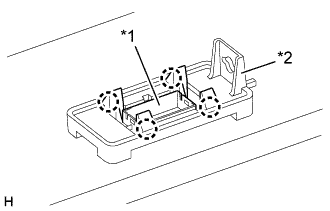 |
Attach the 4 claws to install the roof headlining holder cover and No. 1 roof headlining trim cover assembly.
Text in Illustration *1
Roof Headlining Holder Cover
*2
No. 1 Roof Headlining Trim Cover Assembly
| 3. INSTALL TELEPHONE MICROPHONE ASSEMBLY (w/ Microphone) |
except Single Cab:
Attach the 2 claws to install the telephone microphone assembly.
- NOTICE:
- Make sure care to install the telephone microphone assembly in the correct direction.
Attach the 2 claws to connect the connector.
for Single Cab:
Attach the 2 claws to install the telephone microphone assembly.
- NOTICE:
- Make sure care to install the telephone microphone assembly in the correct direction.
Attach the clamp and connect the connector.