1KD-FTV ENGINE MECHANICAL ENGINE UNIT(w/o Glow Plug Controller) REASSEMBLY
CAUTION / NOTICE / HINT
- NOTICE:
- ·
When replacing the injectors (including shuffling the injectors between the cylinders), common rail or cylinder head, it is necessary to replace the injection pipes with new ones.
·When replacing the fuel supply pump, common rail, cylinder block, cylinder head, cylinder head gasket or timing gear case, it is necessary to replace the fuel inlet pipe with a new one.
·After removing the injection pipes, clean them with a brush and compressed air.
PROCEDURE

 1.INSTALL REAR CRANKSHAFT OIL SEAL
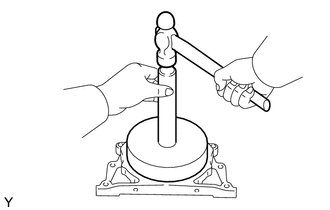
Using SST and a hammer, tap in a new oil seal until its surface is flush with the rear engine oil seal retainer edge.
- SST
- 09518-36030
09950-70010 (09951-07100)
- NOTICE:
- ·
Keep the lip free from foreign matter.
·Do not tap the oil seal at an angle.
Apply MP grease to the lip of the oil seal.
2.INSTALL SUPPLY PUMP OIL SEAL
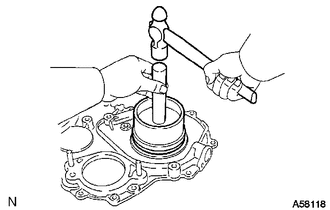
Using SST and a hammer, tap in a new oil seal until its surface is flush with the timing gear cover edge.
- SST
- 09223-15020
09502-12010
09950-70010 (09951-07100)
- NOTICE:
- ·
Keep the lip free from foreign matter.
·Do not tap the oil seal at an angle.
Apply MP grease to the lip of the oil seal.
3.INSTALL FRONT CRANKSHAFT OIL SEAL
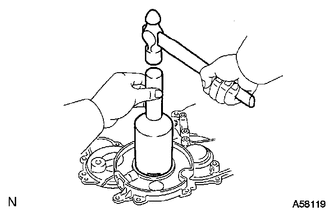
Using SST and a hammer, tap in a new oil seal until its surface is flush with the timing gear cover edge.
- SST
- 09214-76011
- NOTICE:
- ·
Keep the lip free from foreign matter.
·Do not tap the oil seal at an angle.
Apply MP grease to the lip of the oil seal.
4.INSTALL REAR ENGINE OIL SEAL RETAINER
Remove any old seal packing (FIPG material) from the oil pan and cylinder block.
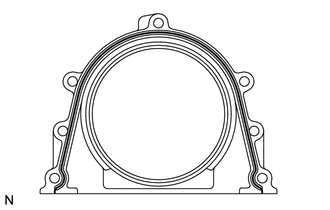
| *1 | Seal Packing |
Apply seal packing to the places shown in the illustration.
- Seal packing:
Toyota Genuine Seal Packing Black, Three Bond 1207B or equivalent
- Standard seal diameter:
4 mm (0.157 in.)
- NOTICE:
-
After applying seal packing, install the rear engine oil seal retainer within 3 minutes and tighten the bolts within 15 minutes.
Install the rear engine oil seal retainer with the 5 bolts. Alternately tighten the 5 bolts in several passes.
- Torque:
- 13 N*m (133 kgf*cm, 10 ft.*lbf)
5.INSTALL NO. 2 BALANCESHAFT DRIVEN GEAR
Mount the balanceshaft between aluminum plates in a vise.
- NOTICE:
-
Be careful not to damage the balanceshaft.
Align the balanceshaft knock pin with the knock pin hole. Then install the balanceshaft thrust washer and balanceshaft driven gear.
Install the bolt.
- Torque:
- 36 N*m (367 kgf*cm, 27 ft.*lbf)
6.INSTALL NO. 2 BALANCESHAFT SUB-ASSEMBLY
Install the balanceshaft with the 2 bolts.
- Torque:
- 13 N*m (133 kgf*cm, 10 ft.*lbf)
7.INSTALL NO. 1 BALANCESHAFT DRIVEN GEAR
Mount the balanceshaft between aluminum plates in a vise.
- NOTICE:
-
Be careful not to damage the balanceshaft.
Align the balanceshaft knock pin with the knock pin hole. Then install the balanceshaft thrust washer and balanceshaft driven gear.
Install the bolt.
- Torque:
- 36 N*m (367 kgf*cm, 27 ft.*lbf)
8.INSTALL NO. 1 BALANCESHAFT SUB-ASSEMBLY
Install the balanceshaft with the 2 bolts.
- Torque:
- 13 N*m (133 kgf*cm, 10 ft.*lbf)
9.INSTALL TIMING GEAR CASE ASSEMBLY
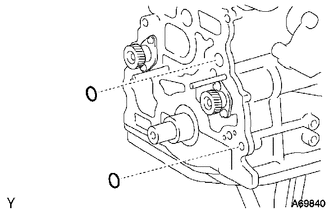
| *1 | New O-Ring |
Install 2 new O-rings to the cylinder block.
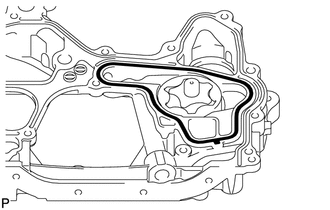
| *1 | New Gasket |
Install a new gasket to the groove of the timing gear case.
Remove any old seal packing (FIPG material).
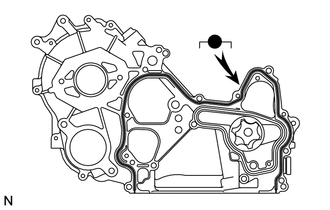
| *1 | Seal Packing |
Apply seal packing to the timing gear case as shown in the illustration.
- Seal packing:
Toyota Genuine Seal Packing Black, Three Bond 1207B or equivalent
- Standard seal diameter:
4 mm (0.157 in.)
- NOTICE:
-
After applying seal packing, install the timing gear case assembly within 3 minutes and tighten the bolts within 15 minutes.
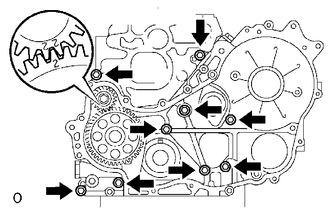
Align the "2" marks of the No. 1 balanceshaft driven gear and oil pump drive gear.
Install the timing gear case with the union bolt and 8 bolts.
- Torque:
- for union bolt : 16 N*m (163 kgf*cm, 12 ft.*lbf)
- for bolt : 13 N*m (133 kgf*cm, 10 ft.*lbf)
10.INSTALL OIL STRAINER SUB-ASSEMBLY
Install a new gasket and the oil strainer with the 2 bolts and 2 nuts.
- Torque:
- 8.0 N*m (82 kgf*cm, 71 in.*lbf)
11.INSTALL OIL PAN SUB-ASSEMBLY
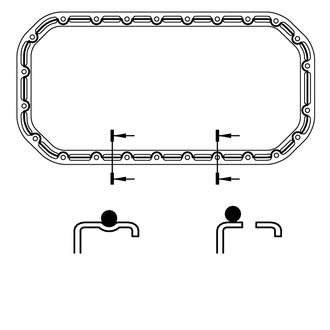
Remove any old seal packing (FIPG material).
Apply seal packing to the oil pan as shown in the illustration.
- Seal packing:
Toyota Genuine Seal Packing Black, Three Bond 1207B or equivalent
- Standard seal packing diameter:
4 mm (0.157 in.)
- NOTICE:
-
After applying seal packing, install the oil pan within 3 minutes and tighten the bolts and nuts within 15 minutes.
Install the oil pan with the 22 bolts and 2 nuts.
- Torque:
- 12 N*m (122 kgf*cm, 9 ft.*lbf)
12.INSTALL INJECTION GEAR
Install a new O-ring and the fuel supply pump with the 2 nuts.
- Torque:
- 21 N*m (214 kgf*cm, 15 ft.*lbf)
Temporarily install the injection gear with the nut.
- HINT:
-
Fit the key (protrusion) of the fuel supply pump into the key slot of the injection gear.
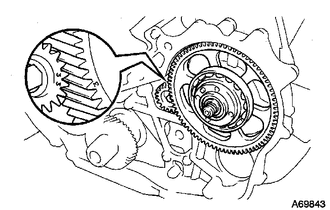
Align the "3" marks of the No. 2 balanceshaft driven gear and injection gear.
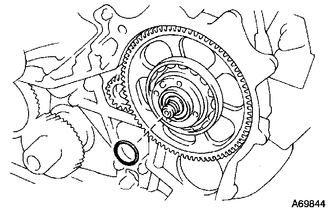
| *1 | New O-Ring |
Install a new O-ring to the injection gear.
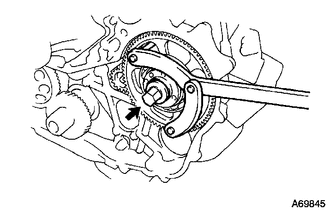
Install the injection gear set nut.
Using SST, tighten the set nut.
- SST
- 09960-10010 (09962-01000, 09963-01000)
- Torque:
- 64 N*m (650 kgf*cm, 47 ft.*lbf)
13.INSTALL CRANKSHAFT TIMING GEAR
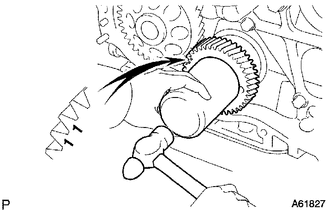
Position the crankshaft timing gear with the "1" timing marks facing forward.
Align the key groove of the crankshaft timing gear with the set key on the crankshaft.
Using SST and a hammer, tap on the timing gear to install it.
- SST
- 09223-00010
14.INSTALL NO. 1 IDLE GEAR SHAFT
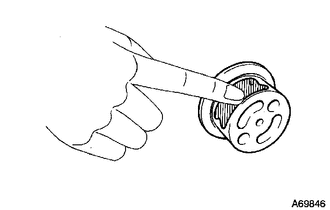
| *1 | Engine Oil |
Apply a coat of engine oil to the No. 1 idle gear shaft.
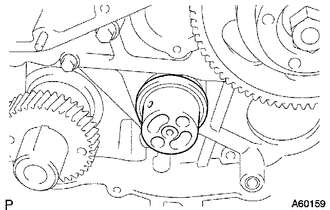
| *1 | Oil Hole |
Install the gear shaft as shown in the illustration.
15.INSTALL NO. 2 IDLE SUB GEAR
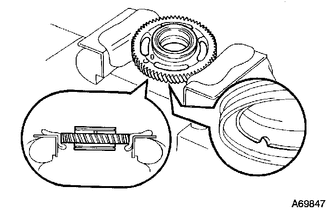
| *1 | Cutout Mark |
Mount the No. 1 idle gear in a vise.
- NOTICE:
-
Be careful not to damage the gear.
- HINT:
-
Make sure the cutout mark of the idle gear faces down.
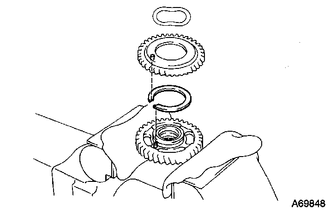
| *1 | Wave Washer |
| *2 | No. 2 Idle Sub Gear |
| *3 | Idle Gear Spring |
Install the idle gear spring.
- HINT:
-
Fit the pins on the gears between the spring ends.
Install the No. 2 idle sub gear.
Install the wave washer.
Using snap ring pliers, install the shaft snap ring.
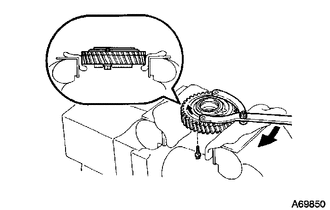
| *1 | Service Bolt |
Using SST, align the holes of the No. 1 idle gear and No. 2 idle sub gear by turning the No. 2 idle sub gear clockwise, and install a service bolt.
- SST
- 09960-10010 (09962-01000, 09963-00700)
Remove the No. 1 idle gear from the vise and turn it upside down.
16.INSTALL NO. 1 IDLE SUB GEAR
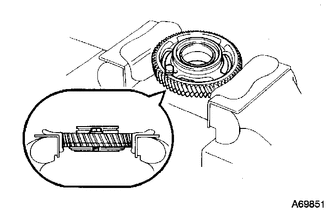
| *a | Upward |
Mount the No. 1 idle gear and No. 2 idle sub gear in a vise.
- NOTICE:
-
Be careful not to damage the gears.
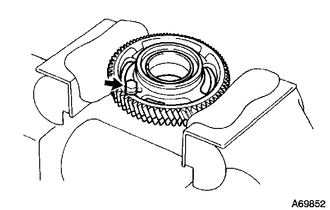
| *1 | Service Bolt |
Remove the service bolt.
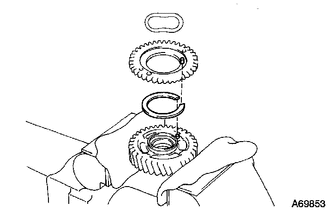
| *1 | Wave Washer |
| *2 | No. 1 Idle Sub Gear |
| *3 | Idle Gear Spring |
Install the idle gear spring.
- HINT:
-
Fit the pins on the gears between the spring ends.
Install the No. 1 idle sub gear.
Install the wave washer.
Using snap ring pliers, install the shaft snap ring.
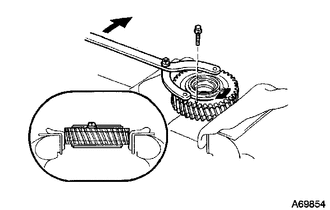
| *1 | Service Bolt |
| *a | Upward |
Using SST, align the holes of the No. 1 idle gear and No. 1 idle sub gear by turning the No. 1 idle sub gear clockwise, and install a service bolt.
- SST
- 09960-10010 (09962-01000, 09963-00600)
17.INSTALL NO. 1 IDLE GEAR
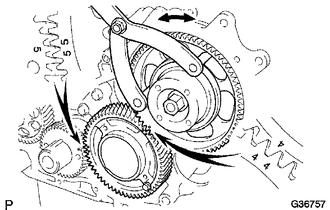
| *a | Turn |
Align the "4" and "5" timing marks of the idle gear and crankshaft timing gear.
Using SST, turn the injection gear and align the "4" timing marks of the idle gear and injection gear, and then mesh the gears.
- SST
- 09960-10010 (09962-01000, 09963-00700)
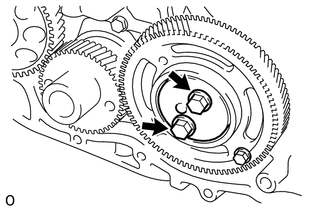
| *1 | Service Bolt |
Position the idle gear thrust plate with the protrusion facing forward.
Align the bolt holes and install the idle gear thrust plate with the 2 bolts.
- Torque:
- 50 N*m (510 kgf*cm, 37 ft.*lbf)
Remove the service bolt.
18.INSTALL NO. 1 CRANKSHAFT POSITION SENSOR PLATE
Align the key groove of the No. 1 crankshaft position sensor plate with the set key.
Install the No. 1 crankshaft position sensor plate with the cupped side facing outward.
19.INSTALL TIMING GEAR COVER
Remove any old seal packing (FIPG material).
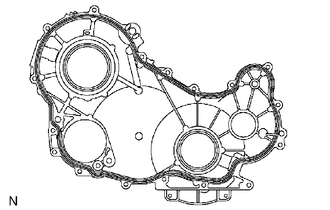
| *1 | Seal Packing |
Apply seal packing to the timing gear cover as shown in the illustration.
- Seal packing:
Toyota Genuine Seal Packing Black, Three Bond 1207B or equivalent
- Standard seal diameter:
4 mm (0.157 in.)
- NOTICE:
-
After applying seal packing, install the timing gear cover within 3 minutes and tighten the bolts within 15 minutes.
Install a new O-ring to the timing gear case.
Install the timing gear cover with the 14 bolts and 2 nuts.
- Torque:
- 13 N*m (133 kgf*cm, 10 ft.*lbf)
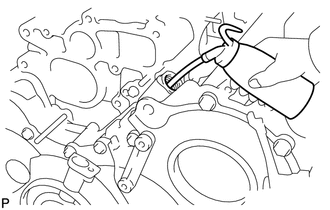
Remove the screw plug and gasket.
Pour approximately 50 cc (3.05 cu. in.) of engine oil into the oil pump.
Install a new gasket and the screw plug.
- Torque:
- 42 N*m (423 kgf*cm, 31 ft.*lbf)
20.INSTALL WATER PUMP ASSEMBLY
Install a new gasket and the water pump with the 5 bolts and 2 nuts.
- Torque:
- 13 N*m (133 kgf*cm, 10 ft.*lbf)
21.INSTALL CYLINDER HEAD GASKET
22.INSTALL CYLINDER HEAD SUB-ASSEMBLY
23.INSTALL VALVE LIFTER
Install the valve lifters.
Check that each valve lifter rotates smoothly by hand.
24.INSTALL CAMSHAFT
25.INSTALL CYLINDER BLOCK INSULATOR (w/ EGR Cooler)
26.INSTALL NO. 2 TIMING BELT COVER
27.INSTALL CAMSHAFT TIMING PULLEY
28.INSPECT AND ADJUST VALVE CLEARANCE
29.INSTALL INJECTOR ASSEMBLY
30.INSPECT FOR FUEL LEAK
31.INSTALL CYLINDER HEAD COVER SUB-ASSEMBLY
32.INSTALL OIL FILLER CAP SUB-ASSEMBLY