2TR-FBE ENGINE MECHANICAL CYLINDER HEAD GASKET INSTALLATION
PROCEDURE

 1.INSTALL CYLINDER HEAD GASKET
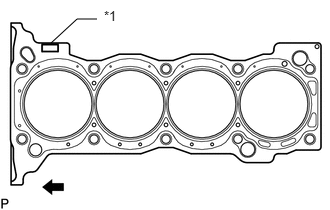
| *1 | Lot No. |

|
Front |
Place a new cylinder head gasket on the cylinder block surface with the lot No. stamp facing upward.
- NOTICE:
-
Make sure that the cylinder head gasket is installed so that it is facing in the correct direction.
2.INSTALL CYLINDER HEAD SUB-ASSEMBLY
- HINT:
-
The cylinder head bolts are tightened in 3 successive steps.
Place the cylinder head on the cylinder block.
- NOTICE:
- ·
Make sure that no oil is on the mounting surface of the cylinder head.
·Place the cylinder head on the cylinder block gently so as not to damage the gasket with the bottom part of the head.
Install the plate washers to the cylinder head bolts.
Apply a light coat of engine oil to the threads and under the heads of the cylinder head bolts.
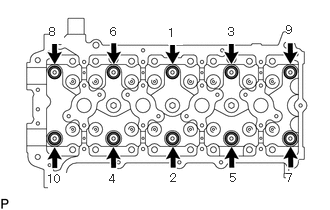
Step 1:
Using several steps, install and uniformly tighten the 10 cylinder head bolts with plate washers in the sequence shown in the illustration.
- Torque:
- 39 N*m (398 kgf*cm, 29 ft.*lbf)
Mark the front of each cylinder head bolt head with paint.
Step 2:
Tighten the cylinder head bolts 90° in the sequence shown in step 1.
Step 3:
Tighten the cylinder head bolts another 90° in the sequence shown in step 1.
Check that the paint marks are now at a 180° angle to the front.
3.INSTALL VALVE STEM CAP
Apply a light coat of engine oil to the valve stem ends.
Install the 16 valve stem caps to the cylinder head.
- NOTICE:
-
Do not drop the valve stem caps into the cylinder head.
4.INSTALL VALVE LASH ADJUSTER ASSEMBLY
5.INSTALL NO. 1 VALVE ROCKER ARM SUB-ASSEMBLY
6.INSTALL CAMSHAFT
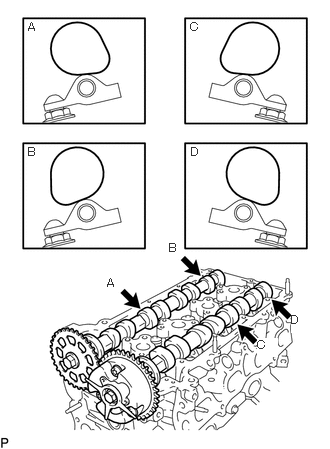
Apply clean engine oil to the camshaft cams and cylinder head journals.
Position the camshaft and No. 2 camshaft as shown in the illustration.
7.INSTALL CAMSHAFT BEARING CAP
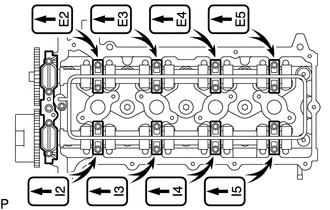
Temporarily install the No. 1 camshaft bearing cap.
Confirm the location for each No. 2 camshaft bearing cap and install each one to the proper location.
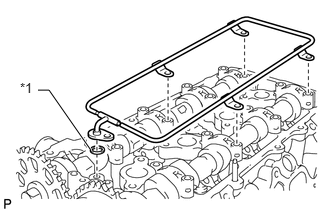
| *1 | O-Ring |
Install a new O-ring to the No. 1 camshaft bearing cap.
Temporarily install the oil delivery pipe.
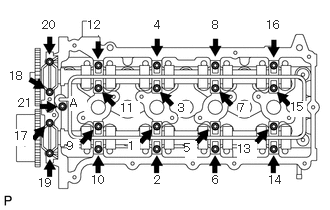
Install the 21 bolts and tighten them in the order shown in the illustration.
- Torque:
- for bolt A : 12 N*m (122 kgf*cm, 9 ft.*lbf)
- except bolt A : 16 N*m (158 kgf*cm, 11 ft.*lbf)
8.INSTALL NO. 1 CHAIN VIBRATION DAMPER
Install the vibration damper with the bolt and nut.
- Torque:
- 21 N*m (214 kgf*cm, 15 ft.*lbf)
9.INSTALL CHAIN SUB-ASSEMBLY
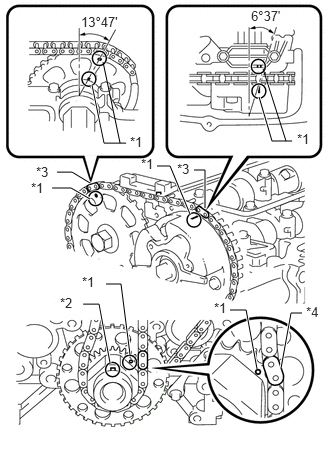
| *1 | Timing Mark |
| *2 | Key |
| *3 | Mark Plate (Orange) |
| *4 | Mark Plate (Yellow) |
As shown in the illustration, install the chain to the sprocket and gear with the mark plates aligned with the timing marks on the sprocket and gear.
- HINT:
- ·
The camshaft mark plate is orange.
·The crankshaft mark plate is yellow.
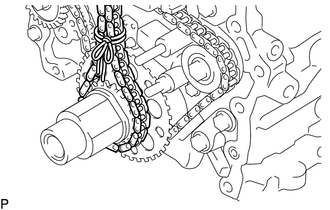
Use a rope to secure the chain of the crankshaft timing sprocket. Tie the rope near the sprocket.
- NOTICE:
-
After the chain tensioner has been installed, the rope must be removed.
- HINT:
-
The rope is used to prevent the chain from jumping a tooth.
10.INSTALL CHAIN TENSIONER SLIPPER
Install the tensioner slipper with the bolt.
- Torque:
- 21 N*m (214 kgf*cm, 15 ft.*lbf)
11.INSTALL NO. 1 CHAIN TENSIONER ASSEMBLY
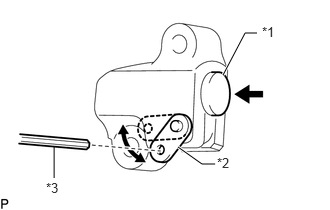
| *1 | Plunger |
| *2 | Stopper Plate |
| *3 | Hexagon Wrench |
Move the stopper plate upward to release the lock and push the plunger deep into the tensioner.
Move the stopper plate downward to set the lock and insert a hexagon wrench into the hole of the stopper plate.
Install a new gasket and the chain tensioner with the bolt and nut.
- Torque:
- 10 N*m (102 kgf*cm, 7 ft.*lbf)
12.INSTALL TIMING CHAIN GUIDE
13.INSTALL EXHAUST MANIFOLD
14.INSTALL TIMING CHAIN COVER SUB-ASSEMBLY