1GR-FE ENGINE MECHANICAL CYLINDER BLOCK DISASSEMBLY
PROCEDURE

 1.INSPECT CONNECTING ROD THRUST CLEARANCE
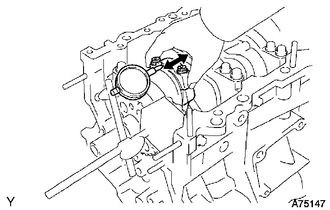
Using a dial indicator, measure the thrust clearance while moving the connecting rod back and forth.
- Standard thrust clearance:
0.15 to 0.30 mm (0.00591 to 0.0118 in.)
- Maximum thrust clearance:
0.35 mm (0.0138 in.)
If the thrust clearance is more than the maximum, replace one or more connecting rods as necessary.
- Standard connecting rod thickness:
20.80 to 20.85 mm (0.819 to 0.821 in.)
If necessary, replace the crankshaft.
2.INSPECT CONNECTING ROD OIL CLEARANCE
Check that the matchmarks on the connecting rod and cap are aligned to ensure correct reassembly.
Remove the 2 connecting rod cap bolts.
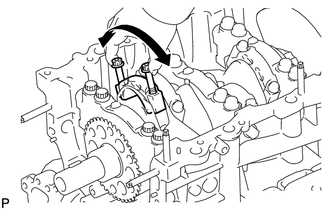
Using the 2 removed connecting rod cap bolts, remove the connecting rod cap and lower bearing by wiggling the connecting rod cap right and left.
- HINT:
-
Keep the lower bearing and connecting rod cap together.
Clean the crank pin and bearing.
Check the crank pin and bearing for pitting and scratches. If the crank pin or bearing is damaged, replace the bearings. If necessary, replace the crankshaft.
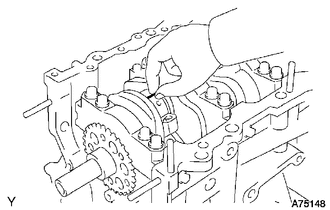
| *1 | Plastigage |
Lay a strip of Plastigage across the crank pin.
Install the connecting rod cap (See page Engine / Hybrid System>1GR-FE ENGINE MECHANICAL>CYLINDER BLOCK>REASSEMBLY).
- NOTICE:
-
Do not turn the crankshaft.
Remove the 2 bolts, connecting rod cap and lower bearing.
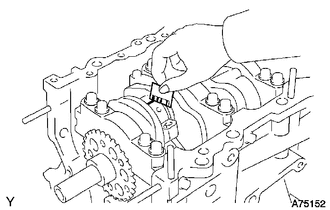
| *1 | Plastigage |
Measure the Plastigage at its widest point.
- Standard oil clearance:
0.026 to 0.046 mm (0.00102 to 0.00181 in.)
- Maximum oil clearance:
0.066 mm (0.00260 in.)
If the oil clearance is more than the maximum, replace the bearings. If necessary, inspect the crankshaft.
- HINT:
-
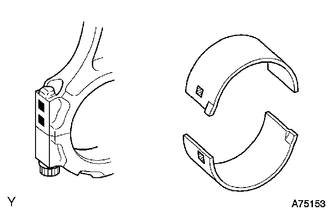 1.698,1.198 1.844,1.198 1.844,1.198 2.073,0.958 true 0.198,1.344 0.198,1.146 0.198,1.146 0.396,1.083 false 0.125,1.375 0.292,1.542 0.167,0.167 10 false *1 1.5,1.115 1.667,1.292 0.167,0.177 10 false *1
*1 Number Mark
-
If replacing a bearing, replace it with one that has the same number as the number marked on the connecting rod. There are 4 sizes of standard bearings, marked "1", "2", "3" and "4" accordingly.
- Standard Bearing Center Wall Thickness:
Item Specified Condition Mark 1 1.484 to 1.487 mm (0.0584 to 0.0585 in.) Mark 2 1.487 to 1.490 mm (0.0585 to 0.0587 in.) Mark 3 1.490 to 1.493 mm (0.0587 to 0.0588 in.) Mark 4 1.493 to 1.496 mm (0.0588 to 0.0589 in.)
Completely remove the Plastigage.
3.REMOVE PISTON SUB-ASSEMBLY WITH CONNECTING ROD
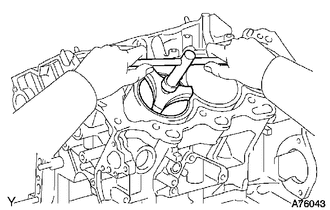
Using a ridge reamer, remove all the carbon from the top of the cylinder.
Push out the piston with connecting rod and upper bearing through the top of the cylinder block.
- HINT:
- ·
Keep the bearings, connecting rod and cap together.
·Arrange the piston and connecting rod assemblies in the correct order.
4.REMOVE CONNECTING ROD BEARING
Remove the connecting rod bearings from the connecting rods and connecting rod caps.
- HINT:
-
Arrange the removed parts in the correct order.
5.REMOVE PISTON RING SET
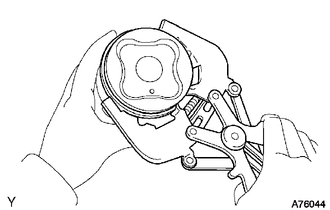
Using a piston ring expander, remove the 2 compression rings.
Remove the 2 side rails and oil ring (expander) by hand.
6.REMOVE PISTON WITH PIN SUB-ASSEMBLY
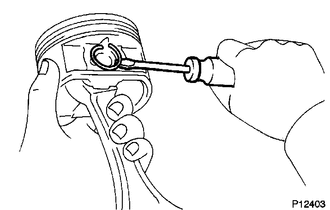
Disconnect the connecting rod from the piston.
Using a screwdriver, pry out the 2 snap rings.
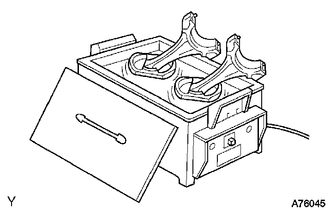
Gradually heat the piston to approximately 80°C (176°F).
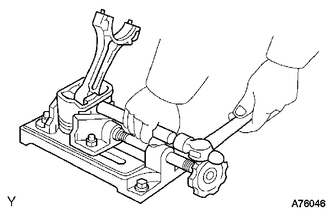
Using a plastic-faced hammer and brass bar, lightly tap out the piston pin and remove the connecting rod.
- HINT:
- ·
The piston and pin are a matched set.
·Arrange the pistons, pins, rings, connecting rods and bearings in the correct order.
7.INSPECT CRANKSHAFT THRUST CLEARANCE
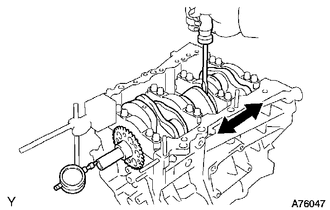
Using a dial indicator, measure the thrust clearance while prying the crankshaft back and forth with a screwdriver.
- Standard thrust clearance:
0.04 to 0.24 mm (0.00157 to 0.00945 in.)
- Maximum thrust clearance:
0.30 mm (0.0118 in.)
If the thrust clearance is more than the maximum, replace the thrust washers as a set.
- Standard thrust washer thickness:
1.93 to 1.98 mm (0.0760 to 0.0780 in.)
If necessary, replace the crankshaft.
8.REMOVE CRANKSHAFT
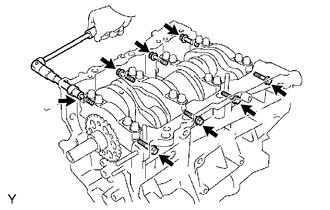
Uniformly loosen and remove the 8 bearing cap bolts and 8 seal washers in several steps in the sequence shown in the illustration.
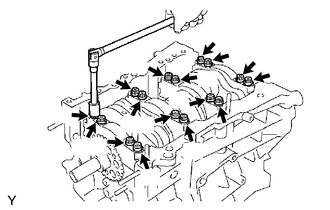
Uniformly loosen and remove the 16 bearing cap bolts in several steps in the sequence shown in the illustration.
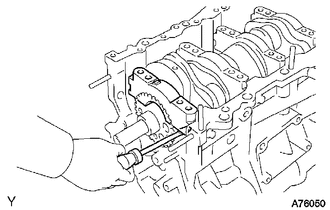
Using a screwdriver, pry out the bearing caps.
Remove the 4 bearing caps and lower bearings.
- NOTICE:
- ·
Push up on the cap little by little, alternating between the right and left side until the cap can be removed.
·Be careful not to damage the joint surfaces of the cylinder block or bearing cap.
Remove the 2 lower crankshaft thrust washers.
- HINT:
- ·
Keep the lower bearing and crankshaft bearing cap together.
·Arrange the removed parts in the correct order.
·Be sure to arrange the bearing caps and lower thrust washers in such a way that they can be reinstalled exactly as before.
Lift out the crankshaft.
Check each crankshaft journal for pitting and scratches.
If necessary, replace the crankshaft.
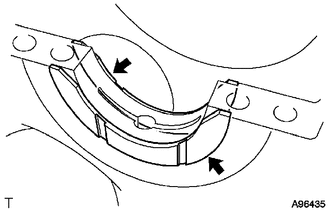
Remove the 2 upper thrust washers.
- HINT:
- ·
Be sure to arrange the removed upper thrust washers in such a way that they can be reinstalled exactly as before.
·Keep the upper bearings together with the cylinder block.
9.REMOVE CRANKSHAFT BEARING
Remove the crankshaft bearings from the cylinder block.
- HINT:
-
Arrange the removed parts in the correct order.
10.REMOVE NO. 1 OIL NOZZLE SUB-ASSEMBLY
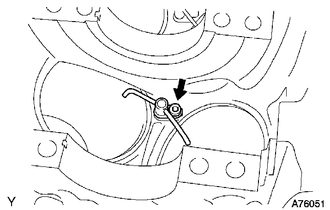
Using a 5 mm hexagon socket wrench, remove the 3 bolts and 3 No. 1 oil nozzles.
11.REMOVE STUD BOLT
- NOTICE:
-
If a stud bolt is deformed or its threads are damaged, replace it.