1KD-FTV EMISSION CONTROL EXHAUST FUEL ADDITION INJECTOR INSTALLATION
PROCEDURE

 1.INSTALL EXHAUST FUEL ADDITION INJECTOR ASSEMBLY
- NOTICE:
-
If there is foreign matter on the installation surface of the exhaust fuel addition injector, be sure to clean it before installation.
Install a new E-ring, a new O-ring and 3 new backup rings to the exhaust fuel addition injector.
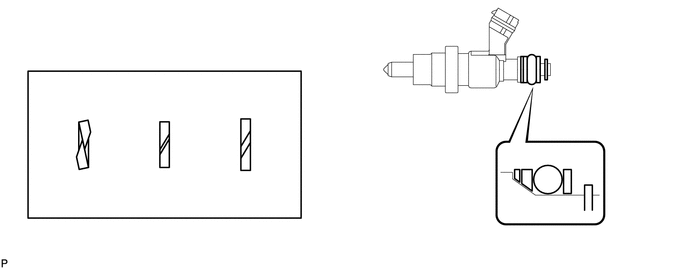
| *1 | O-Ring | *2 | E-Ring |
| *3 | No. 1 Backup Ring | *4 | No. 2 Backup Ring |
| *5 | No. 3 Backup Ring | - | - |
| *a | Incorrect | *b | Correct |
| *c | Overlapped | *d | Normal |
| *e | Stretched | *f | Alignment Opening |
- NOTICE:
- ·
Check that there is no foreign matter or damaged areas in the injector O-ring groove.
·Check that the No. 1 and No. 2 backup rings are installed in the correct direction.
·Make sure that the backup rings and O-ring are installed in the correct order.
·Check that the alignment openings of the backup rings are not stretched and that the ends of the backup rings are not overlapped as shown in the illustration.
·After installing the O-ring, check that it is not contaminated with foreign matter and is not damaged.
Install a new gasket and the exhaust fuel addition injector.
Using a T40 "TORX" socket wrench, install the No. 1 nozzle holder clamp with the screw.
- Torque:
- 10 N*m (102 kgf*cm, 7 ft.*lbf)
Install the injector holder with the 2 bolts.
- Torque:
- 28 N*m (286 kgf*cm, 21 ft.*lbf)
2.INSTALL TURBINE OUTLET ELBOW
3.CONNECT CABLE TO NEGATIVE BATTERY TERMINAL
- NOTICE:
-
When disconnecting the cable, some systems need to be initialized after the cable is reconnected (See page General>INTRODUCTION>REPAIR INSTRUCTION>INITIALIZATION).
4.ADD ENGINE COOLANT
5.BLEED AIR FROM FUEL SYSTEM
6.INSPECT FOR COOLANT LEAK
7.INSPECT FOR FUEL LEAK
8.INSTALL NO. 1 ENGINE UNDER COVER SUB-ASSEMBLY