1KD-FTV INTAKE / EXHAUST EXHAUST PIPE(w/ DPF) INSTALLATION
PROCEDURE

 1.INSTALL CONVERTER PROTECTOR STAY
Install the 2 No. 1 converter protector stays and 2 No. 2 converter protector stays to the front exhaust pipe.
2.INSTALL MONOLITHIC CONVERTER PROTECTOR
Install the upper monolithic converter protector and lower monolithic converter protector with the 4 bolts and 4 nuts.
- Torque:
- 11 N*m (107 kgf*cm, 8 ft.*lbf)
3.INSTALL EXHAUST PIPE CLAMP SUB-ASSEMBLY
Install the exhaust pipe clamp with the bolt and a new nut.
- Torque:
- 18 N*m (184 kgf*cm, 13 ft.*lbf)
4.INSTALL NO. 3 EXHAUST GAS TEMPERATURE SENSOR
5.INSTALL WIRING HARNESS CLAMP BRACKET
Install the wiring harness clamp bracket with the bolt.
- Torque:
- 21 N*m (214 kgf*cm, 15 ft.*lbf)
6.INSTALL NO. 2 EXHAUST GAS TEMPERATURE SENSOR
7.INSTALL EXHAUST GAS TEMPERATURE SENSOR
8.INSTALL FRONT EXHAUST PIPE ASSEMBLY
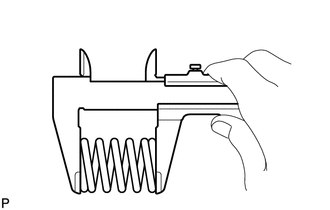
Using a vernier caliper, measure the free length of the compression spring.
- Minimum free length:
43 mm (1.69 in.)
If the free length is less than the minimum, replace the compression spring.
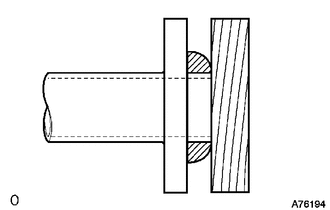
| *1 | Gasket |
| *2 | Wooden Block |
Using a plastic-faced hammer and wooden block, tap on a new gasket until its surface is flush with the front exhaust pipe.
- NOTICE:
- ·
Be sure to install the gasket so that it faces the correct direction.
·Do not reuse the gasket.
·Do not damage the gasket.
·When connecting the exhaust pipe, do not push in the gasket with the exhaust pipe.
Install a new gasket and the front exhaust pipe to the No. 2 turbine outlet elbow with 3 new nuts.
- Torque:
- 54 N*m (554 kgf*cm, 40 ft.*lbf)
Connect the front exhaust pipe to the 2 exhaust pipe supports.
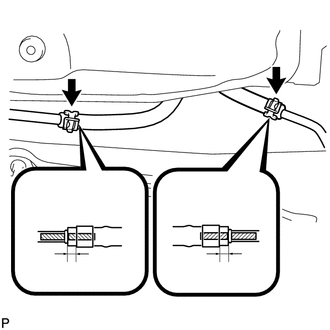
| *1 | Clip |
| *2 | Stopper |
| *a | 4 to 10 mm (0.157 to 0.394 in.) |
| *b | Pink Paint |
| *c | Blue Paint |

|
Paint Mark |
Connect the No. 6 exhaust pipe air hose and No. 7 exhaust pipe air hose to the front exhaust pipe with 2 new clips.
- NOTICE:
- ·
Align the paint marks of the front exhaust pipe and exhaust pipe air hose and push on the exhaust pipe air hose until it contacts the stopper.
·Make sure the clip is 4 to 10 mm (0.157 to 0.394 in.) from the end of the exhaust pipe air hose when installing the clip.
·Make sure that there is no slack in the exhaust pipe air hose, and that it is not twisted or bent.
·Take care not to damage the inner or outer surface of the exhaust pipe air hose when installing it. If the exhaust pipe air hose is damaged, replace it with a new one.
Connect the No. 3 exhaust gas temperature sensor connector and attach the clamp.
Connect the No. 2 exhaust gas temperature sensor connector and attach the clamp.
Connect the exhaust gas temperature sensor connector and attach the clamp.
9.INSTALL AIR FUEL RATIO SENSOR
10.INSTALL NO. 2 EXHAUST PIPE SUPPORT BRACKET
Install the No. 2 exhaust pipe support bracket with the 2 bolts.
- Torque:
- 19 N*m (194 kgf*cm, 14 ft.*lbf)
11.INSTALL NO. 3 FRAME CROSSMEMBER SUB-ASSEMBLY
12.INSTALL NO. 2 ENGINE UNDER COVER
13.INSTALL CENTER EXHAUST PIPE ASSEMBLY
Install the center exhaust pipe to the 3 exhaust pipe supports.
Install the center exhaust pipe and 2 compression springs with the 2 bolts.
- Torque:
- 43 N*m (438 kgf*cm, 32 ft.*lbf)
14.INSTALL TAILPIPE ASSEMBLY
Install the tailpipe to the exhaust pipe support.
Install a new gasket and connect the tailpipe to the center exhaust pipe with the 2 bolts and 2 nuts. Alternately tighten the bolts in several passes.
- Torque:
- 48 N*m (489 kgf*cm, 35 ft.*lbf)
- NOTICE:
-
Do not reuse the gasket.
15.INSPECT FOR EXHAUST GAS LEAK
If gas is leaking, tighten the areas necessary to stop the leak. Replace damaged parts as necessary.