R150F /R151F / R156F MANUAL TRANSMISSION / TRANSAXLE MANUAL TRANSMISSION ASSEMBLY INSTALLATION
PROCEDURE

 1.INSTALL TRANSFER ASSEMBLY
2.INSTALL MANUAL TRANSMISSION UNIT ASSEMBLY
Make sure that the knock pins are not loose, bent, damaged or scratched.
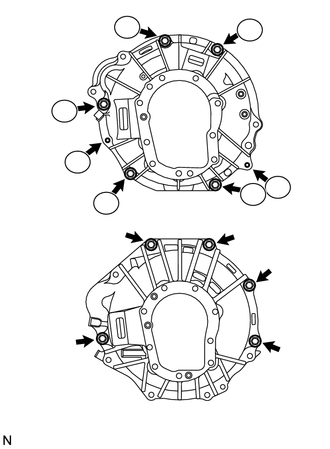
| *A | for 2TR-FE |
| *B | for 1KD-FTV, 2KD-FTV |
Align the input shaft with the clutch disc and install the transmission to the engine.
Install the 5 bolts.
- Torque:
- 72 N*m (729 kgf*cm, 53 ft.*lbf)
3.INSTALL STIFFENER PLATE (for 1KD-FTV, 2KD-FTV)
Install the stiffener plate RH with the 4 bolts.
- Torque:
- 72 N*m (729 kgf*cm, 53 ft.*lbf)
Install the stiffener plate LH with the 4 bolts.
- Torque:
- 72 N*m (729 kgf*cm, 53 ft.*lbf)
4.INSTALL MANIFOLD STAY (for TR Series Engine)
5.INSTALL REAR NO. 1 ENGINE MOUNTING INSULATOR
Install the mounting insulator with the 4 bolts.
- Torque:
- 47 N*m (479 kgf*cm, 35 ft.*lbf)
6.INSTALL NO. 3 FRAME CROSSMEMBER SUB-ASSEMBLY
Install the No. 3 frame crossmember sub-assembly with the 4 bolts and 4 nuts.
- Torque:
- 50 N*m (510 kgf*cm, 37 ft.*lbf)
Connect the No. 3 frame crossmember sub-assembly to the No. 1 rear engine mounting insulator.
- Torque:
- 27 N*m (275 kgf*cm, 20 ft.*lbf)
7.INSTALL STARTER ASSEMBLY
for 2TR-FE 1.6kW Type: (See page Engine / Hybrid System>2TR-FE STARTING>STARTER(for 1.6 kW Type)>INSTALLATION)
for 2TR-FE 1.7kW Type: (See page Engine / Hybrid System>2TR-FE STARTING>STARTER(for 1.7 kW Type)>INSTALLATION)
for 1KD-FTV DENSO made: (See page Engine / Hybrid System>1KD-FTV STARTING>STARTER(for DENSO Made)>INSTALLATION)
for 1KD-FTV BOSCH made: (See page Engine / Hybrid System>1KD-FTV STARTING>STARTER(for BOSCH Made)>INSTALLATION)
for 2KD-FTV DENSO made: (See page Engine / Hybrid System>2KD-FTV STARTING>STARTER(for DENSO Made)>INSTALLATION)
for 2KD-FTV BOSCH made: (See page Engine / Hybrid System>2KD-FTV STARTING>STARTER(for BOSCH Made)>INSTALLATION)
8.CONNECT CLUTCH RELEASE CYLINDER ASSEMBLY
Install the clutch release cylinder with the 2 bolts.
- Torque:
- 12 N*m (119 kgf*cm, 9 ft.*lbf)
9.CONNECT WIRE HARNESS
Transmission side:
Connect the back-up light switch connector.
Transfer side:
Connect the No. 1, No. 2 and No. 3 transfer indicator switch connectors, and vehicle speed sensor connector.
10.INSTALL FRONT EXHAUST PIPE ASSEMBLY
for 2TR-FE: (See page Engine / Hybrid System>2TR-FE INTAKE / EXHAUST>EXHAUST PIPE>INSTALLATION)
for 1KD-FTV w/o DPF: (See page Engine / Hybrid System>1KD-FTV INTAKE / EXHAUST>EXHAUST PIPE(w/o DPF)>INSTALLATION)
for 1KD-FTV w/DPF: (See page Engine / Hybrid System>1KD-FTV INTAKE / EXHAUST>EXHAUST PIPE(w/ DPF)>INSTALLATION)
for 2KD-FTV w/o DPF: (See page Engine / Hybrid System>2KD-FTV INTAKE / EXHAUST>EXHAUST PIPE(w/o DPF)>INSTALLATION)
for 2KD-FTV w/DPF: (See page Engine / Hybrid System>2KD-FTV INTAKE / EXHAUST>EXHAUST PIPE(w/ DPF)>INSTALLATION)
11.INSTALL PROPELLER WITH CENTER BEARING SHAFT ASSEMBLY
12.INSTALL FRONT PROPELLER SHAFT ASSEMBLY
13.ADD MANUAL TRANSMISSION OIL
14.ADD TRANSFER OIL
15.REMOVE NO. 3 ENGINE UNDER COVER
16.INSTALL NO. 2 ENGINE UNDER COVER
17.INSTALL NO. 1 ENGINE UNDER COVER
18.INSTALL TRANSFER CASE LOWER PROTECTOR
Install the transfer case lower protector with the 4 bolts.
- Torque:
- 18 N*m (183 kgf*cm, 13 ft.*lbf)
19.INSTALL TRANSFER HIGH AND LOW SHIFT LEVER ASSEMBLY
Install the transfer shift lever.
Using pliers, install the snap ring.
- HINT:
-
Apply MP grease to the tip of the transfer shift lever.
20.INSTALL FLOOR SHIFT LEVER ASSEMBLY
Cover the shift lever cap with a cloth.
Press down on the shift lever cap and rotate it clockwise to install it.
- HINT:
-
Apply MP grease to the tip of the shift lever.
21.INSTALL SHIFT LEVER BOOT ASSEMBLY
Install the shift lever boot with the 4 screws and 2 clips.
22.INSTALL CONSOLE BOX ASSEMBLY
23.CONNECT CABLE TO NEGATIVE BATTERY TERMINAL
- NOTICE:
-
When disconnecting the cable, some systems need to be initialized after the cable is reconnected (See page General>INTRODUCTION>REPAIR INSTRUCTION>INITIALIZATION).