2KD-FTV INTAKE / EXHAUST EXHAUST MANIFOLD W/ TURBOCHARGER(w/ EGR Cooler) INSTALLATION
PROCEDURE

 1.INSTALL EXHAUST MANIFOLD
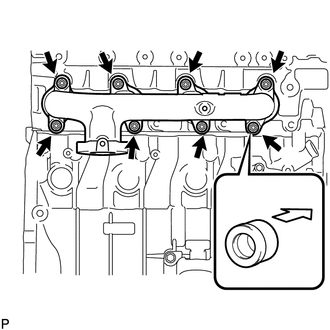
| *1 | Collar |

|
Engine Side |
Install a new gasket, exhaust manifold, 8 new collars and 8 plate washers to the cylinder head with 8 new nuts.
- Torque:
- 40 N*m (408 kgf*cm, 30 ft.*lbf)
- NOTICE:
- ·
Make sure that the side of the collar with the smaller diameter faces the exhaust manifold.
·Tighten the nuts in the order shown in the illustration.
2.CLEAN TURBOCHARGER SUB-ASSEMBLY
3.INSTALL TURBOCHARGER SUB-ASSEMBLY
Temporarily install a new gasket and the turbocharger with 3 new nuts.
- HINT:
-
It is easier to install the turbo oil inlet pipe if the 3 nuts are only loosely installed.
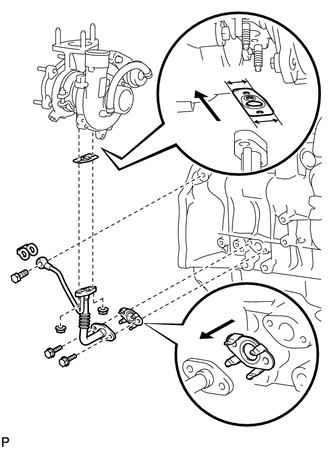
| *1 | New Gasket |
| *2 | Claw |
| *3 | Narrow |
| *4 | Wide |

|
Outside |
Temporarily install the turbo oil inlet pipe.
Install a new gasket and the oil inlet pipe with the 2 nuts, but only loosely install the nuts.
- NOTICE:
-
The notch (wide part) of the gasket must face the engine.
Install a new gasket and the oil inlet pipe with the 2 bolts, but only loosely install the bolts.
- NOTICE:
-
The claws of the gasket must face the pipe.
Install a new gasket and the oil inlet pipe with the union bolt, but only loosely install the union bolt.
Temporarily install the turbocharger stay with the 2 bolts and nut.
Tighten the 3 nuts of the turbocharger.
- Torque:
- 52 N*m (530 kgf*cm, 38 ft.*lbf)
Tighten the 2 nuts and 2 bolts of the turbo oil inlet pipe, and the union bolt.
- Torque:
- for bolt : 12 N*m (122 kgf*cm, 9 ft.*lbf)
- for nut : 13 N*m (133 kgf*cm, 10 ft.*lbf)
- for union bolt : 26 N*m (265 kgf*cm, 19 ft.*lbf)
Tighten the 2 bolts and nut of the turbocharger stay.
- Torque:
- 38 N*m (387 kgf*cm, 28 ft.*lbf)
4.INSTALL TURBINE OUTLET ELBOW
Install a new gasket and the turbine outlet elbow with the 4 new nuts.
- Torque:
- 26 N*m (260 kgf*cm, 19 ft.*lbf)
5.INSTALL NO. 1 EXHAUST MANIFOLD HEAT INSULATOR
Install the No. 1 exhaust manifold heat insulator with the 2 bolts.
- Torque:
- 12 N*m (122 kgf*cm, 9 ft.*lbf)
6.INSTALL COMPRESSOR INLET ELBOW
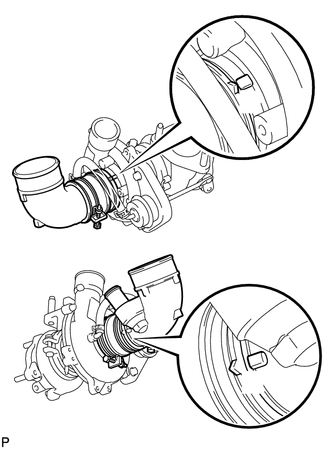
Install the air cleaner hose and air No. 3 cleaner hose with the clamp labeled A as shown in the illustration.
- HINT:
-
Align the protrusion of the turbocharger and the protrusion of the hose.
Install the compressor inlet elbow with the clamp labeled B as shown in the illustration.
- HINT:
-
Install the inlet elbow with the clamp labeled B as shown in the illustration.
7.INSTALL VENTILATION PIPE
Connect the 2 ventilation hoses to the cylinder head cover and compressor inlet elbow.
Install the ventilation pipe to the cylinder head with the bolt.
- Torque:
- 20 N*m (204 kgf*cm, 15 ft.*lbf)
8.INSTALL AIR CLEANER ASSEMBLY
Connect the No. 1 air cleaner hose.
Install the cleaner with the 2 bolts.
- Torque:
- 14 N*m (143 kgf*cm, 10 ft.*lbf)
Connect the connector to the mass air flow meter.
Tighten the hose clamp.
9.INSTALL INTERCOOLER ASSEMBLY
10.INSTALL FRONT EXHAUST PIPE ASSEMBLY
11.CONNECT CABLE TO NEGATIVE BATTERY TERMINAL
- NOTICE:
-
When disconnecting the cable, some systems need to be initialized after the cable is reconnected (See page General>INTRODUCTION>REPAIR INSTRUCTION>INITIALIZATION).
12.INSPECT FOR OIL LEAK
13.INSPECT FOR EXHAUST LEAK
14.INSTALL FRONT FENDER APRON SEAL UPPER
Install the front fender apron seal upper with the 5 clips.
15.INSTALL FRONT FENDER SEAL
Install the front fender seal with the 5 clips.
16.INSTALL NO. 2 ENGINE UNDER COVER
17.INSTALL NO. 1 ENGINE UNDER COVER